Attic stairs do it yourself
In most cases, the attic is used to store unused and old things. In the past, few could dare to use it for living space. Today, in pursuit of every square meter, many are rebuilding the attic space, making the living room. Accordingly, the attic stairs in this case plays a key role. In this article, we will examine with you from different sides the manufacture of this piece of furniture, and find out what types of stairs in the attic exist.
Devices and types of structures
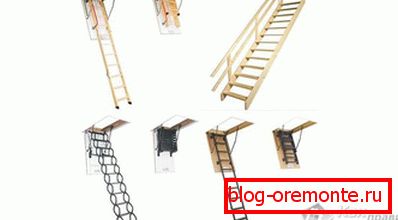
Ladders are installed both outside and inside the house. The latter option has a lot of great advantages. To get to the attic, you do not need to go through the courtyard. There are several types of staircase designs:
Monolithic.
- March.
- Screw.

Folding attic stairs.
- Folding.
- Ножничные.
- Telescopic.
- Folding or lever.

Portable
- Attached.
- Stepladders
As for the latter option, such stairs are often used as temporary structures. For example, they are applicable in cases where the attic has to be used less frequently. Portable ladders are not so reliable.
If we talk about reliability, then here, of course, it should be noted monolithic stairs, which have a wide march and reliable railings. But if you have a small room, then it will be almost impossible to accommodate it. In such circumstances, the ideal option stairs - retractable. It is easy to use, safe and ergonomic.
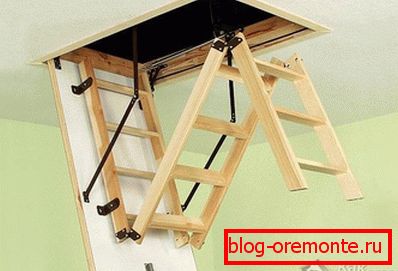
Folding transforming ladder
Mostly, the transforming staircase is made of metal or wood. If these two materials are combined, the result will be very worthy. For example, the staircase is made of wood, and the important components of the metal: mount, mechanism and springs. Wood will lighten the whole structure, and metal will add strength. For the manufacture of wooden elements is better to use solid wood.
In some situations, you can use plastic accessories. In the process of transformation, plastic levels friction. According to the opening method, folding ladders are manual and automatic. For easy manual opening, a load is attached to the ladder.
The main requirements for folding attic stairs are compact dimensions and durability. No less important is the aesthetic appearance of the structure.
Sliding ladder with retractable marches
Scissor stairs are very popular. Its production is carried out only from metal parts. In another way, it is called "accordion". But they have a number of negative qualities. For example, after a while, a flight of stairs will emit an unpleasant creak, since some parts will wear out. But this can be prevented by timely lubricating each working connection.
Telescopic ladder
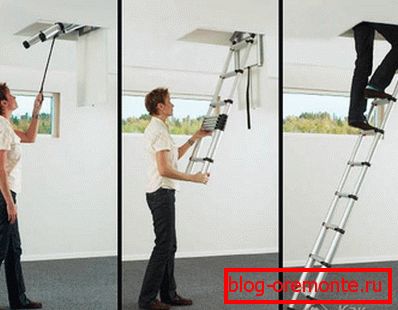
This type of construction consists of sections that extend. When folded, it takes up little space, as the parts are assembled into one another. They are made mainly from aluminum. Telescopic ladder has high strength.
Sectional and articulated
It can have 1-4 sections. The first is fixed on the cover. Subsequent sections are interconnected and form a uniform flight of stairs. They are equipped with hinges and special hinges.
Folding
If you do not have free space, folding ladder has clear advantages. In most cases, it is folded in the wall. If necessary, it can be advanced. Using the card loops, the steps are fastened to a string. When she is folded, she hides in the wall.

General requirements for attic stairs
It should be mentioned about the standard dimensions of such facilities:
- The permissible width of the march is 650 mm.
- It is not recommended to make a ladder more than 3000 mm in height. This will entail a lesser rigidity of the structure, as a result of which an accident may occur. Among other things, too high a design will be problematic to fold.
- Steps in the amount of from 13 to 15 pieces.
- Between steps there should be a gap of not more than 19.3 cm. Otherwise, the operation of the stairs will be difficult.
- The step must be between 1.8 and 2.2 cm thick.
- The standard tilt angle is 60–75 °.
- The entire structure must withstand a weight of up to one hundred and fifty kilograms.
- The arrangement of the steps is only parallel to the floor. For complete safety, they can be stuck with anti-slip pads.

Separately, it should be noted and the size of the hatch. The standard size is considered 120? 70 cm. If the opening is smaller, then it will be inconvenient to rise. At the big sizes of the hatch there will be big heat losses. If your attic is not heated, then the hatch must be steam- and heat-insulated.
Location of the attic stairs

Stairs should not interfere with living in the house. For this reason, installing a ladder in the kitchen or in the bedroom will be impractical. Therefore, it can be located, for example, in the corridor, hall. The selected room must be of the appropriate size. In some cases, such ladders are used as an interior detail, so in some cases it can be not hidden. It is recommended to make a preliminary drawing in order to present the stairs in your interior.
Production of a ladder from two sections

If you want to make a simple ladder without complicated mechanisms, then a two-section ladder is ideal. For its production you will need:
- Hacksaw for wood.
- Roulette.
- Ladder.
- Card loops on kosoura width - 4 pieces.
- Timber - 2 pieces with a thickness of 2-3 cm. The length should be equal to the width of the hatch.
- Hinges, screws, hook and anchor.
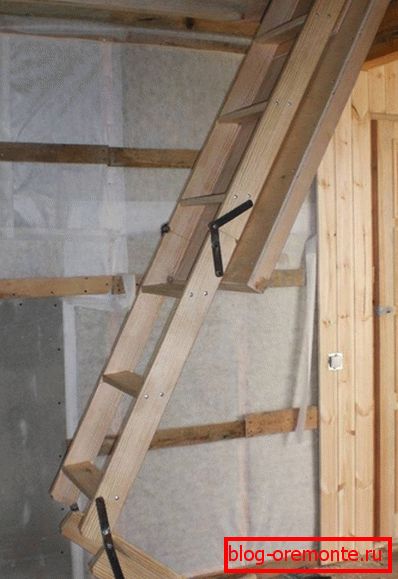
With the help of a loop, a short bar is fastened to the upper end of the ladder. The second, similar segment of the bar, on the bottom. They must be fixed obliquely, otherwise they will interfere with the movement. This design will be quite tough. After, measure out 2/3 of the ladder and make a neat cut. With the help of metal loops connect two parts.
The hinges must be fastened correctly, otherwise the ladder will open in the wrong direction.
Now on the wall under the hatch mount the top bar. In order to prevent the ladder from being folded up, you can use a hook. To do this, twist the loop near the cutting place, and the hook at the appropriate distance into the wall. Attic two-piece ladder is ready!
One of the drawbacks of this design is that it is always in sight. But if you put in a little more effort, then you can build a ladder with your own hands, which will be hidden in the hatchway.
Hide the ladder behind the hatch

This type of ladder has three sections, but in this case, it will be conveniently located in the hatch. First of all, determine its location. For example, the opening has dimensions of 120 × 65 cm. Then, to prevent heat loss, the hatch should be cut 7–8 mm wider on each side. The work will require the following material:
- A bar with a section of 50? 50 mm - 2 long and 2 short.
- Plywood, 10 mm thick.
- Plywood, 4 mm thick, for the manufacture of kerchiefs.
- PVA glue.
- Screws.
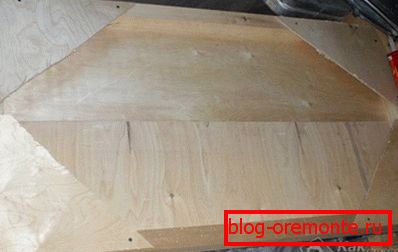
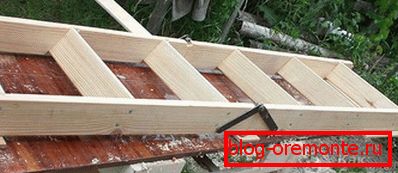
At the end of each bar make a drink at half its thickness. After these places, coat with glue and put everything into a groove together in a rectangle. For strength between themselves, you can additionally twist the screws. To get the exact diagonal out of 4 mm plywood, cut the kerchief.
When the glue is dry, remove the kerchiefs and screw the sheet of plywood with 10 mm self-tapping screws. Now try on the structure in the opening. If everything fits, then the measurements were performed accurately.
For aesthetic look, insert the door latch into the cover. With the help of a screwed handle, you can open the hatch on the latch.
The mechanism for the staircase with the hatch - articulated without spring
One of the important knots of the folding attic stairs is the opening mechanism. The easiest method is to buy it. But if you want to save your family budget, you can do it yourself.
To do this you will need:
- Corner - 1 piece.
- A piece of metal sheet.
- Two strips of different lengths.
- M10 bolts.
- Drill.
- Drill.
- Small.
- Hobbies
- Tough.
- Clamps
Manufacturing technology:
- The first step is to make a drawing on the cardboard of the stairs. It should indicate the approximate angle of inclination in the open state.
- Now cut out a sample of the structure and individual parts from the cardboard. This will allow you to choose the correct length of the hinge.
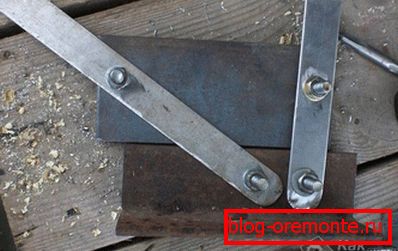
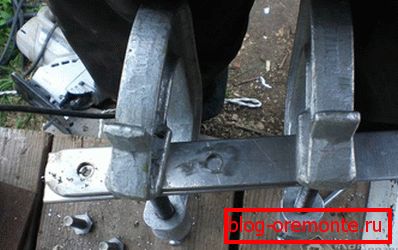
- On metal strips measure the holes for the hinge. Measure distances according to preliminary measurements. The hole is made for the bolt M10.
- These details are collected between each other and slightly stiff.
- Now measure the desired angle using bevel. Then push the mechanism to the desired angle.
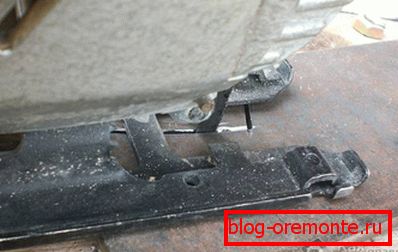
- On the metal mark the area that when opened will overlap the corner. Using a jigsaw cut it.
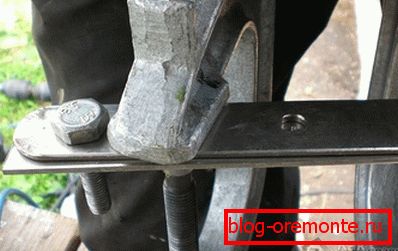
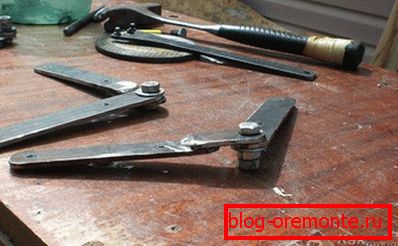
- At this stage, the stripes give the presentation. Round off the corners and cut off the extra length. This will allow them not to cling to each other and, accordingly, not to interfere with each other.
- After removing excess metal, the corner will rest in the desired position. The first mechanism is ready!
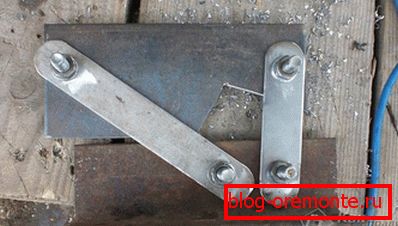
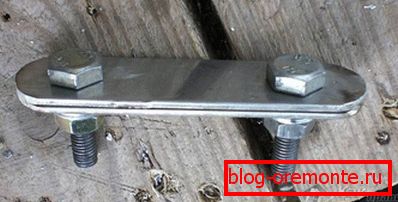
- For the preparation of the second mechanism, fasten each pair of parts with clamps. This will make an identical part. Drill holes.
- Insert the bolt into the finished hole and drill the second.
- Having twisted preparations with two bolts, level them on length and give the identical form.
By this principle, do all parts of the mechanism. As a result, you can make two identical parts of the mechanism.
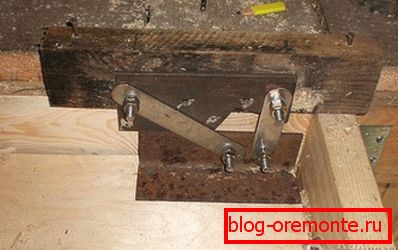
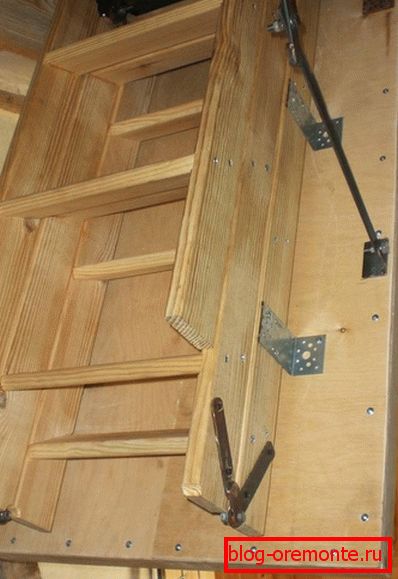
When the mechanisms are ready, they should be attached to the hatch that was made earlier. In this case, you should try on the hatch with the mechanisms to the opening.
In the open position, the hatch should not touch the walls of the opening. If necessary, it can be adjusted. In order for the entire structure to be well kept, one more important detail should be made. To do this, take two strips, the width of which is 2 cm, as well as a corner. By the end of one of the strips, weld a small piece of metal. A corner will act as a supporting platform.
So, you will make a hinge, which in the open position will be slightly bent, but at the same time withstand the entire load. Among other things, it must be fully disclosed. This will allow you to evenly distribute the load created by the hinged ladder.
Ladder from a tree on bowstrings
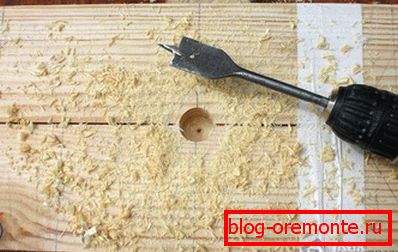
Let's make a staircase made of wood. Take an inch board, ten centimeters wide. It is useful for making bowstrings and steps. The first section is done exactly along the length of the hatch, the second is similar, and the third is slightly smaller. As for the last section, its length should be equal to the remaining distance between the floor and the two sections when unfolded. Here you will also need to use small. Vymerete tilt angle of the stairs in its unfolded state. Transfer these measurements to the board and mark the steps. This is done on two long sections. These lines should be applied evenly on the two boards. To do this, they can be taped together. The lines should be mirrored. In places where there will be hinges, drill 25 holes in the pen.
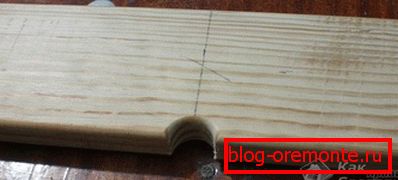
The holes should be on both sides of the boards, so first make holes from the inside, and then from the outside. Grind each hole with a router.
This will give the blanks an aesthetic look. At the junctions of the segments, saw the boards.
Cut the required number of steps, polish them. For each step on the string, make small holes of 5 mm. Assemble the entire structure with PVA glue and screws.
Making metal loops
To connect the sections of the march should also make loops. Thanks to their presence, the ladder will fold and unfold, respectively. For this purpose it will be necessary to take a metal strip 2.5 cm wide. Eight such strips will be needed. To four of them, weld a small piece of a similar strip. In each of them make holes that will be used for fastening the stairs.
Now lay the first and second segments of the ladder on a flat surface. The junction between them should be tight enough. Screw the hinge so that the hinge bolt is in the recess in the center of the connected sections. On the other hand, the edge will be the bowstring edge. After screwing two loops, check the ladder for flexion. If everything is working properly, for the same example, connect the third segment.
Installation of a folding structure in the opening
Now there is only a little. When all the parts you made are finished and interconnected, you can proceed to installation in the opening.
First of all, treat all metal parts with a metal primer, spray paint and apply two layers of varnish on wooden elements.
When the whole structure is dry, it remains to fix it with anchors in the opening to the attic. After long work the folding ladder is ready! You can find a photo guide at the end of the article.
How to make a folding attic ladder?
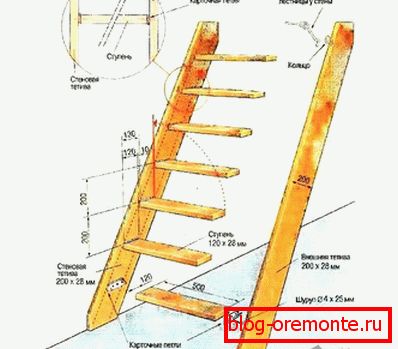
In the attic or on the attic you have made you can climb using the folding ladder. To do this, you need the following building material:
- For the manufacture of bowstring 2 boards. Thickness is 30 mm, width is 200 mm. The length depends on the angle of the stairs and the height of the ceiling.
- Boards for steps. Width is 120 mm, thickness is 30 mm, length is 500 mm.
- On each step there are two card loops.
- Screws.
- Anchor.
- Hook for mounting structures on the wall.
For successful assembly of the stairs to the ceiling, the upper edge of the stationary string should not reach 550 mm.
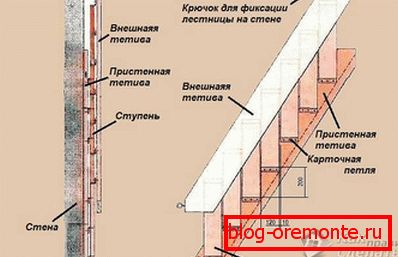
So, all the work is done in the following sequence:
- Fix one string with an anchor to the wall. The mount itself must be rigid, since the whole structure will be supported on it.
- Mark up the steps. The position of the first mark parallel to the floor. Draw a line, the length is equal to the width of the step 120 mm.
- Now draw two parallel lines through the ends of the segment parallel to the edges of the string.
- Then draw a perpendicular from the end of the first segment.
- Retreat from this line to the right by 10 mm and draw a line parallel to the perpendicular.
- The point of intersection of this line with the top, which is held parallel to the edge of the string, determines the location of the next stage. By this principle, the marking of all subsequent steps.
So that the steps when folding do not rub against each other, a one centimeter indent is needed between them. Transfer all this marking to the second string and fasten the steps in the marked places. As for the loops, they must be placed on a stationary string, so that they eventually lift the steps up and the moving string down. Accordingly, a hook is mounted in suitable places on the wall. This is perhaps the easiest and fastest method of making folding attic stairs.
Things are easy
So, we have reviewed with you several options for making attic stairs with your own hands. Of course, at first it may seem like an unthinkable task, but with effort and effort you can do everything. Leave your comments on this article and share your impressions!
We recommend to read:
- how to make the stairs to the second floor;
- how to glue vinyl wallpaper.
A photo