Arbor rectangular with his own hands
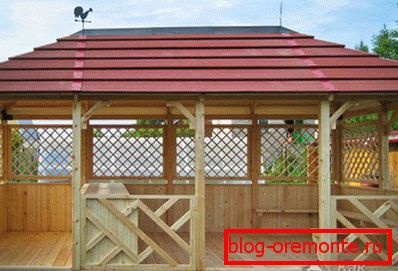
There is one element for the garden, which can not be replaced by anything else. A rectangular gazebo is a building that is being built in a short period of time, but will serve for quite a long time. Food consumed in the open air is better absorbed and brings more benefits, and spending time with your loved ones is priceless. In today's world filled with electronics, many people forget about live communication. But it is precisely this that is the key to a strong relationship. Next, we look at how a rectangular gazebo can be built with your own hands.
What size

In order to fully give a thoughtful answer, it is necessary to analyze a few simple points:
- Where will the building be located?
- What territory under it can be distinguished?
- Will the gazebo function as a kitchen?
- How many people will be in the building at the same time?
- What kind of seats will be installed inside?
- Will the construction adjoin the house in the form of a canopy?
- Does the water rise high during heavy rains?
- Will there be a need for communications?
There is no need to make too large a structure, since it will not be used as fully as often. Moreover, it will be additional maintenance expenses. At this stage, you need to think about whether all the walls of the gazebo will be open or a few of them will need to be closed. The easiest way is to present a table in the middle surrounded by chairs. You can make a decision that is distinctive for some crops - loungers.
Draw up a drawing
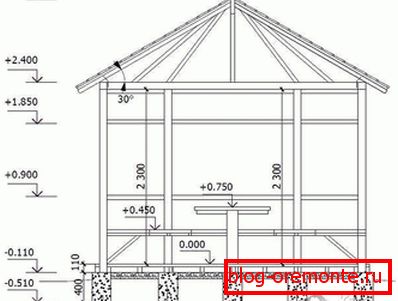
Having considered the above questions, it's time to transfer the plan to a piece of paper so that it becomes a little more real than our imagination. Here are some projects that take up little space, but allow you to place all the necessary elements.
- 2.5? 3.5 m. This solution is enough to arrange inside the dining table and chairs. Four people will feel quite comfortable.
- 3? 4 m. In such an arbor you can invite guests or gather a large family at a good table.
- 4? 4 m. This option with a brazier. A small platform is made with dimensions of 1–1 m without a covering, so that the smoke can freely rise and not linger under the roof.
- 5? 5 m. In such an arbor it will be possible to build loungers on which mattresses and pillows are placed. It will be a really good place for rest and pastime.
Dimensions are shown as examples. They can be varied and tailored to specific needs and land. Knowing the specific parameters, you can choose the type of foundation to be applied. There are several options that do not take much time in the building, but will be a good support for the whole structure:
- columnar brick;
- columnar monolithic;
- piling
- solid slab.

How each one is made will be discussed below. The material planned for use is also applied to the plan. The arbor can be closed on all sides with the help of double-glazed windows. At the same time you can make a large number of sash or sliding windows. In this structure will be comfortable in any weather. The most common material that is used is wood. It is available, easy to process, and no special tools are needed to cope with it. Profile metal can be easily applied to the frame, but to work with it you need to have the skills of a welder. One or several walls can be laid out of facing bricks, which looks quite attractive and makes it possible to combine the design with the main building.
Foundation
It was mentioned above, what types of foundation can be used for buildings of this type. The easiest to build will be columnar brick. To implement it you will need:
- Dig holes to a depth of 30 cm. This is done through each meter along the length of all the walls. Sanding is carried out with a layer of 20 cm. It is well rammed, then moistened with water so that the material undergoes shrinkage.
- For each item you will need 4 blocks. Their size should be 20? 20? 40 cm. These are standard dimensions for a cinder block or other similar building material.
- The first two are placed on the prepared pillow. They are set by level. The most convenient way to use a laser level, with which the projected line. It will be a reference for all elements. A solution is applied between the stones that will hold them together. They are equal in level.
- Thus, two elements are set at all angles.
- Between them the fishing line is pulled, which will help to set intermediate supports.
- From above, two more bricks are laid perpendicularly on the solution.
Foundation можно считать готовым. Но важно помнить, что такой вариант подойдет для тех местностей, где грунт имеет достаточную плотность и не размокает чрезмерно при дождях. В противном случае беседка может потерять опору и разрушиться.
The bar-shaped monolithic foundation resembles the previous version, but has its own characteristics:
- The optimal pitch of the supports for a particular structure is chosen. It can be in the range of 1–1.5 meters.
- First, dig holes in the corners. Their depth should be below the freezing ground, and dimensions, for example, 40? 40 cm.
- Next, with the selected step, pits are dug along the future wall. If the width of the building is large, then in the middle you also need to provide several supports for the central beam. If this is not done, then the floor will not be strong enough.
- At the bottom of each depression, sand is laid in the same layer as in the previous version.
- Formwork is made of edged boards, OSB sheets or plywood. It should be of such height that the tip is 20 cm above the surface. This will protect the main construction material from getting wet during rains or other precipitation.
- The form is mounted and fixed.
- The inner walls are covered with roofing felt.
- Reinforcement bars are inserted in the middle. It will be more efficient to make the crate: 4 main vertical elements should be 12 mm in diameter, the rest can be taken 8 mm. They are tied together by a knitting wire so that a parallelogram is obtained. Transverse segments are arranged in increments of 30–40 cm.
- The prepared concrete solution is poured. It must be well compacted. Better to do this with an electric vibrator. If this is not possible, then in a pinch, you can use a piece of reinforcement.
- The upper ends of all elements are aligned in one plane to facilitate further construction.
- At this stage there is an advantage to do the workpiece under the grillage. To do this, you need a metal shank (sheet metal strip). Its width should be at least 5 cm. 2 sections of 15–20 cm each are made. They are vertically immersed in a fresh solution at a distance of a bar, which will then be applied.

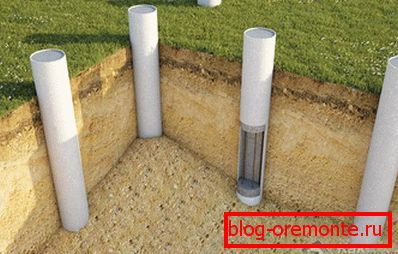
Can be made and permanent formwork for such a foundation. For this you need an asbestos pipe with a diameter of 250 mm. Pits are dug in the same way, bedding is done, but fine gravel is still laid on the sand with a layer of 15 cm and is well tamped. Pipes are inserted inside, they are set at the level. On the sides up to half rubble is poured and compacted. Several rods of reinforcement are inserted inside and the solution is poured. In the same way, you can make blanks from metal plates for timber.

Like the previous version, the pile foundation will allow to sustain the construction of a large mass. It will be possible to build brick walls. The easiest is to work with screw elements.
 The number of items is calculated from the calculation of the installation in increments described above.
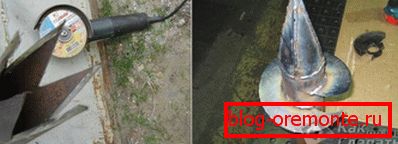
- If desired, they can be made independently. To do this, you need a metal pipe with a diameter of 85 mm. Its length should be such that the support is below the soil freezing and protrudes 20 cm above the surface. One of the ends is tapering. To do this, cuts are made along 15 cm, the strips are bent to the middle, boiled and smoothed. In increments of 5 cm are attached to the plate for the screw. A hole is made in the upper part into which the lever for tightening can be inserted.
- For the installation of all elements will be enough for two people.
- After immersion, the upper parts are aligned by one height and a square base of 20 × 20 cm is welded on.
In order for the supports to last as long as possible, they must be treated with an anticorrosive agent and coated with paint. To prevent the growth of weed under the gazebo floor can be as follows: sheets of roofing material are laid over the entire area. The overlap is made in 10 cm. From above there is a filling of sand in 5 cm and it is well rammed.
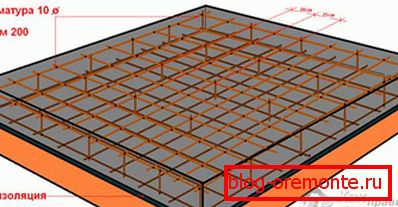
The basis in the form of a monolithic slab will allow in one pass to achieve two goals - to make the foundation and prepare the floor.
- Marked territory.
- A pit is dug to a depth of 30–40 cm.
- The bottom is covered with a layer of sand in 15 cm. It is well rammed.
- The next step is metal crates, which will give strength. Instead, you can use the construction buta - broken brick, the remnants of concrete slabs or natural stone. It is laid evenly over the entire excavated area.
- Lighthouses are made of metal pipes or wooden pegs. They are set by level. At the same time, you can make a small bias in one direction by 1-2 cm. This will allow the spilled liquid or rain water to calmly flow into the ground.
- The solution is poured in and tightened using a rule or a flat metal strip, for example, a piece of drywall profile.
- If you do not plan tile laying, then you can make ironing from above. To do this, dry cement is applied to the still wet floor and rubbed. Subsequently a smooth surface with a slight gloss is obtained.
- The construction will reach full strength not earlier than in 27 days.
In the case when there is no desire to mess around with concrete and the foundation, you can just stand up to the ground 50–70 cm into the ground, make a foundation of rubble and sand and pack everything well.
Basic construction
The principle of construction of wooden and metal frame is in many ways similar. For the first option, you will need a bar of 10? 10 cm and a cut board of 10? 5 cm. In the second case, an I-beam will be needed for the base, and for racks a square shaped tube with a size of 6? 6 cm or 8? 4 cm. In this case, all work is carried out welding machine.
- If the first three variants of the foundation were chosen, then it is necessary to make the lower trim. To do this, the bar is cut along the length of each side, in the same way another element is made, which will be laid in the middle.
- They communicate with each other. To do this, a 5 cm depth cutout is made in the corners, and a width of 10 cm. The grooves are joined together and fastened with screws.
- The next step is to install the corner posts. For them, the same material is used as for the grillage. They are attached to the base with metal plates, angles. To make the joint more reliable, it is necessary to cut the spike and drown it into the corresponding groove.
- If the walls are more than 3 meters, then it is necessary to make additional vertical supports of the cut board. You can install them after 1 m.
- On top of all the elements are connected with the help of two boards, which are nailed on the inside and outside. The corners are reinforced with metal straps.
- The next step is laying the floor. It can be made of a polished board, which is nailed. When finishing it can be coated with varnish and stain.
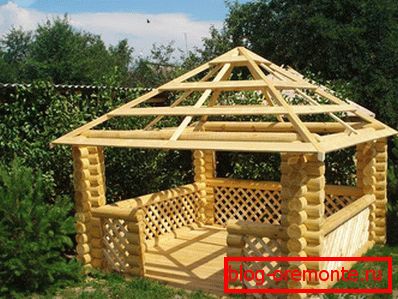
- If a shed roof is planned, then racks on one side must be made higher by 20–30 cm. For a gable or hitherto, they must be the same size. For the first option, it will be enough just after 40 cm to install the boards from one wall to another and fix them. For a gable you will need to build several farms, you can arrange them in steps of 60–100 cm. They represent an isosceles triangle. The first thing two extreme are mounted. They are set to level in the horizontal and vertical plane. Between them 3 fishing lines are stretched, which will serve as a guideline for the other components. You can connect them to each other with the help of a pontoon beam or slanting bridges. A crate is made for a specific flooring, and the area is covered.
For a monolithic foundation corner posts must be drowned in the ground. This can be done at the stage of filling or after. 4 corners are dug holes to a depth of 50 cm. The columns are made on the basis of the foundation, which was written above. They will support racks. Further assembly is the same as in the previous versions, but it is no longer required to perform the lower strapping. In this case, you can go the other way. The main racks can be not wooden, but brick. For this, columns are laid out at the corners, which are necessarily reinforced inside. A wooden bar of 10 × 10 cm is laid on top of them. The elements are tied together as described for the grillage. This will be the mauerlat, which will be the basis for the roof.
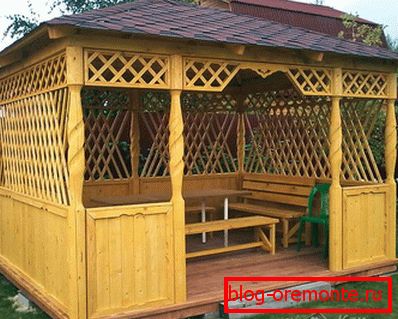
Some elements that may be located inside have already been mentioned in the course of the article. The space between racks may be open. Multiple sides can be closed with transparent polycarbonate. In another embodiment, masonry is made to the middle with facing brick. The remaining opening is left as it is, or a wooden lattice is mounted in it. Around the area you can plant wild grapes or ivy. Over time, he will envelop the entire arbor and get a green island.
If desired, the structure can be made with elements borrowed from the wooden hut. To this end, a hole is left in the middle of the roof, which will be used to release smoke. In this case, right in the middle, you can make a fireplace, which will allow you to enjoy the fire in any weather, sitting around it on comfortable chairs or sun beds.
It must be remembered that wooden structures need constant maintenance. At least every 3 years it is necessary to remove the old coating and re-apply varnish or paint, which is intended for use on the street. In this case, it will be possible to avoid drying and rotting.
Everyone can become the author of their unique project. We are interested in what and how to do it personally. Share your decisions in the comments to the article, perhaps for someone they will serve as a new idea.
Video
An example of the construction of a rectangular arbor:
A photo

See also:
- How to build a hex arbor
- Construction of arbors with barbecue
- How to build a polycarbonate gazebo
- Construction of a live arbor