Adjustable floors on logs with their own hands
Nowadays, specific designs, called adjustable floors, are often chosen as one of the possible options for arranging rough flooring. Arrangement of such structures involves the use of a lag system mounted on mechanically adjustable supports, due to which all procedures for leveling the base are noticeably simplified. In addition, when using such a foundation, it is still possible to adjust the position of ready-made floors during their operation (in areas of arbitrary size).
Design
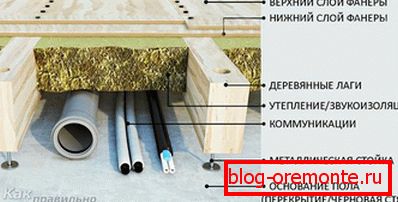
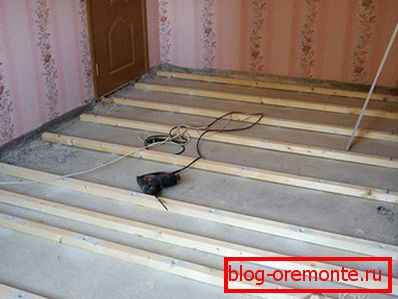
In order to manufacture adjustable floors on logs, first of all, one should be familiar with the principle of their construction. Immediately, we note that in this case (by analogy with the traditional installation system), a clean floor covering is mounted over the base, consisting of special wooden boards or log.
The main difference of the mounting method we are considering from the classical scheme is a special method of fixing the genital lags, which in the first case occupy a strictly fixed position, since they are mounted on a static basis (on cranial bars). When preparing the adjustable base, the supporting bars are equipped with special movable sleeves with screw thread. Acting as supporting elements of design, such sleeves during rotation change the position of the logs vertically and adjust the plane of the base.
Thus, by rotating the sleeves embedded in the lags, it will be possible to raise or lower the portions of the sex base that need to be corrected. The possibility of alignment without dismantling is the main advantage of designs on adjustable lags.
Despite the seeming fragility of embedded plastic bushings, the strength of the floor assembled on their basis is quite high. To increase the bearing capacity of the rough base, simply increase the number of movable support bolts.
Material preparation
Regulated floors can be installed simply enough provided that the following requirements are strictly fulfilled when organizing assembly work:
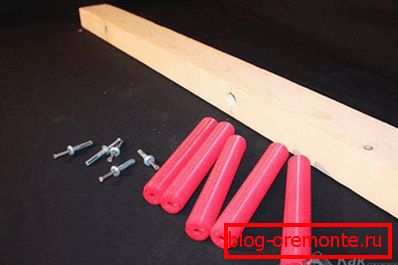
- Wooden poles of coniferous woods that do not have cracks, chips, knots, as well as obvious signs of decay are selected as supports.
- The quality of the plastics from which the bushes are made and their holders should not be in any doubt.
- To extend the life of the structure, its wooden elements should be treated with antiseptic. In addition, to exclude the possibility of fire of wooden parts, the latter are treated with flame retardants.
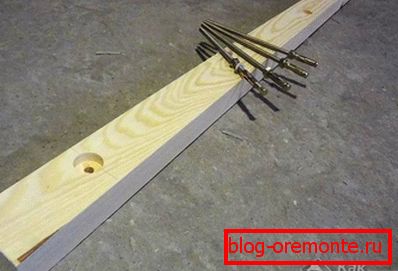
- If ready-made holes are not provided for in the blanks of the floor lag, you will have to prepare them yourself using a special drill, whose diameter is 1.0–1.5 mm smaller than the cross section of the plastic sleeve itself. This approach ensures maximum rigidity of the landing support in the material lags.
Foundation preparation
Before you make an adjustable floor, you should carefully prepare its base, which must be sufficiently rigid (best of all, if it is a concrete slab or a screed poured over the sub-floor).

To prepare the concrete base will need to do the following operations:
- clean plates from debris and dirt;
- cracks and crevices located along the perimeter with the help of a grinder cut to a depth of about 30 mm and then filled with epoxy-based sealant;
- in order to increase the stiffness of the top layer of concrete, treat it with a special reinforcing mixture (sold in dry or liquid form);
- lay waterproofing over the reinforcing material.
These preparatory operations will allow you to get a fairly solid foundation, as well as provide the required microclimate in the space under the floor.
Assembly design
The direct assembly of adjustable floors should be carried out taking into account the following recommendations:
- Ready lags with holes for the supports are pre-dispersed on the surface of the base with a step that depends on the type of future coating.
- For tile or linoleum, this distance should be about 40 cm, and for covering from parquet or laminate it is chosen within 60 cm.
- A small gap is left between the wall and the extreme lags (about 15 mm).
- It is also necessary to provide a gap of at least 3 cm in the joints of the floor bars laid longitudinally.
We advise you to take full responsibility for the requirement to comply with the specified temperature gap required to prevent possible deformations of the structural elements when the temperature and humidity in the room change.
At the next stage of installation work it will be possible to proceed to the installation of the lag with the use of height-adjustable plastic racks. For this:
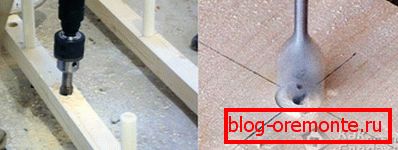
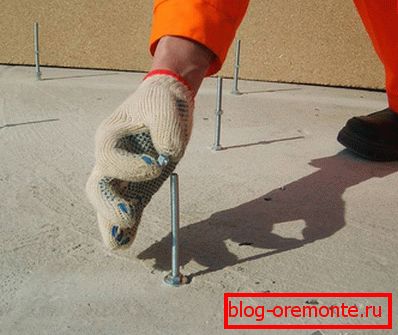
- using the holes in the bars as guides, drill holes in the concrete base to accommodate the dowels;
- insert support posts into the holes and attach them to the threaded connection. When screwing in carefully, make sure that small chips or dirt do not get inside the threaded connection;
- then we hammer the dowels into the concrete nests and fix the prepared supporting legs in them;
- By means of a special key, the lag position is adjusted, aligning them on the base plane. We make sure that the maximum difference in height does not exceed 1 mm per 1 linear meter.
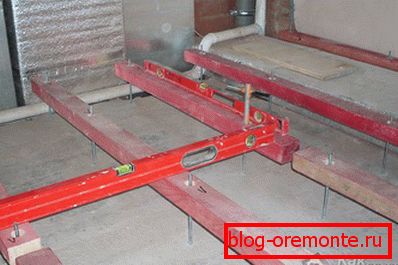
The height of the supports should start from the edges of the cover, gradually moving to its center.
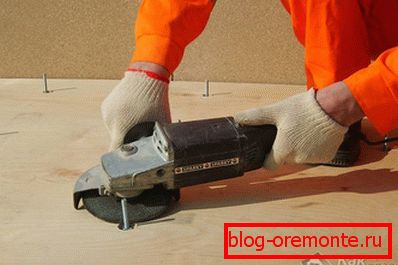
After all adjustment operations are completed - it will be necessary to cut the protruding parts of the support sleeves using a conventional chisel or grinder. Try to fix the racks of the structure as hard as possible, so that over time they can not loosen. All subsequent flooring operations are performed in the generally accepted order.
Video
This video footage from the beginning to the end shows the process of installing an adjustable floor on the logs: