Shed roof do it yourself - step by step instructions
Shed roof is the simplest type of roof in the device. It does not have any complex elements, it is installed on the load-bearing walls, which have different heights.
Typically, this roof is used in the construction of outbuildings: garages, baths, verandas, sheds, but also often occurs in the construction of private houses and country houses. So, let's see, how to make a lean-to roof with your own hands step by step.

The first step in building you need to decide on the angle of inclination. The angle of the roof of the house will depend primarily on how you are going to cover it with roofing material. For a shed roof of profiled sheeting, the optimum angle of inclination will be 20 degrees, and the minimum slope - 8 degrees.
If you do less, the roof may simply fall through the weight of snow in the winter or spring, which is especially important for the regions of Siberia. For metal, the minimum slope rises to 25 degrees. When constructing a shed roof, this figure rises another 10, and is already 35 degrees. For a faltsevy roof the minimum tilt angle makes from 18 to 35 degrees.
After determining the angle of the single-pitch roof, we raise the facade wall relative to the rear wall to the required height to obtain the required degree, for this we will need to refer to some trigonometric formulas.
How to calculate a shed roof

For clarity, the calculation of a single-pitch roof will give the figure:
tgA and sinA are found in the following table:
| Roof angle, degrees | Tangens, tgA | Sine, sinA |
|---|---|---|
| 5 | 0,09 | 0,09 |
| 10 | 0,18 | 0,17 |
| 15 | 0,27 | 0,26 |
| 20 | 0,36 | 0,34 |
| 25 | 0,47 | 0,42 |
| 30 | 0,58 | 0,5 |
| 35 | 0,7 | 0,57 |
| 40 | 0,84 | 0,64 |
| 45 | 1,0 | 0,71 |
| 50 | 1,19 | 0,77 |
| 55 | 1,43 | 0,82 |
| 60 | 1,73 | 0,87 |
Project creation
Despite the simplicity of the design before you make a shed roof, make up the project. Knowing the required angle of inclination of the slope, they count on how much one wall should rise above the other with the help of simple trigonometric formulas.
Let us give an example of calculating the height of the elevation of the front wall Lbc and the length of the rafters Lc for a house, the length of the wall is Lss = 5 m, and the inclination angle of the single-sided roof A = 25 degrees.
- Determine the height of the raising of the front wall Lbc = 5 x tg 25 = 5 x 0.47 = 2.35 m.
- Determine the length of the truss foot Lc = 2.35 / 0.42 = 5.6 m.
Also, do not forget to add the length of the rear and front overhangs, which will serve to protect the house from precipitation, to the resulting length of the rafter foot. The length of the overhangs we take 0.5 meters, you can take more, but not less. Total, you need to add another 1 meter. So, we get: Lc = 5.6 m + 1 m = 6.6 m. At this the calculation ends, you can proceed to further work.
Design and device

Shed roof is considered the simplest type of roof, it has two points of support, two unequal walls, the difference in height of which determines the slope of the slopes. It consists of:
- Truss system. This is a set of supporting elements supporting roof slopes. We will tell more about it in one of the following points.
- Gables So called the sections of the wall in the form of a rectangular triangle, bounded by slopes and cornice. For sloping roofs, pediments are laid out of the same material as the main walls, so there is no clear division here.
- Overhang This is the protruding part of the truss leg, carried outside the perimeter of the structure. Overhang protects walls from getting wet in the rain.
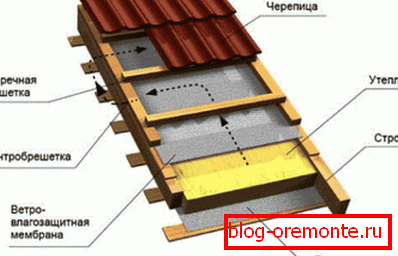
- Roofing material. They cover the truss system shed roof. Durable modern finish coating serves as a shield from precipitation.
- Insulation. If this is required by the tasks assigned to the building, additional thermal insulation of the roof is carried out. Of course, this is not about a barn or gazebo, but a bath and a garage will not damage the quality insulation.
The composition and features of the truss system
The rafter system is made entirely of wood. Experienced roofers recommend the use of dry softwood, pine is great. Before you build a shed roof, all elements of the truss system are pre-treated with antiseptic and fire retardant. It is better to choose smooth lumber, without knots and chips, it is much easier to work with them. The rafter system consists of the following parts:
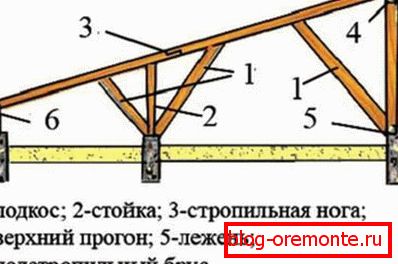
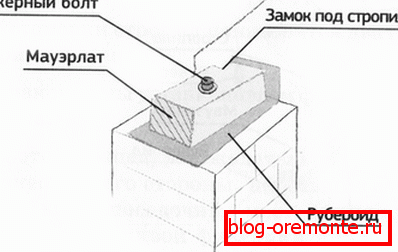
- Mauerlat Thick, strong timber section 150x150 mm, acting as the base on which the lean-to roof. Mauerlat distributes the load from the truss system, transferring it to the foundation. It is fixed flush to the top of the wall on the anchor bolts. The attachment point is calculated in such a way that it does not coincide with the sections of the truss legs. No need to "overdo it" with the number of holes, as they reduce the strength of the power plate. Before fastening, waterproofing of the upper part of the wall is carried out using folded ruberoid twice.
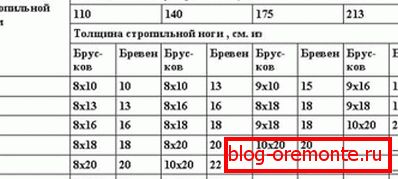
- Rafter legs. Smooth, strong bars that form the slopes. They are fastened to the power plate or to the bearing walls. The ends of the rafters form ramps, if the length of the legs is not enough, they lengthen with the help of fillies. The distance between the supporting elements is determined taking into account the width of the roofing material, usually 60-120 cm.
- Crate. Lattice or solid foundation, on which the roofing material is laid. Solid crate is made of moisture-proof sheet plywood, it is used if the single-pitch roof is covered with shinglas, roofing felt or ondulin. Lattice crate is packed from unedged boards, mounted perpendicular to the rafters.
Types of roof systems
The roof of the shed roof of the house looks like a half part of the gable, so the structure of the truss system of these two types is very similar. I use three varieties:
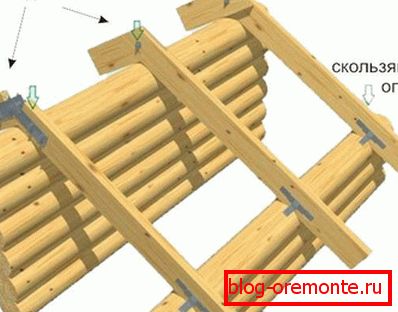
- Sliding. Used mainly in the construction of log cabins. This design, thanks to the lower mount-type slider, helps to compensate for the shrinkage of a wooden house, which sometimes reaches 15%. The upper part of the rafter fixed rigidly, and the bottom slips if necessary. If the installation is carried out correctly, the roof will not be deformed in the first years of operation, when the shrinkage is especially strong.
- Outrageous This type of rafters is used mainly in block and brick structures, in which there are internal partitions. Rafter legs rely not only on external walls, but also on internal racks, which take on part of the load. The easiest way is to build just such a rafter system. When building a shed roof with their own hands, moving step by step, step by step, even a novice builder will not miss the important points of installation.

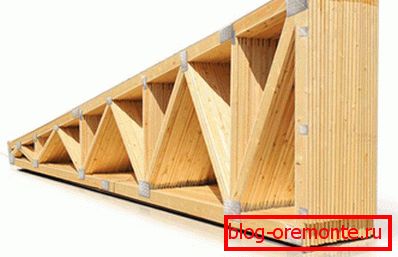
- Hanging. Hanging truss legs do not have additional supports in the middle, they lie only on the bearing external walls. The device of the hanging system involves the construction of walls of the same height, the slope of the roof is given by a wooden rack on which the rafters rest. Rafter trusses are collected on the ground, put on the roof as a finished product and mounted, measuring out by level.
Assembly process
Having studied the device of a shed roof, it will be easy to build it yourself. They start with the calculation and purchase of the necessary building materials, and then act according to the plan:
- After the household building box is ready, a power plate is laid on the upper side walls. Pre-waterproofing the installation site, using a long drill, make holes for anchor bolts. Mauerlat treated with antiseptic, allowed to dry, and then also drilling. Then put on the wall, insert the anchors and tighten tight.
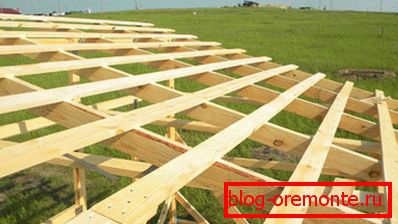
- Sawing boards intended for the manufacture of rafter legs defined by the calculation of the length. First of all, the extreme rafters (gable and rear) are installed, a string is tied between them, which serves as a guideline for installing the rest of the legs. The heavier the roof, the steeper its slopes, the more often the rafters are located.
- The next stage - waterproofing rafters. To do this, use a waterproofing film, which is sold in rolls. Film strips are fixed with a construction stapler along the roof, starting from the bottom. The strips are laid not in the joint, but in an overlap of 10-15 cm.

- On top of the rafters, a waterproofing film is fixed by rivers of counter-sheathing. Their thickness of 3-5 cm creates a ventilation gap.
- The crate is nailed. Solid, if the roofing material in rolls, does not hold the form. Latticed if used corrugated or metal tile.
- Responsible phase - flooring roofing material. How to properly perform it depends primarily on its type. For mounting use special screws, supplied complete with a roof, galvanized with a rubber head, which is deformed when tightening, protects the hole from moisture. Roofing material is also laid with an overlap of at least 10 cm.

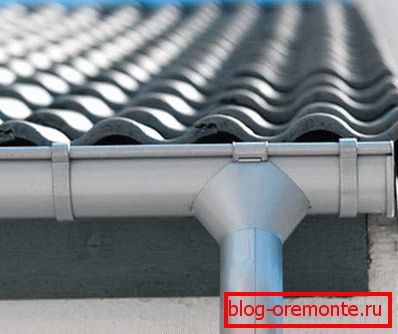
- It remains only to equip the drainage system, fix the eaves and wind beams. Clamps for the gutter watercourse recommend the use of plastic, which, unlike the metallic ones, do not corrode and are mounted directly on the wind board.
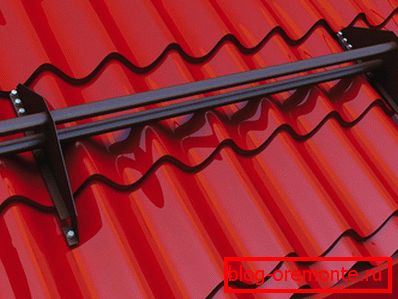
- Install snow catchers to prevent the spontaneous discharge of snow. They represent a small cornice, fixed on the lower edge of the slope.
Advantages and disadvantages
Like any invention of mankind, the shed of a house has advantages and disadvantages. The pluses include:
- Availability, low cost of materials for the roof.
- Ease of design and speed of construction.
- The design and the device has good resistance to wind and precipitation.

But they call several drawbacks that other designs do not have:
- It is impossible to equip the attic or attic space.
- Low degree of thermal insulation.
- Unconventional appearance.
In short, the disadvantages of a shed roof flow from its advantages. What makes it the best option for outbuildings makes it impossible to crown a house. Nevertheless, the practicality of this design has been proven for years of faithful service, and it is up to you to decide whether to do it or not!
Video instruction
We recommend to see detailed video instructions on how to build a lean-to roof with your own hands step by step with explanations and tips.