Mansard roof itself
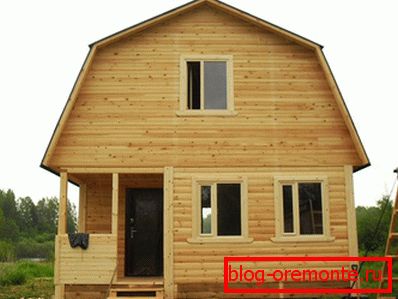
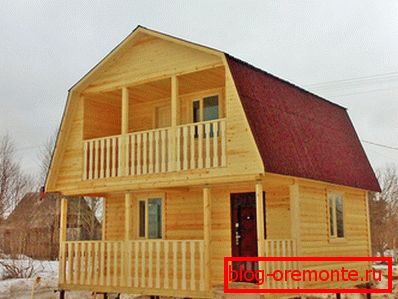
The roof under which there are living rooms, called the attic. In this structure, the ceiling is not provided. This design allows you to increase the total volume of the room and do it with minimal material investment. Roofs may have a different shape, but the most popular is the gable sloping roof. In the article we will tell you how to make a mansard roof with your own hands.
Carrying out design work
First of all, it is necessary to conduct studies of the foundation and walls. The design of the broken roof is much more complicated and heavier than the standard one, therefore, for its construction a strong foundation is required. In the process of studying the walls and the foundation, it is required to establish whether they will withstand this kind of roof. If the mansard roof is planned in preparation for the construction of the building, then all the features should already be taken into account in the design.

The choice of the shape of the roof should be taken responsibly. As with errors in the calculations or with the wrong choice of parameters, the roof can collapse, and with it all the supporting structures.
It is best to entrust the design of the project to professionals. Modern technologies allow all the necessary calculations to be made using special computer programs. With their help, optimal tilt angles and other characteristics are calculated using initial parameters. Moreover, all calculations are made in compliance with the SNiPs.
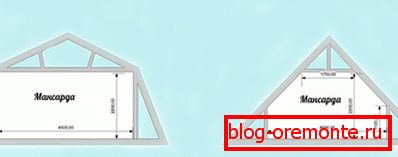
Ceiling height есть главное требование удобного обустройства мансарды. Он должн быть от двух с половиной метров и выше. Ломаную линию крыши необходимо располагать на уровне около 2,8 метра. При этом в расчет берется толщина утеплительного слоя, выступы полов и отделки стен изнутри.
Before the start of installation, a clear plan should be drawn up, indicating all the linear parameters of the building, pitched corners and the total height of the house.
Technical terms
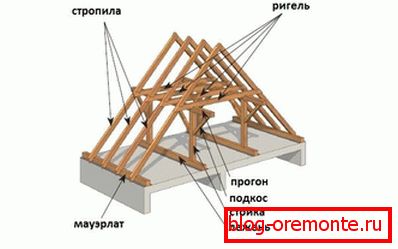
- A beam that performs a support function, which transfers the load from the lower ends of the rafters to the upper end of the walls of the structure, is called the mauerlat.
- The construction of wooden beams, which forms the main form of the roof, is called rafters.
- Powerful timber that supports tightening and evenly distributes the load between the individual rafters is called a suspension.
- Plywood sheets or flat boards that serve for laying roofing material are called crate.
Roof frame
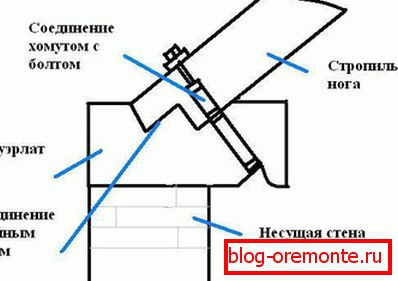
First, a mauerlat is installed on all four sides of the building, which is a support beam that allows you to transfer the load to the walls of the house from the roof system. If the main structure is made of wood, then the uppermost timber or the upper log can be a mauerlat. In rooms made of brick or blocks, the support bar is fastened using studs or anchors, which are already mounted in the walls during the laying. Such a timber has a cross section of 10–15 centimeters and is made only from softwood. On the inner surface of the wall of the house is aligned mauerlat. What remains outside afterwards is ennobled with the use of decorative masonry.
The support bar is placed on top of the anchor bolts and tightly pressed so that dents from the studs remain on its surface. On these marks are drilled the necessary holes for subsequent fastening. You can mark the timber with the help of roulette, but the first option is preferable and more accurate. Waterproofing is laid on the wall surface. As it can be used roofing material, putting it in two layers. A mauerlat is put on the waterproofing layer on the stud, and the nuts are tightened.
A support bar is installed on a brick wall using wood stoppers. Overlapping beams are made of coniferous timber with a cross section of 100 × 200 mm. These beams are placed on the mauerlat in such a way that they protrude thirty to fifty centimeters beyond the wall. You can put them in special pockets that are made during the construction of walls. When laying on the mauerlat, beams are fastened with metal corners and self-tapping screws. In order to lay the ball evenly, the extreme beams are first attached, then intermediate beams are installed along the stretched cord.
Note! Floor beams are installed in steps from fifty to one hundred centimeters. However, experts advise the optimal step - sixty centimeters. Such arrangement of the inter-gully space allows laying the heat insulator without cutting it.
To level them in height, they are trimmed or used wooden linings.
When mounting racks using pockets in masonry, their ends are treated with a special liquid waterproofing material and wrapped in roofing material. Align them using a similar pattern using a cord.
Racks mounted on the beams, which are located on the edges. They are made from a bar of one hundred and one hundred fifty millimeters in cross section.
The installation line and the height are predefined in the corresponding drawing. Be sure to use the device called the level, as well as a plumb for leveling racks. Then they are temporarily fastened in the perpendicular direction with the help of hacks, securing them across and along the axial section of the roof.
All these measures are taken so that the racks are installed without deviations. For stings, you can use any tree. They are attached to the racks with nails. After the racks are installed at the edges, the cord is stretched between them again. They are guided by it during the installation of intermediate racks. Their pitch should be equal to the pitch of the beams. When carrying out a sequence of such works, two rows of racks, which have the same height, and parallel to each other, should result.
Installation

On the already installed racks fit and fasten the so-called girders - boards fifty fifty to one fifty fifty in diameter. Fastening is made by nails on one hundred fifty mm, as well as on metal corners, which are fastened with self-tapping screws. On top of the girders are placed bolts, which are made of planks with dimensions: fifty mm thick and two hundred mm wide. The narrow side of them facing down, which allows for greater rigidity. During the operation, the bolt will not be loaded; therefore, their dimensions are considered optimal. But to exclude deflection and increase reliability during installation, temporary supports are additionally placed under the crossbars. These are boards, the thickness of which must be at least twenty-five millimeters. Temporarily and on top of the bolt are fastened with boards, until the process of installing the rafters begins. Additional fasteners are not installed in the middle of the puff, so that they do not become a hindrance during further installation.
After the bolts, racks and girders are installed and secured, a sufficiently rigid structure should be obtained that will limit the room inside the attic. In the future, it is subject to even greater strengthening with the use of contractions and braces.
The lower rafters are made of boards with dimensions in diameter: fifty to one hundred fifty millimeters. To begin with, a template is made of boards of smaller thickness. So they are faster and easier to process. By applying such a board to the upper girder, with a chalk or pencil on it draw the form of the cut, and then the marks are cut out of the marks. The template is applied to the run, in those places where it is intended to install rafters. If in all places there is a complete coincidence, then the upper part of all the prepared rafters is cut using this template. The lower end of the rafters, which should rest on the mauerlat close to the ceiling beams, is cut to the place where it will be attached. Rafters are fastened with metal corners, screws and nails.
Note! When it comes to the upper rafters, you must first note the geometric center of the roof. This is done with the use of a temporary rack, which is nailed to the mauerlat with one end and a tightening located at the end of the roof.
The work is done in such a way that one of the edges of this temporary board corresponds to the center of the future roof. On this edge the rafters are aligned. Again, preparing a template from a flat board, the transverse dimensions of twenty-five to one hundred fifty millimeters. It is applied to the edge of the previously installed board at an appropriate level and to the girder on which the lower rafters are supported.
There are gash from both ends of the board, and the template is cut out by marking. Verification of the definition of the center is carried out by applying the sawed parts of the template to both sides of the roof. If during the installation of the racks the condition of parallelism is met, then there should be no problems with the installation of upper rafters. After all, they all have exactly the same size.
Using the made template, the necessary quantity and the corresponding configuration of rafter legs will be executed. On the mounted girders and installed rafters. In the upper part, they are fastened with metal plates using self-tapping screws. In the run itself, the trusses are inserted into the cuts and fastened using special metal angles and screws.
Note! In order for the rafters to stand strictly vertically, they are additionally reinforced with struts. The bottom end they are set to tighten.
The installation of the remaining rafters is carried out in a similar way. Choosing pieces of boards, the size of twenty-five to one hundred fifty millimeters, mounted suspension racks. The upper edges of the suspension are attached to the place where the rafters are connected, and the lower edges to the tightening.
On the rafters, which are located in the lower part, are installed the struts. They are made of boards with dimensions in cross section of fifty to one hundred fifty millimeters. They rest with an oblique lower cut on the carrier beam and are fastened with metal corners. The upper edges are nailed to the rafter legs from the side. Additionally through holes are drilled. Bolts are inserted into them and tightened with nuts. When the lower struts are installed, all temporary fixings are removed.

Now it’s time to glue the gables. They are sheathed in such a way that there is room for door and window openings. When laying beams in the wall pockets, on the lower rafters reinforce special boards that continue the line of rafters and forming the eaves of the roof. They are called filly.
If laying is done on a mauerlat, then there is no need to use fillies.
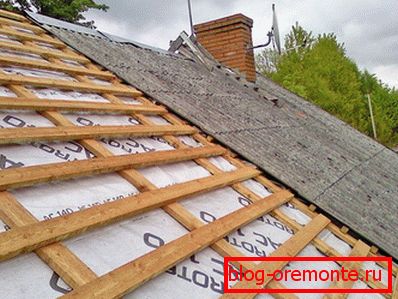
Now you need to make a crate. Its type depends on the roofing material. When using roofing material or roofing sheet, the crate is mounted solid, without gaps. It is mandatory to install waterproofing material on the crate. After that, you can start laying roofing material. If a mansard roof of a broken configuration is built, then it does not need any insulation. Insulation subject to walls and ceiling.
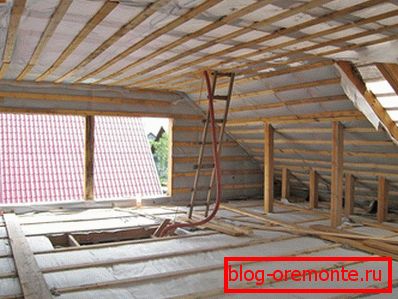
The under-rafter room is quite spacious, which ensures good ventilation of the attic room. At the same time, in summertime, the heating of all rooms in the attic room is reduced, and in the winter additional insulation is provided. For this purpose, windows are left in the gables to improve the ventilation process.
Features of crates
The crate is designed to perform a number of functions:
- redistribution and weight transfer of roofing to rafters;
- making an additional bundle of rafter system;
- the basis for installation of a roofing cloth.
The crate can be single- or double-layer, solid or discharged. At the device of a roof from wave slate, the metal tile the obreshetka is carried out from boards which fasten to rafter bars nails. In this case, the distance between adjacent boards may vary in the range of 15-30 centimeters. The final decision is made when using a specific type of coverage.
The solid type of lathing is applied when mounting a soft roofing roll material. In this case, moisture resistant sheets of plywood are used or particle board is oriented. Pine wood material, in the form of a cut board can be used.
Note! When mounting such a batten one must take into account that the material laid on the batten will repeat all the contours of its outer surface. Then the frame should be strong and smooth.
When laying the crate material, you need to use a special construction cord, with which the boards or slabs will lay exactly, strictly parallel to each other. Before fastening, the material should be treated with an antiseptic, which will protect it from fungal growths, premature decay and moisture.
Material for the manufacture of crates should be of high quality and smooth, preference is given to wood of the first or second grade, without numerous knots and any other defects.
Note! Mandatory requirement - the tree must be pre-dried, otherwise it will warp the boards during drying.
For clarity, the installation process attic roof, you can watch videos on the Internet.
A photo


Video
How to insulate the mansard roof for a comfortable stay in the room: