How to seal the pipe on the roof
If you plan to build a house or a bath, you need to remember about the need to arrange the heating system - a furnace or boiler. The main condition for the normal functioning of the chimney is its length and straightness. The higher the pipe, the better the thrust, so you should correctly calculate the balance of heat transfer and heat loss.
Brigades that are engaged in construction, build absolutely everything and the chimney as well. But it is extremely useful to be able to do something with your own hands, therefore we advise you to independently strengthen the pipe on the roof and seal up all the gaps. To get started, you should familiarize yourself with simple rules that relate to the installation and finishing works associated with the arrangement of the chimney.
If there was no stove in the house up to this point, and its construction begins only now, you should think about where it will be located. Moreover, it is necessary to assess the location of the furnace not only from the point of view of ease of subsequent use, but also from the point of view of ease of arrangement of the chimney. In the case when the house is only being built, it is quite simple and easy, you can immediately decide where and what. It is much more difficult when the house is already built, and the construction of the furnace begins only now. It should be thoroughly prepared for the erection of the pipe. For its construction will require reliable supports and suspensions.
Note! During the construction of the chimney should pay special attention to the burden and heat transfer furnace. Traction depends on the wind and its direction. Because of this, the pipe through the roof out near the ridge. If it comes to improving the thrust, the tip goes in the course - the continuation of the pipe, its upper lobe.
In order to avoid further condensation, the chimney is wrapped with thermal insulation. When the pipe is just about to be built, materials with good thermal conductivity are used. If you ignore these tips, then in the future you can face such a problem as the accumulation of excess fluid in the chimney.
How to get the pipe through the roof?
When the construction of the stove begins, it is necessary to think about how to bring the pipe through the roof and how to seal the gap between the pipe and the roof. So that in the future there will be no problems, you should adhere to some rules and regulations:
- Everything that is protected from fire should be located near the pipe at a distance of twenty-five centimeters.
- Fireproof systems should be located at a minimum distance of thirty five centimeters from the pipe and the furnace itself.
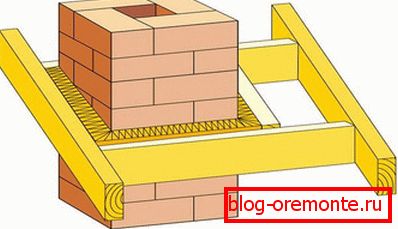
- Among other things, it is particularly necessary to know how to get the pipe through the roof. It is worth remembering that the wooden rafters should be at least 35 centimeters from the pipe.
During the withdrawal of the pipe, many do not want to make a large hole, and try to make it clearly the size of the pipe itself, so that less is spent on its insulation and putty. It is not right. It should be borne in mind that the roofing material should not be too close to the pipe. By generally accepted fire standards there should be a gap.

When deciding how a pipe will be output through the roof, it is necessary to literally designate the place of its output. The following well-known method that can be followed will help in this. You can make a cardboard pipe that will exactly fit the size and shape of your chimney. After, the pipe is lifted up until it rests on the roof. There and indicate the place of its withdrawal. In this case, help is needed, since such an event cannot be done on its own. This method is good for those who plan to make a round pipe, because working with it is much easier.
Technology
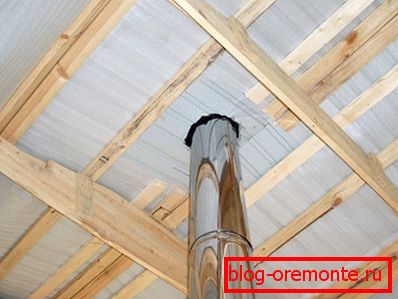
The pipe is brought to the street, but the work has not yet been completed. It still has to close the joints between the pipe
and roof. This operation is necessary so that no water gets into the chimney and does not accumulate there. There are several ways to seal gaps.
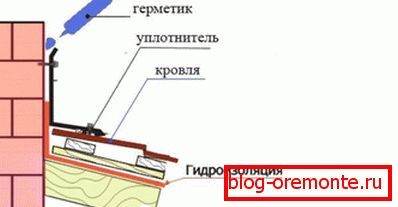
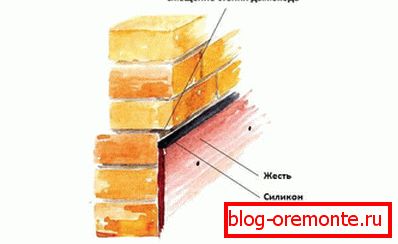
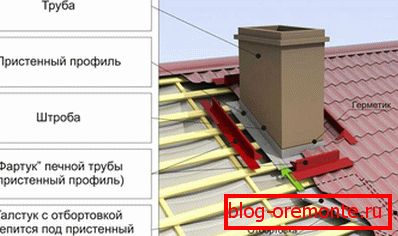
The most common way of arranging a brick chimney is the manufacture of the so-called apron. With the help of connecting bars, which are located in the lower part of the pipe, the main part of the work takes place. On the wall of the chimney make marks, repeating the outlines of the upper edges of the slat. The notched strips are required to be worked by the grinder, forming a strobe depth of approximately 15 mm. Then there is the installation of the apron, with the edge of the strap, bent inward, is put in the gate. The edge of the plate mounted in the groove is treated with a sealant, then the excess parts of the plank are cut off and secured with dowels.
The second stage of eliminating the gap between the pipe and the roof is called a tie. So called waterproofing sheet, which is installed about the same as the apron. Only it is not suitable for all types of roofs and roofs. This type of system is designed for a hip roof. Installing the "tie" is so that the water flowed into the roof drain system without getting into the chimney.

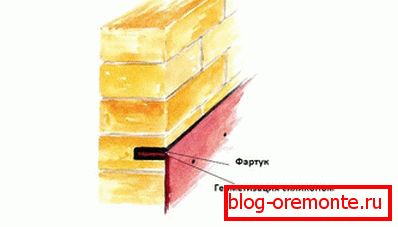
On top of the installed apron and tie, install the roofing material, and on top install an additional external apron - false. It is installed in the same way as the inner one, only the upper planks are screwed to the pipe itself, and not to the gate.
Means and materials

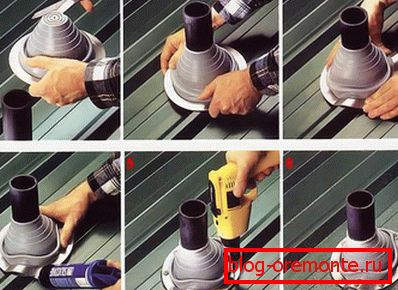
If the pipe is round, then you can not search, than to seal the pipe on the roof, and use the special tool "Master Flash". This is the penetration of the roof to isolate different connections, and it can be used not only to install chimneys, but also to output antennas, ventilation pipes, and more. When using the Master-Flash passage outside resembles a step pyramid.
The penetration may be made of silicone or of a special type of rubber. It is a two-layer, if the top layer is of the above materials, then the bottom layer is aluminum.
Note! If the penetration is made of EPDM rubber, it is allowed to use it in the temperature range from -55 to + 135 ° C, when choosing a model of silicone, the temperature gap is even wider (-74 - + 260 ° C). The sealing of the pipe on the roof with this device can be done with the use of any roofing material.
After all the gaps are sealed, it remains to solve the problem of protecting the roof from water flowing in close proximity to the pipe.
When using conventional methods of pipe removal, it is unrealistic to avoid the leakiness of the joint, therefore, it is necessary to look for what to cover up the pipe on the roof. Small gaps are allowed to be smeared with special silicone-based sealants. When choosing this material, it is necessary to pay attention to its heat resistance, because only heat-resistant sealants are suitable for insulation of furnace tubes.
If the chimney is brick, the owner, as a rule, is not interested in how to sheathe the pipe on the roof, because the brick is hygroscopic, it draws in water and additional protection is not required.
In that case, if the pipe is made of alloy or asbestos cement, you need to make an "umbrella" that will protect against water flowing to the pipe. To facilitate your work, you should make the umbrella patterns on paper in advance. And only then, when all the fittings and the matching patterns fit, cut the parts out of the material. Many make the mistake of cutting out a solid umbrella and cutting it out. Work will be much easier if you cut the two halves. Then these two halves must be tightened and the gaps covered with sealant.
If the work is done incorrectly, the moisture will leak into the attic, which ultimately will lead to decay of the rafters, carrier beams and insulation. When bringing the pipe to the roof, it is important not only to follow the rules, but to adhere to all the recommendations regarding this work.