How to roof a professional flooring
In this article we will tell you how to cover the roof with a professional flooring so that the roof is strong and reliable. Let's start with the characteristics that describe this magnificent roofing material.
Properties
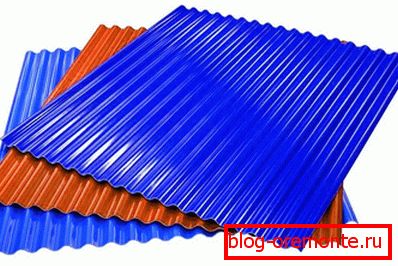
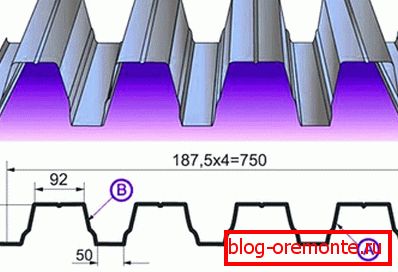
Good quality roofing is the key to long-term operation of the entire building structure. Profiled metal flooring (profiled) is the best suitable for use as a coating for the roof. Sheeting is available in sheets with smooth and trapezoidal protrusions with a wave height of 8 to 75 mm. Due to this structure, maximum sheet stiffness and increased resistance to mechanical loads are achieved.
But since our ecology is not perfect, with the purchase of professional flooring should additionally have the following qualities:
- Galvanized coating - allows to withstand many negative environmental effects - acid precipitation, corrosion and the like.
- Lightness of material - in order not to have a large load on the main structure, you should choose sheets with durability that give maximum protection with a low weight.
- Polymer coating - additional protective layer on the surface of the sheet from the tinned and acidic environment.
Depending on the angle of the roof slope, you need to select the appropriate coverage. Sheeting, unlike other materials, can be laid in case of a 12-degree angle. At the same time, in the presence of an angle of 15 degrees, the sheets are “overlapped” on each other of 200 mm. At 30 degrees from 150 to 200 mm, more than 30 degrees - from 100 to 150 mm. As soon as the choice of material is completed, we calculate the amount of profiled sheeting required.
Calculation of the amount of material
Note! For accurate calculations, first of all, measurements of the roof and all ramps should be carried out inclusively. This should be done twice, the first at the design stage, and the second before the purchase of corrugated flooring and the final changes to the roof structure.
This approach will take into account all changes and purchase the exact amount of material. Once all the data is taken into account, you can start the calculations:
- To calculate the data, a comparison of two diagonal sizes is carried out, on one ramp the discrepancy should not be more than 20 mm. Since corrugated sheets are made with rectangular sheets, too much discrepancy will affect the installation and in the end will have to cut the coals and excess pieces.
- Now it is necessary to clarify the plane of the slopes with the help of a building level with a tensioned cord. This data helps to level the roof slopes for an even installation of corrugated flooring, and if this is not done, bulges or notches can form on the finished surface. During construction, a deviation of 5 mm every 5 meters is allowed, but no more.
- When calculating the size and number of sheets, you should take into account the fact that when you purchase you need to add to the existing size 40 - 50 mm long for mounting the eaves overhang. Now we carry out computational work on the amount of material according to the formula: the length of the eaves divided by the sum of the mounting width of the sheet and the overlap equals the number of sheets.
- There is a second method for determining the number of sheets. For this, the known length of the cornice is divided into size — the width of one sheet without the size of an overlap. The end result is rounded up in a big way, that is, 4.5 will be equal to 5 sheets.
- In the case of a complex shape of the roof, the entire surface should be divided into uniform parts, and for each of them already to calculate the number of sheets of corrugated flooring.
After that, you can buy materials for roofing.
Roof structure
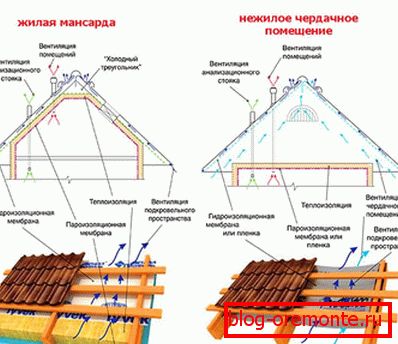
In order for the roof to have a comprehensive protection, you must consider:
- Vapor barrier. The main function is to protect the frame and the inner layers of the roof from moisture penetration from inside the house. To create an airtight layer, a special film is used, which is laid on the inside of the roof onto a frame and fixed with a construction stipler, creating horizontal lines. Seams and damages after installation are sealed with tape in all required places.
- Insulation. Защищающий дом от потери тепла зимой и нагревания внутренней конструкции летом слой, то есть препятствующий процессу свободного теплообмена и появлению конденсата. В зависимости от региона и максимальных температур летом и зимой, подбирают соответствующую толщину слоя, но в среднем специалисты рекомендуют 200 мм. Installation производят в промежуточных местах между стропилами, плотно закрывая все щели и не допуская пропусков.
- Waterproofing. The protecting roofing pie from the ingress of external moisture and the layer supplementing the insulation with its thermal insulating property. Installation is carried out from below - upwards, starting from the eaves and moving towards the ridge, having joints on the rafters with an overlap of 150 mm. Thus, maximum protection against the ingress of snow and rainwater into all the inner layers is achieved.
The amount of materials used is calculated by the above methods. After that, you can proceed to the installation process of corrugated flooring.
Tools and additional materials

For the work will need tools:
- construction stapler;
- electric or manual scissors for cutting corrugated sheets;
- screwdriver or hammer - depending on the type of fasteners, one of the proposed tools will be used;
- roulette;
- building level;
- black and red markers for designations;
- sealant and gun for him;
- drill with a set of drills.
Additional materials:
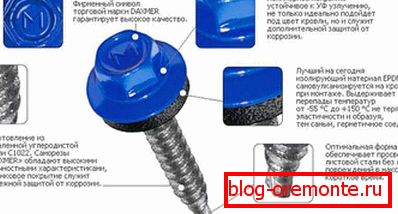
- galvanized self-tapping screws (self-tapping screws) with a sealing washer and a plastic plug;
- seal for sheet joints;
- ridge for the top sheet joints;
- wind strip to protect the walls from rainwater flowing from the roof.
Installation

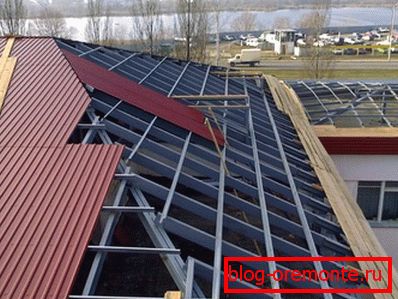
Now consider the question of how to properly cover the roof. As mentioned above, we calculate the angle of inclination, the number of sheets of corrugated sheets and the length of the "overlap". After we install the internal layers of roof protection - vapor barrier, insulation, waterproofing and begin the installation of sheets.
Note! Decking is always laid bottom and up, and the joints are made "overlap", which allows for maximum protection against moisture. The direction of the wind prevailing in this region is also taken into account and sheets are arranged against its direction. Thanks to this structure, decking never breaks during a storm and the water will not get inside after rain or snow melt.
To do this, set the first sheet, aligning the eaves with the retreat of the desired distance for the formation of the overhang of the roof. It is fixed with one screw in the center, in order to be able to adjust the angle of inclination. In the same way mount the second sheet, but at the same time create an "overlap" on the edge of the first.

After receiving the installation of the first row in this way, all the sheets are aligned horizontally relative to the eaves. After that, they are interconnected in the skate area with a step through each second wave. And in the end, after all the checks and alignments make final consolidation. It should be borne in mind that the screws used in no case should not be bent or installed at different angles, that is, they are all installed exactly at 90 degrees relative to the sheet of professional flooring.

Screws are installed in this order:
- through each step of the batten in a vertical line;
- in each horizontal deflection;
- starting from the end, the sheet is strengthened by the step of the batten;
- on the eaves and at the ridge, the screws are placed in each deflection of the corrugated board.
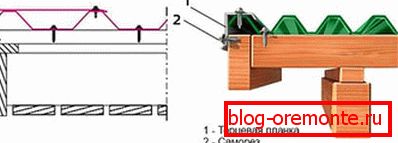
Note! After installing the last sheet, cut off the excess, set the end plate and fix the roof ridge with an overlap of 100 mm and with a step of more than 300 mm. All compounds, if necessary, are treated with a sealant and install a sealant.
Thus, a single or double gable roof, covered with profiled sheets, is created. Get to work and very soon your home will look completely different. Come back to us and write about your work experience. We’ll be interested to know how useful the article was for you.
Video
Watch the video about the installation of the roof of corrugated:
Analysis of errors when installing corrugated: