How to make sloping windows in the attic
The device attic floor allows you to increase the living space of the house. Here you can equip a cozy bedroom or children's room. You can get maximum natural lighting by installing sloping windows that are not mounted in the wall opening, but in the roof slope. This design provides more opportunities for ventilation and increases the level of illumination by 40%. Understanding how to make the beveled windows in the attic, you will understand that such a job is homemade.
Attic windows
The shape and size of window designs is chosen according to the interior design. Their number is calculated by the floor space.
Note! Vertical attic windows have no differences in the manufacture, opening system and installation of light-transmitting structures on other floors. They are easier to install, but because of the slopes protruding, the vertical windows let in not enough sunlight.
Sloped windows are placed flush with the roof slope. This arrangement allows you to fully use the daylight and make room for the arrangement of furniture. The window sizes are selected based on the functional purpose of the room, a small window will fit in the bathroom, and a large area window structure will be installed in the children's room.

The width of the window opening is affected by the distance between the rafters. The height of placement is determined by the angle of the slope, with its small value, high windows will be required. Of these, there should be a good view, regardless of whether the person is in a position: sitting or standing. The optimal device is the window at 130 cm, but if the rotary knob is on top, it is better to lower the structure to 1 meter.
Features of sloping windows

For windows located on the slope of the roof, strength and tightness are important. They experience an increased load of precipitation in the form of rain, snow and hail. The window frame is made of aluminum, PVC and durable wood grades. Deaf windows are not common, so they are made to order.
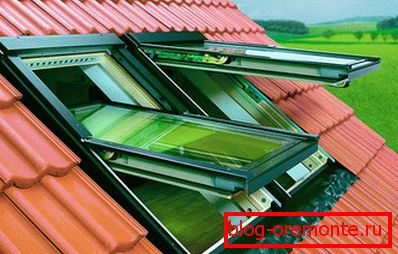
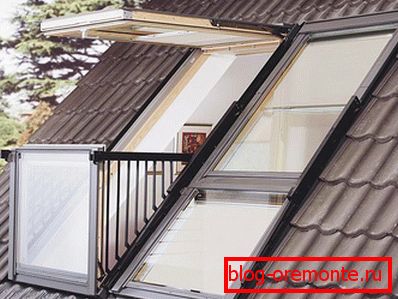
- The design of the balcony type consists of two elements - inclined and vertical. It is installed instead of the balcony door. Parts open in different directions: vertical to the side, and beveled rises up.
- Constructions of a classical rectangular shape - the most demanded option. They consist of a frame and a swing gate.
- The inclined window may include a fixed element, which is located under the sash, and an extension mounted on top. This detail is made as a decorative ornament, it can be round or triangular in shape.
- The eaves window resembles a balcony-type construction; it also has two parts, each of which opens separately.
Ways of opening inclined windows:
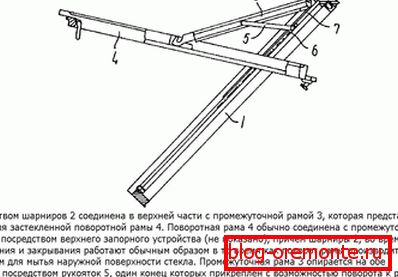
- rotation on the central axis, providing rotation by 180 degrees;
- on the offset axis, located in 1/3 from the top of the structure;
- side opening;
- combination of offset and central axis;
- turn on the lower axis, used exclusively for balcony models.
The window opening system can be automated and use the remote control. Fastening the sash, made on the friction hinges, allows you to rotate it around its axis and fix in the desired position.
Window device
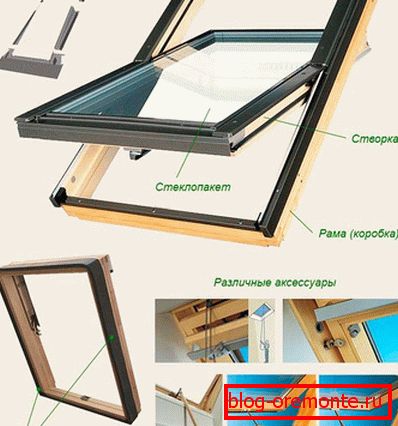
The sloping window includes the following parts: frame, glass and fittings. Included for its installation are necessary: waterproofing, salary, drainage chute, hermetic gaskets, internal slopes.
Tools: level and tape measure, saw, stapler, construction knife, saw.
Installing Bevelled Windows

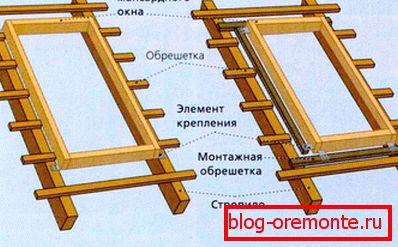
Choose a place for the window, given that between it and the rafters should remain 5? 6 cm. Determine the installation height by the angle of the slope. The location of the window should provide enough light. After analyzing all the nuances, make the layout of the window structure.
- Consistently sawing and cutting, disassemble the crate and roofing pie. When cutting waterproofing, leave a margin of 20 cm and wrap it inside. To facilitate installation, it is possible to separate the sash from the frame and simply fix it after installation.
- At the bottom of the resulting opening, nail the assembly bar 5 cm thick, putting it on a horizontal level.
- The lower part of the left waterproofing film is attached to the beam with a stapler. The upper part is fixed on the crate, and the side folds out.
- The manufacturer’s instructions indicate the procedure for mounting the brackets and specify the marks by which the depth of landing is determined. It depends on the type of roof. Along the perimeter of the frame fit insulation and fastened with a stapler.
- The frame is inserted into the opening and with the help of brackets is fixed to the beam and crate. She densely presses the laid heater. The plane of the window is controlled by level. Fastening is made by screws. The upper brackets are screwed loosely to make the necessary adjustment after inserting the sash.
- The flap is inserted and checked for the absence of distortions. Tighten the top mount. The edges of the waterproofing are fixed on the frame.
- A drainage chute is installed above the frame for draining water.
- All parts of the waterproofing apron are installed, its upper side is installed under the drainage chute.
- Mounted protective salary. All its parts are tightly screwed to the crate and frame. Work begins at the bottom. Pads on the window are attached after the remaining parts.
- Installed internal slopes. They need to be warmed.

Reliable and properly installed windows on the roof deck will provide excellent lighting and waterproofing of the room.
Video
Watch the educational film on installing Roto roof windows:
This video shows how to prepare the window opening: