How to make a weather vane out of wood with your own hands -
Weather vane is a device that is installed on the roofs of houses and is used to determine the direction and strength of the wind. It was originally used by meteorologists, but now that more reliable and accurate methods have emerged for this, it has become an element of decor that emphasizes the personality and style of the owners. You can buy a beautiful and original weather vane in the store or order a model with an individual design from a master. In this article we will explain how to make this useful device with your own hands from wood and other improvised materials.
Device
The weather vane is a simple meteorological device with which it is easy to determine where the wind is blowing. It is installed on the ridge of the roof or on the tip of the pipe and serves as an amusing decoration, which also has practical application. The design of this device includes the following elements:
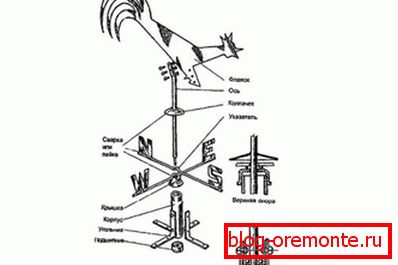
- Housing The body or glass is the part of the weather vane into which the axis is inserted and the wind rose is fixed. With the help of struts, it is fixed on the ridge of the roof. To make a case with their own hands they use a pipe section, sometimes a bearing is placed in it to facilitate the rotation of the axis.
- Axis. The axis of rotation is the element by which the vane rotates. It is made of reinforced twigs, sticks or other materials.
- Cap. A small detail in the form of a funnel or a circle with a hole in the middle is called a cap. It is attached to the axis of rotation of the vane and serves as a limiter and protection for the body from moisture penetration.
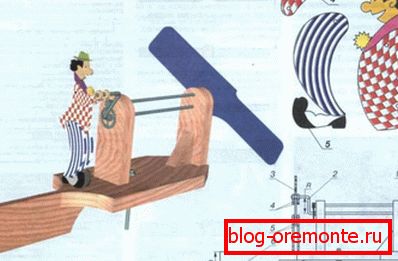
- Flyugarka. The flag is attached to the axis of rotation, it is driven by the flow of wind and indicates its direction. The pointing part of the fly-gun is called the arrow, and the opposite is the counterweight. Experienced masters can make this detail in the form of an animal or a whole picture of the plot, while for work they do not need drawings, it is enough to show the photo you like. The hands can make flyugarku of wood or plastic.
- Rose of Wind. The wind rose is called the index of the sides of the world, it consists of two twigs crossed at right angles with letters or color designations, by which one can understand where there is north, south, west and east. In order to properly make a wind rose with your own hands, you need to orient compass pointers when installing.

Note! If you have visited seaside cities, you probably noticed that almost every house there is crowned with an intricate weather vane in the form of animals, plants, or even entire plots. It may reflect the occupation of the homeowners, the family coat of arms. At all times, people believed that the weather vane scares away evil spirits and protects from the evil eye. If you do not take into account superstition, the weather vane, made with your own hands, perfectly frightens the birds away.
Independent production
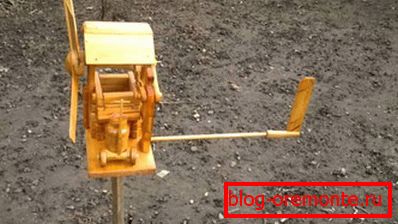
Vane simple design is easy to do with your own hands from scrap materials, using galvanized steel, plywood, plastic bottles, or even unnecessary wheels. The advantage of this method is that this product looks unique and does not require large expenditures. Spending a weekend in the country, this venture can be turned into a joint entertainment for children and adults. To make a weather vane with your own hands, trimming building materials will be useful, for example, thin plywood. In addition, you will need a long nail or screw, a wooden bar, 3 large flat beads, a handsaw, a pencil, glue and a marker. The manufacturing process is as follows:
- Print or make a pattern of the details of the weather vane on paper. We suggest choosing a model in the form of a simplified airplane from three triangles of different sizes.

- Transfer the pattern to thin plywood with a marker and carefully cut out the details of the workpiece with a hacksaw or jigsaw. In the middle of the middle and small triangles make cut-outs so that you can connect the individual parts of the aircraft. Make a hole exactly in the middle of a large part.
- Prepare a wooden block 50x50 mm or 100x100 m. It is needed to make the base of the weather vane. Drill a hole in the middle of the bar, corresponding to the diameter of the prepared nail.
- Assemble the air vane from plywood blanks. The triangle of the largest size will be the fuselage; a medium-sized triangle, which depicts the tail of the aircraft, is put on and glued to the middle of the base of this part. A small triangle is inserted at the corner of the fuselage, it plays the role of the nose.
- A nail or screw is put on one bead, then a wind vane in the form of an airplane, and then the remaining two beads. A nail or screw is hammered into a prepared bar. After that, it remains only to install a weather vane on the ridge of the roofs.
Important! Wood is not the most durable material for the manufacture of a weather vane, it darkens, becomes covered with mold, and then collapses from constant exposure to moisture. In order to make an eye-catcher enjoy the eye longer, you need to cover the plywood with paint or varnish. This measure will preserve the appearance of the weather vane and make it more visible.

Installation of weather vane
After you have made a weather vane with your own hands, you need to fix it on the roof. So that he correctly determines the direction of the wind, and does not serve as a useless decoration, you should follow these rules:
- The weather vane is installed on the highest point of the roof - a ridge, a chimney or ventilation pipe. You can fix it on the roof of the house, gazebos, greenhouses. If you want the vane to correctly indicate the direction of the wind, then set the device to a height of 4-5 meters.
- In the building stores sold special mounts for the weather vane. They are corners for fixing on the ridge of the roof. More expensive models are equipped with special screws, with which you can adjust the position of the vane, to make it exactly vertical.
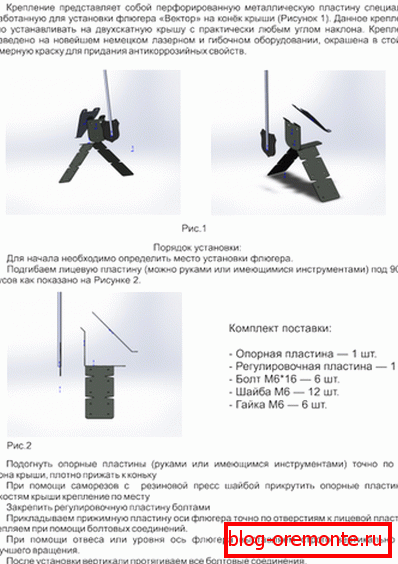
- In order to position the vane strictly vertically, which is very important for correct determination of the cardinal points, check the position of the device using the building level.
- The wind rose, indicating the directions of the world, is fixed and guided by a compass. If you are not able to work with a compass, then use a mobile phone or a navigator, on the maps of which it is always indicated where it is north and south.
- With a non-rigid mounting vane, rotating, creates noise and vibrates, so screw the screws to the end. So that strong gusts of wind do not break the wind vane, strengthen the mount with struts.

Note! So that the weather vane shows not only the wind direction, but also the force, they make a special suspension. It is cut from a sheet of metal, foam or thin plywood in the form of a small rectangle. On the one hand, the blanks make a hole, insert a thread into it, and then hang the flygars on the arrow. When the wind blows, the suspension deviates, showing how strong the gust is.