How to make a truss system
Building a new house is a difficult and complicated process. This is especially true of the design and installation of a gable roof, which should protect residents from rain and snow. Thanks to modern technology, the installation of many parts and structural components of the building can be performed independently, without hiring a team of specialized workers. When home owners decide to do the installation of the truss system with their own hands, you should learn about all the nuances, as a properly installed roof saves time and money.
What it consists of
Everyone knows that the gable roof has the shape of a triangle, consisting of two rectangular halves equally spaced at each other, fixed by the truss system from the inside. Consequently, the effect of natural and autonomous cleaning of the surface under the influence of gravity from rain, snow, hail, leaves and dirt without the participation of external forces is created. Before you make a truss system, you should know its basic structural components.
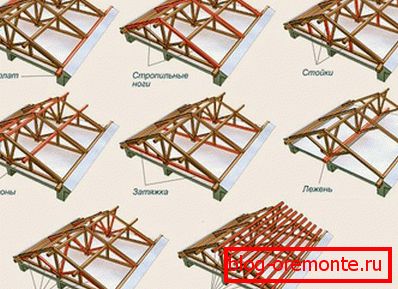
The rafter system consists of several components:
- Reward - timber with a cross section of 100–150 mm, mounted on the supporting walls around the perimeter of the building to distribute the load created by the truss system.
- Kone - a beam connecting all truss legs along one line together at the very top of the roof to maintain structural stability and stability during strong wind loads.
- Rafter legs - timber or board with a cross section of 100–150 mm, which is installed at an angle to the mauerlat, creating an isosceles triangle shape. In this way, the entire load transmitted from the roof and the whole structure is evenly distributed to the power plate and the load-bearing walls. Depending on the weight of the roofing material, the rafter legs are set 60–120 mm apart.
- Sves - protruding from the wall by 400 mm part of the structure to create a outlet from the walls of rain or melt water.
- Sill - beam with a section of 100-150 mm, which is at the level of the mauerlat parallel to the ridge to create additional support for the weight transferred to it from the roof pillars.
- Подкосы - Tightening to form a solid structure for large spans.
- Mares - boards that are installed as a continuation of the rafters for the formation of a roof slope in the case of short truss legs.
- Racks - a bar with a section of 100–150 mm located in a vertical position between the inner walls or lying and the junction of the ridge with the rafter legs, for transmission and distribution of the entire mass of the structure.
- Tightening - the lower beam - the crossbeam connecting the two lower ends of the rafter legs to prevent the entire structure from moving apart.
- Obesity - boards or bars to strengthen the truss system and install the roofing pie.
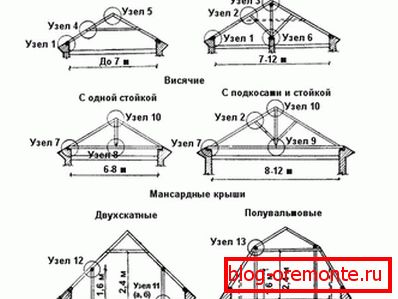
Depending on the presence or absence of some elements of the structure, there are two types of roof systems - these are hanging and napsled rafters, as well as their combination.
- Hanging rafters - set when the height of the external walls is less than 10 meters with a decent thickness and with no internal walls-partitions. This kind of design should be complemented by tightening at the base of the rafters.
- Suspended rafters - installed with a height of external walls of more than 10 meters with the presence of internal column supports, which are placed on the ground or support beam.
When you have chosen the type of truss system, you can proceed to the calculations.
Dimensioning
To properly calculate the size and shape of the roof should follow certain rules.
Note! Any gable roof should have an angle of 5 to 90 degrees, otherwise the installation will be very difficult and with further problems during the operation of the house.
In the case of frequent and heavy rainfall in the area of construction, you can create a sloping roof, where the upper part has a gentle slope, and the lower with a sharp slope. During the choice of the angle you also need to think about the wind speed - the sharper the angle of the roof, the more it will look like a ship's sail. Thus, it is necessary to select the average size and height of the rafters, taking into account all the factors of the weather and the mass of the roofing pie.
Find the area of one slope of the roof:
Ramp area = Ramp length multiplied by the width of the ramp
Wherein:
Slope width = Wall length + Protrusion length multiplied by 2
The height of the slope in this case is equal to the length of the rafters.
The number of rafters will be calculated by the formula:
The number of rafter legs is equal to double the width of the slope, divided by the step between the rafters.
Now we calculate the permissible load:
The weight of the roof is equal to the sum of the weight of all layers of the roof per 1 square meter. It is also necessary to add 10% of the resulting figure.
To this value, we add the load from the impact of environmental factors and the angle of inclination of the roof. Depending on these data, you should select the material to create a truss system.
Installation
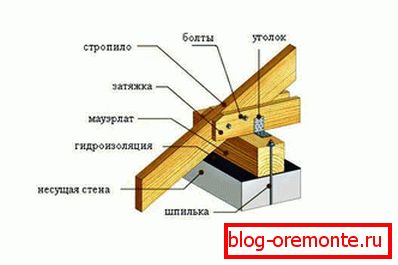
In the case of concrete or brick walls, installation of a power plate is carried out. If the structure consists of logs or logs, then the top of the wall will play the role of a power plate.

Metal rods are mounted on the concrete or brick construction to the top with a step of 1–1.3 m with a transverse diameter of 1 cm and with carved threads on them, and after their full installation, the power plate is placed on top. You should also create a waterproofing layer between the mauerlat and the wall to prevent the ingress of moisture and water. Walls of foam concrete blocks in the joints need to be further reinforced and filled with concrete of 200–300 mm.
For construction with a decent margin of safety use mauerlat in the form of a bar with a cross section of 150 mm. It is installed on threaded rods in the area of the upper edge of the walls (a special channel for the Mauerlat) on the waterproofing layer. For long truss legs with a huge mass, you can install additional support with an emphasis on the sun.
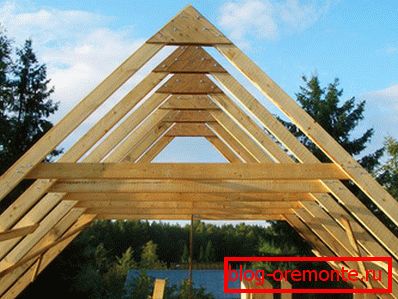
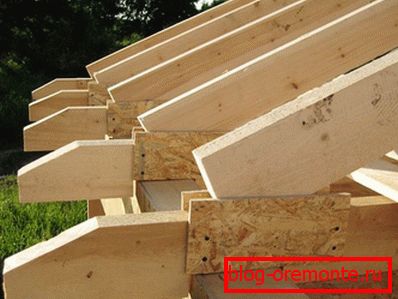
Now you can proceed to the installation of truss legs with a combination of nylon and hanging systems. To do this, take beams with dimensions of about 50–70 x 150-170 x 6000 — In9000 mm and make the initial template of one rafter foot, along which the remaining rafters will be created later.
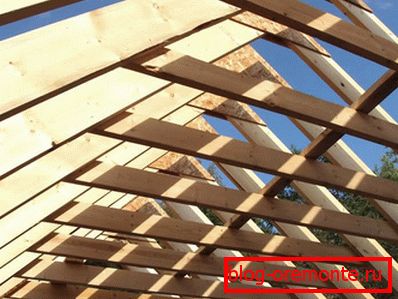
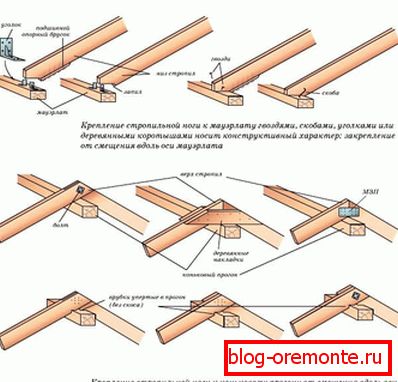
Once the required number of trusses has been received, the installation of rafters on the power plate can begin. Additionally connect with ridge beam nails and with the beam overlap screws. In case of installation of the nylon system, it is necessary to install the supports under the rafters with the step previously determined at the design stage. Upon completion, the rafters are connected to the ridge at the top of the beams using brackets, bolts or metal corners.
Now it is necessary to give the rigidity of the structure by installing the lower tightening and upper bolts. If in the area of residence there are often strong winds and storms, the roof can be strengthened with diagonal ties using simple boards.
After this, the batten is installed on the horizon and the roofing pie is installed. For crates use dry timber without cracks and knots, which begin to install near the ridge with the direction from top to bottom. So installation of both sides is carried out to obtain good surface hardness.
Thus, a truss system of the roof of a garage or a small building is created without the involvement of a team of specialists and with a considerable saving of money.
Video
We recommend to watch the video about the installation of the truss system of a wooden house: