How to make a shed roof of corrugated do-it-yourselfers -
Having lived around in a private house or in a country house, homeowners, over time, construct household buildings for various purposes. Barns are built for storing tools and equipment, picturesque pavilions are being arranged for rest, and garages or carports for car maintenance. For the construction of these buildings is impractical to hire professional workers, it is better to do the installation work with your own hands. This article will tell you what elements a single-pitch roofing system consists of corrugated flooring, how to choose a slope, do the calculation and do-it-yourself installation.
Design features
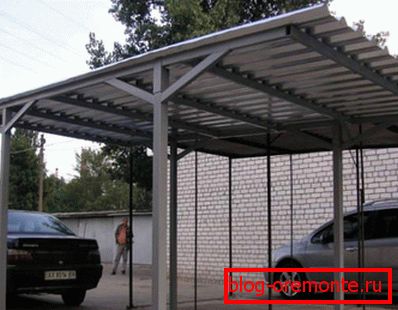
The single-pitch roof from a professional leaf is an excellent variant of a roofing structure, which is used both for detached structures and for economic extensions. It is an affordable and inexpensive way to do it yourself, which does not require special skills. Installation of shed blood has the following features:
- Permissible bias. A sloping roof is given a slope within 20-25 degrees, since the construction of the profiled sheet, the slope of which is less than the specified values will cause accumulation on the surface of the snow cap, which exerts a heavy load on the roofing material and roof frame. An angle of more than 25 degrees increases the windage of the roof from the side of the ridge, which leads to the breaking of the covering from the slope in windy weather.
- Efficiency. Shed construction requires less roofing material, so the installation of such roofs is more profitable than the installation of dvukhskatnyh, chetyrekhskatnyh and tent. Consider, the smaller the slope of the roof, the smaller the area of the slope. For a canopy or extension, protected from the wind on the one hand, you can make a roof, the angle of which does not exceed 10-15 degrees.
- Easy to assemble. During the construction of a shed roof, even a novice wizard will not encounter difficulties, so installation is often done by hand. Calculation and creation of the roof project is also done independently.
Note! Profiled - versatile material, produced by stamping sheet metal. It is covered with paint or a special polymer coating that protects against corrosion. The permitted slope of the roofs for the flooring of this coating is 12-60 degrees. If the angle of the slope is less than 12 degrees, the installation is done by sealing the joints between the sheets with a thiokol sealant.
Project creation
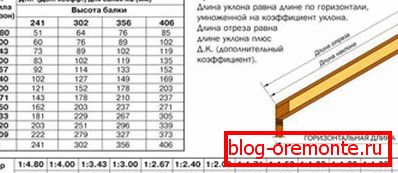
Installation of shed roof start with the creation of the project and schemes based on simple engineering calculations. Using trigonometric formulas, the calculation is performed, determining the angle of the slopes, the difference in height of the pillars and the area of the roof. Calculations can be done by hand or enter the source data in a special calculator program that will perform the calculation automatically. To determine the parameters of a shed roof use the following formulas:
- The calculation of the difference between the height of the support posts is performed according to the formula: Lbc = Lcd x tg A, where Lcd is the length of the wall of the house, gazebo or roof, and tgА is the angle of inclination of the roof slope.
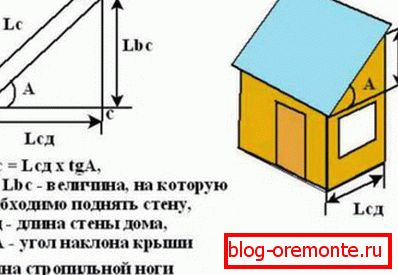
- The length of the truss foot is calculated by the formula: Lc = Lbc x sin A, where Lbc is the difference between the length of the supporting posts of the frame, and sin A is the angle of the roof slope relative to the base.
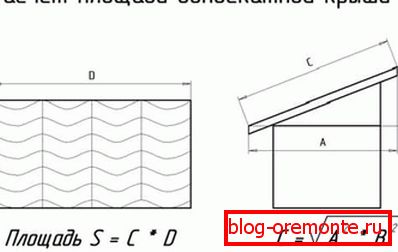
- The calculation of the area of the slope is made according to the formula: S = C x D, where C is the width of the slope of the roof, taking into account the overhang, and D is the length of the slope.
- The angle between the slope and the base of the roof is determined by the formula A = Lbc / Lc, where Lbc is the difference between the height of the roof supports and the length of the truss foot.
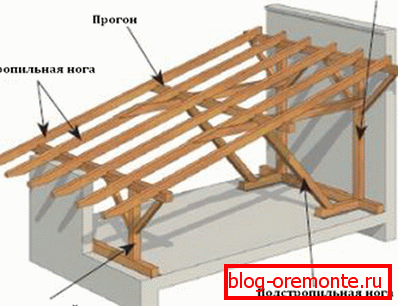
Important! The trusses of a single-pitch roof made of corrugated sheets in the frontal projection are a right triangle, the hypotenuse of which is a truss leg. Installation of a shed roof with a hanging truss system is possible if the width of the structure does not exceed 6 m, for larger buildings an internal main wall or column is required.
The result of the calculation of the parameters of the single-pitch roof is a plan diagram, which reflects the calculated slope of the slope, the length of the rafter legs, the step between them and the dimensions that the calculation determined.
Assembly
Having the scheme of a shed roof, you can easily assemble a shed roof of corrugated board with your own hands. This will require a hacksaw for metal and wood, a drill, a screwdriver, a marker and a measuring rod, a construction stapler and fasteners. It is necessary to purchase sawn timber for the truss frame, waterproofing film and professional flooring of the desired color and relief in advance. The technology of performing installation works with your own hands is as follows:
- First of all, the construction site is cleared, cleared of debris, stones and sticks, level the surface of the earth with sand or soil. Filled with a columnar or strip foundation.
- After solidification of the foundation assemble the frame structure. First of all, the lower trim is laid, then the support legs are installed, controlling that the difference between their length corresponds to the calculated slope of the slope.
- Make a piece truss legs, trying on the top trim and making it notch for fixation. The rest of the rafters are made from the boards of 50x150 mm in size. With the help of metal corners, they are attached to the top trim of the building framework.
- The waterproofing material is laid on the truss legs with stripes, making an overlap of 10-15 cm so that no water penetrates the seams. The waterproofing layer is fixed on the rafters with a construction stapler.

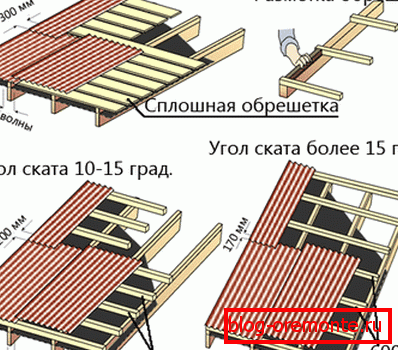
- A counter-crate of 25x50 mm wooden slats is nailed on top of the waterproofing along the rafter legs. It is necessary for the organization of the ventilation gap between the crate and the truss frame.
- The crate is made of 50x150 mm planks, they are nailed in 10-15 cm increments. A continuous coating of moisture resistant plywood is sometimes used as a crate.
- Roofing material is laid on the crate. Decking is recommended to be laid, starting from the lower right corner, observing an overlap between the sheets of 10-15 cm. For mounting use roofing screws, equipped with a press washer, which closes the hole for a better waterproofing.
- After installing the roofing material, the roof is equipped with a gutter, eaves and wind board. After completion of work, be sure to check the tightness of the connecting joints.
Important! At installation of a professional flooring it is necessary to calculate correctly the necessary number of self-tapping screws. Do not place fasteners too often, as the moisture penetrating into them leads to corrosion, destroying the coating. If the screws are too rare, decking can "clap" in windy weather, making loud noises.