How to make a roof slope with their own hands - calculation
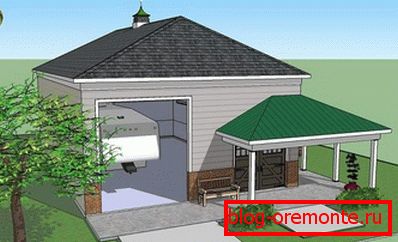
Central Russia, rich in coniferous and deciduous forests, is considered the cradle of wooden construction. The traditional dwelling, chopped pyatistyonok, was built of wood, and this elegant, spacious tower was crowned with a slop roof. Driving along the roads of our country, plastered on both sides of small villages, note that the roof of most houses is of this type.
Despite the ancient history and tradition, the triangular roof for a private house looks modern and stylish, so architects use it in the most ambitious design projects. Applying modern, functional materials to the construction of the knowledge of ancient architects, an accurate calculation they achieve a stunning look, distinctive and unique. In this article you will find all the necessary information for its design and construction.


Design features
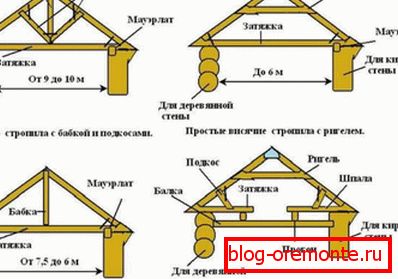
The design of the roof slope of the house is somewhat more complicated than the dual slope. The main difficulty is that at one point three elements are connected - two stitched truss legs and a ridge girder. Make this connection with your own hands right - fine work, which only a high-level professional who can perform an exact calculation can do. The roof consists of the following elements, which demonstrates the scheme:

- Roof slopes. One of them, frontal, has the shape of an equilateral triangle, the other two are trapeziums. The angle of inclination forms the frame, which consists of ordinary and slant rafters, ladies and auxiliary supporting elements of the triangular roof. To determine the angle of inclination of the ramps, the calculation is made or recommendations of the manufacturer of the roofing material are used.
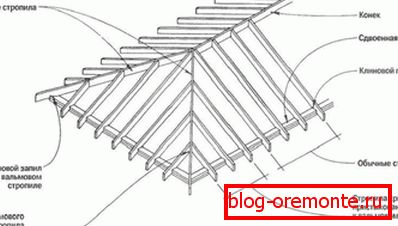
- Rafter legs. Smooth, durable boards, installed with a thin edge for greater rigidity, on one side they rest on the mauerlat, and on the other on the ridge girder. Three types of rafters are used in the device of the triangular roof: privates, bridges and diagonal. The diagonal form the hip, and the rank and file and the barnes support trapezoidal rays. Diagonal ones, also called “planes”, carry an increased load, therefore, for making them with their own hands, they use boards with a cross section that is more than twice as ordinary rafters, or simply spliced them.
- Crate. Boards, fixed perpendicular to the rafter legs in rows, are a support for the laying of roofing material. For installation of sheathing, unedged boards or sheets of moisture-resistant plywood are used. Lattice crate is used for metal, corrugated, and solid for roll materials and soft roofs.
- Mauerlat Supporting beam used as a base for fixing truss feet. He distributes the weight of the roof structure to the bearing partitions and redirects it to the foundation of the house.
- Fad. The junction of rafter legs, the highest point of the roof, its peak.
- Crossing skates, they form endov, razlichkovki.
- Overhangs The protruding parts of the roof, formed by rafter legs or filly, they protect the walls of the house from moisture and wind. In order for them to effectively carry out the tasks entrusted to them, their length must be 40-50 cm and more. According to the location distinguish eaves and gable overhangs.
- Gutter drain. One of the elements of the roof drainage system, it provides water drainage from the roof.
- Water intake funnels. Collect water precipitation and direct it down the drain system.
- Drainpipe. It transports rainwater to storm sewers.
The roof, consisting of 3 skates, is difficult to design, laborious in construction, so the beginner builder cannot do it with his own hands, if with the help of a highly qualified roofing master who will undertake the design and calculation.
The composition of the truss system
Rafter roof system включает в себя элементы вальмовой и двухскатной. Они соединяются между собой и, взаимодействуя, распределяют между собой немалый вес трех скатов. В ее состав входят:

- Mauerlat As already mentioned, this is a timber with a section of 100x100 mm or 150x150 mm, which acts as a support for attaching rafter legs. It is located on the external support walls of the house.
- Sill. A beam of the same section as the mauerlat, performing the same functions, only its location is the internal bearing partition, which is used to install the vertical pillars of an inclined roof system.
- Ridge run. A bar that is installed at the junction of rafter legs. He relies on the pillars.
- Podkonykovye rack. Vertical supports made of timber, supporting the ridge roof ridge, transferring its weight to the supporting internal wall, that is, ultimately, to the foundation.
- Ordinary truss legs. Boards with a section of 50x150 mm, supporting trapezoid roofs. In the upper part they are attached to the ridge girder, and the lower part to the power plate.
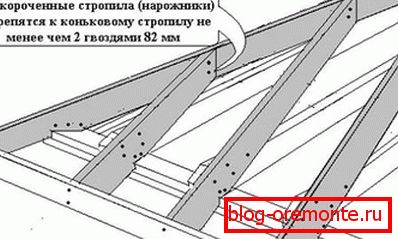
- Narozhniki. Or, as they are called semi-legs, they have a different length, increasing with distance from the hip. Their upper part is fixed to the diagonal rafters, and not to the ridge girder.
- Diagonal rafter. Two truss legs, which depart from the ridge to the two corners of the house, in which the sloping roof settles. They form the hip slope and are longer than the rank and file. Therefore, they need to be made from boards of a larger section.
- Sprengel farms. The supporting elements of a triangular shape for the diagonal rafters of the triangular roof. They are mounted if the length of the rafters is too long, then when they sag. Their need determines the calculation of the load on the diagonal rafter.
- The struts. Props, located at an angle of 45 degrees, supporting rafter legs, protecting them under the deflection.
Rafter roof system насчитывает большое количество частей. Чем больше площадь, которую предстоит перекрыть, тем больше вводят вспомогательных элементов для обеспечения жесткости конструкции, тем сложнее ее устройство. Учтите, при этом подкровельное помещение загромождается всевозможными опорами, которые снижают возможность его использования в качестве жилого.
Types of roof systems
The different layouts of the building under construction allow the use of one of two types of roof systems, differing in the number of supports used:
- Hanging. It is used in the event that inside the house is not provided for the bearing wall. In the absence of support in the middle, the rafter legs rest only on the outer walls, exerting a strong tearing load on them. Therefore, to stabilize the system, numerous auxiliary elements are introduced that make the construction of the roof heavier. The hanging system is difficult to do it yourself.
- Outrageous If inside the building there is a supporting capital wall, it can be used as an additional support for the rafters or ridge girder. Lezhine is laid on it, stands are supported against it, which support the ridge. The device on the slant truss system is possible if there are two internal supports.

Experienced roofers recommend to give preference to exactly the sloping truss roof system, as it is more reliable and stable, it is easier to calculate and design. The frame of the roof is made with their own hands from metal or wood. If the choice fell on metal supports, it is better to use the corners. But most often supporting elements are made of wood, so it is cheaper, affordable material.
Construction process
To build a sloping roof with your own hands, you need to purchase the necessary lumber, roofing material, waterproofing film, fasteners, insulation and vapor barrier membrane. All wooden elements are treated with antiseptic compounds and fire retardants to reduce the risk of fire and wood damage. Installation is carried out according to the following plan:
- Install the power plate. If the house is built of gas silicate or brick, then along the upper edge of the walls, on which the slopes will build, they will create a reinforced concrete belt, a screed, into which metal studs are fastened for fastening the power plate. In a wooden house, the support bar is fixed to the anchor bolts, and in some cases its role is played by the upper crown of the log house. A waterproofing layer, for example, a ruberoid folded in two, must be laid between the wall and the power plate. Attachment studs are placed between the tie-in trusses. Like a mauerlat, they fix the bed.

- Install podskie rack. The most important thing in this case is to ensure that they are perpendicular to the ground position. Therefore, as long as they are not pulled together with a ridge bar, they are reinforced with temporary struts. And during installation several times check the angle on the construction level. On the upper parts of the racks mounted ridge girder on metal corners or nails.
- Laying ordinary truss legs. First, make a rafter pattern, mark it bitten under the mauerlat, and then cut all the others on the pattern. Fix the first and last truss pair, stretch the thread between them, on which the rest of the legs are aligned and set. If the length of the rafters is more than 4.5 m, then they are supported by struts extending from the stand at an angle of 45 degrees. The step between the ordinary rafters determines the calculation of the load.
- Install diagonal rafters. This is the most difficult moment to build a triangular roof. The upper part of the diagonal rafters is connected to the ridge, and the lower ones are attached to the ends of the gable gablet. Between them lay inline rafters forming the hip. Usually it is enough to have 3 legs with a pitch of 60-90 cm, however, if a window is planned to be inserted, then an additional rafter is introduced to support it.
- Attachment rafters are attached to the diagonal truss feet using nails or metal corners. At the bottom of the scoop do gash for attaching to the mauerlat.
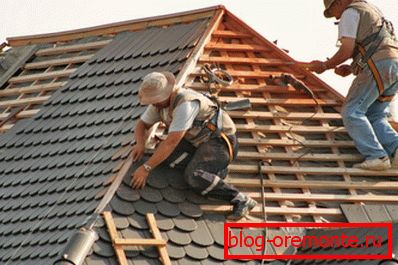
- Fillets are nailed, fastened with their eaves, install wind boards, fastenings under the gutter drain. Sheath cornices decorative material.
Flooring roofing material
Before covering the roof slope roofing material, carry out its waterproofing. On the surface of the earth stretch a roll of film, cut it into strips. Then they are fixed horizontally on rafters with the help of a construction stapler, having an overlap of 10-15 cm. A counter-crate is made of thin batten and the crate is mounted on top of waterproofing. For metal and corrugated flooring, fit the grid pattern of the batten, and for a soft roof, only solid.
The flooring of the roofing material starts from the bottom, arranging sheets or cuts so that they find each other at the joints by 10 cm. All joints and corners between the slopes are treated with silicone-based sealant. Fasteners use only the one that came with roofing material. Usually it is a special nails or screws made of galvanized metal, equipped with a rubber hat. When tightening, such a cap flattens out to protect the hole from moisture, so that the roof will not leak.
The three-pitch roof is not only an aesthetic, but also a functional solution for roof arrangement, the costs of which pay off with a long service life and a high degree of protection against wind and precipitation!