How to make a roof roof
Roofing is one of the most difficult and important stages in the construction of any home. The implementation of this task should be treated as responsibly as possible. It should be understood that some works are not particularly complex and can be performed independently, and the solution of other tasks requires the use of special tools and knowledge, and therefore they are best left to professionals. Whatever it was, but if you need to familiarize yourself with how to make a roof end, you should definitely understand the process.
general description
Endova is the element of the roof, which is formed by the closing of the roof slopes, which has a complex structure. This is the inner corner between two adjacent slopes. Its main purpose is to divert water from the roof area.
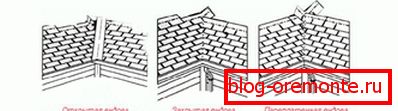
Andov крыши по своему типу может быть трёх основных видов:
- open valley,
- closed valley,
- interlaced endova.

The main difference between the types is how exactly the ramps adjoin each other. In a closed-end valley, intersecting ramps are in contact with each other, butt joint, forming a gutter. Interlaced will be considered endova, where roofing panels are intertwined with each other (most often this can be when using as a roofing material bitumen tiles or other types of soft roofing). As for the open endova, in this case, the ramps do not touch each other at all. This should be taken into account at the time of installation of the truss system. The distance between the slopes is closed by a special chute, over which the water will flow.

Assembly process
Then you can proceed to the description of the installation process. In order to understand how to make a valley correctly, it is necessary to learn that the key to success of any business is in thorough preparation and rigorous implementation of all necessary actions. Therefore, all work is best divided into several stages and perform them consistently.
Mounting the grid
It is necessary to start the formation of the endova roofs from the device of the corresponding batten.
Note! At the points where skates converge, it is necessary to make a continuous crate, that is, the distance between its elements should not be greater than the width of the elements themselves. This is done because it is on the valley that the maximum mechanical loads from water and snow will fall. In addition, you need to understand that this approach will ensure the highest quality waterproofing of this section of the roof.
Laying waterproofing

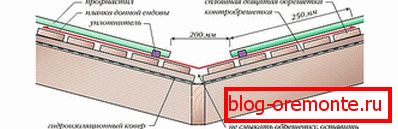
After the crate is made, it is necessary to lay a layer of waterproofing material. At first glance it will seem that you can do without it, as, for example, in the case of interlaced endowa, when the roofing material covers the angle formed by the slopes. But you should not neglect waterproofing. As mentioned above, the endova accounts for most of the loads, and water flows there, so that even a minor leakage in this place can cause the rafter system to begin to break down.
Virtually any available rolled material can be used as a waterproofing, but those made on the basis of bitumen are considered the most suitable and convenient to use.
Note! When laying waterproofing endov should not be joints. It is better to use one wide sheet. In case the joints cannot be avoided, the sheets should overlap by at least 20 cm.
Installation endovy
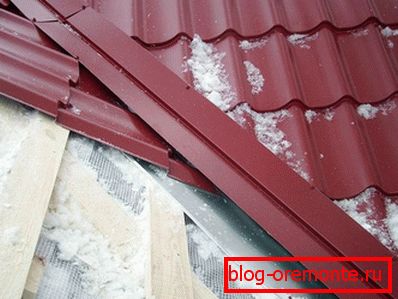
If the waterproofing is ready, you can proceed to the direct installation of the valley. Work will be carried out depending on the selected type of joint. Closed and intertwined versions do not need to be considered in detail, since in these cases the usual installation of the roofing material is carried out taking into account the nuances of the chosen technology. If there is an open endova type, then installation of special elements having the form of a trench is made.

The process is performed in the same way as in the case of a tiled roof, namely the constituent elements are stacked from bottom to top with some spacing on each other and fastened to the batten with self-tapping screws.
Note! Screws must go every 30 cm, and the overlap of elements on each other to be at least 20 cm.

Summing up the above, it should be said that if there is some experience in carrying out roofing works, then it is quite possible to make a roof roof with your own hands without the involvement of specialists from the outside. But, the main thing to remember is that roofing works are always associated with risk, which means that compliance with safety regulations is a top priority.
See also:
How to make a horse on the roof
Video
The device of the end of a metal-tiled roof is shown below: