How to make a roof envelope with your own hands - the
In modern private housing there is a huge variety of forms or types of roofing structures. This abundance is achieved mainly due to the emergence of new, technological roofing materials, with which you can cut off roofs with complex geometry. However, classical architectural solutions, such as, for example, a roof envelope, remain equally popular. In this article we will describe how to make a roof of this type with your own hands, as well as its types, features of the truss frame.
Kinds
The roof of the envelope received this name because of the visual similarity of the top view with this uncomplicated object. It belongs to the classical form of roofing, therefore it is often used in private low-rise housing construction. A distinctive feature of this type of roof is that they do not have gables, since they are replaced in the construction with additional slopes. Depending on the shape of the slopes, there are 2 types of roofs in the form of an envelope:
- Hip. The hip roof has two trapezoidal slopes, as well as two triangular slopes, replacing the pediments, which are called the hips. The ridge compound in this design is much shorter than the length of the slope along the eaves. The slope of the roof on the hips and trapezoid slopes is different.
- Tent. Tent roof, consisting of 4 slopes, also called envelope. It also does not have gables in its design, but consists of 4 identical triangular-sloped slopes. The peculiarity of the tent roof is that its horse is a combination of rafter legs at one point, and not a line, as is the case with a dvukh or hip.
Important! It is believed that the hip roof is great for houses of a square shape, and hip - for rectangular. The main thing in designing such types of roofing is an accurate calculation that takes into account wind or snow loads, as well as its own weight of the structure.
Virtues
The roof envelope is a popular architectural solution that is often used in the construction of private low-rise houses. Professional roofers argue that the hip construction from the point of view of design, installation is much more complicated than the hip, and the calculation of its roof frame in general only by an experienced designer. Virtuesми этих кровель считают:
- Large roof space. The high ceiling height and the area under the roof allows you to organize residential attic and spacious attics.
- Good water flow from the slopes. Due to the rather large slope and the number of slopes, the melt or rain water from the surface of the slopes flows down without encountering difficulties. Due to this, the load on the frame does not increase even during the heaviest snowfalls and intense melting.
- Protection of walls from precipitation. Due to the fact that the gables are replaced by slopes, all exterior walls and their finishing is well protected from precipitation, and therefore is better preserved.
- Uniform heating of the roofing room. Due to the fact that the roof structure, resembling an envelope in appearance, does not have vertical fronts, the attic room and the roof surface warms up evenly.
Important! Although it is quite difficult to build a roof in the form of an envelope with your own hands, due to the replacement of vertical gables with additional slopes, the design acquires increased wind resistance, durability and carrying capacity.
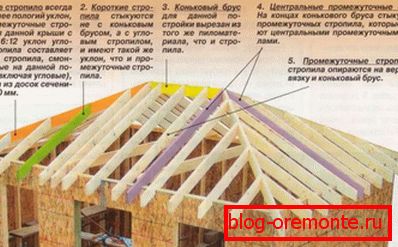
Installation Features
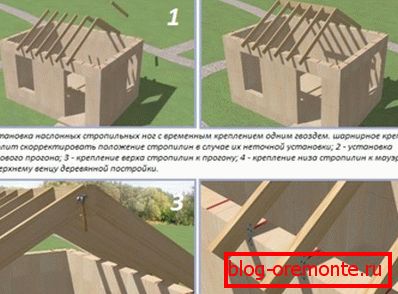
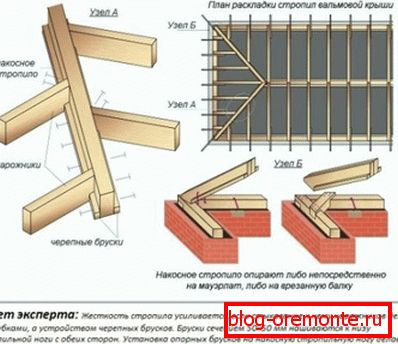
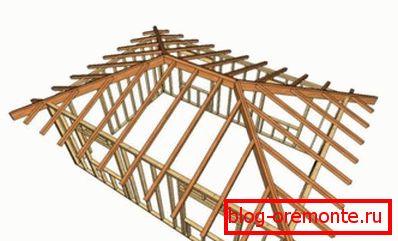
The roof with an envelope and its scheme is a strong enough, reliable, but problematic for the design and installation of a structure that requires careful calculations and carpentry skills. The most difficult knots are considered ridge joints, where the diagonal rafters converge with the ridge bar. In general, the construction of the roof, a form resembling an envelope, consists of the following steps:
- Bookmark Mowerlat. First, turn on the upper trim of the house stack mauerlat. This term is called durable, thick timber of rectangular or square cross section, into which rafter legs are cut. It is necessary for a better distribution of the weight of the structure.
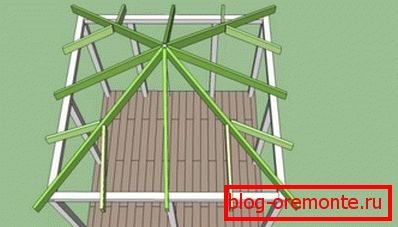
- Installation of vertical racks. Vertical posts supporting the ridge girder are installed on the inner bearing wall covered with a flat bed. At the hip roof at least 2 racks, and at the hip roof - always one.
- Then there is the installation of diagonal rafters, they hem in such a way that they are connected with vertical racks and ridge girder.
- After that, proceed to fixing the row and nasosny rafters, which form the plane of the slope of the roof-envelope.
- The next stage is the installation of the batten. The crate is called rails, fixed perpendicular to the rafter legs, which distribute the weight of the roofing material.
After assembling the rafter frame, you can proceed to waterproofing and warming the slope, and then the roof surface is covered with roofing material. The final stage of roofing work will be the arrangement of the drainage system and additional decorative elements.