How to make a lean-to roof to the extension of the house
After the completion of the construction of the house, it often turns out that there is not enough space for any economic needs. It happens, there is a need to equip a garage, build a gazebo for outdoor recreation, make a greenhouse or a greenhouse, but the small house territory does not allow to satisfy all the needs of homeowners. To save free space and building materials, the dwelling is expanded in a horizontal direction, attaching necessary premises to it. In this article we will describe how the lean-to roof of the extension to the house is being built with our own hands.
Design
Shed roof is called a light roofing structure, consisting of only one slope. It consists of a wooden truss frame, lathing, pediment and coating material. The construction of a shed roof attached to the house differs from the detached one in that it is attached to the supporting wall of the building with one side. The rafter frame of this design consists of the following elements:
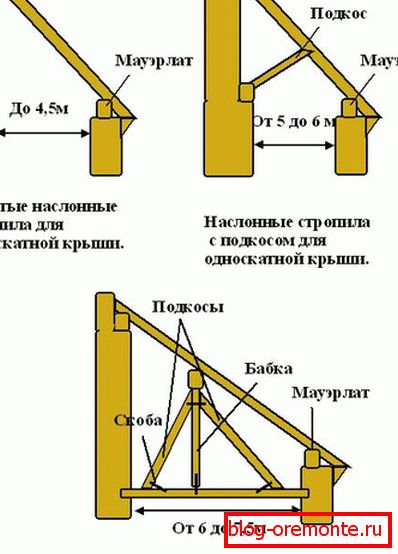
- Mauerlat This term is called a timber, which serves as a support for the rafter legs of a shed roof. It is made from hard wood and is treated with an antiseptic composition. The weight of the roof covering is transferred to the mauerlat, which it evenly distributes and transfers to the bearing walls and the foundation. In order to make a roof for an extension with their own hands, one master-beam is fixed on the wall of the main house, and the other is laid on the supporting posts.
- Rafter legs. These elements of the truss system are made of boards of 50x150 mm or 100x150 mm. At both ends of the rafters, gash is made in order to fasten them to the power plate. They carry the weight of the roofing material, distributing the load evenly and transferring it to the support beam.
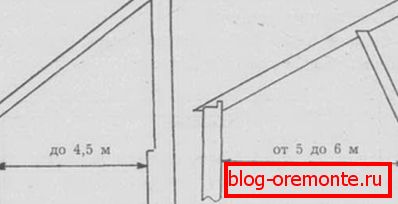
- Strut An additional element of the truss system is called a brace, which serves to reinforce the structure in cases where the ramp has a length greater than 4 m.
- Crate. Crate is called plank section of 40x150 mm, which lay on the rafter legs to make a sustainable basis for the flooring of the roofing material. If to overlap the extension using soft types of roof, construct a continuous crate of sheets of moisture-resistant plywood.
Note! Shed roof - the simplest version of the roof structure, available for installation by hand. The design and creation of the project of the roof of this type does not require special knowledge and complex calculations. The weak point of this variant of overlap, which you need to pay attention to - is the joint of the ramp with the wall of the house, where additional room is attached. Bad waterproofing of the joint seam often causes leakage in the extension.
Design and calculations
Even the most simple roof structures need to be pre-calculated and create at least a schematic project. To build a shed roof with your own hands for an extension, you need to calculate the slope and the area of the slope, the difference between the heights of the supporting pillars, the length of the rafters. Each of these parameters affects the efficiency and durability of the roof. To perform calculations, you can use special computer programs or refer to simple trigonometric formulas:
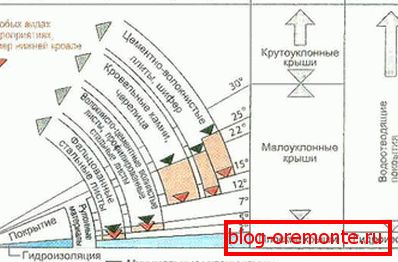
- The slope of the slope is calculated as the quotient of the difference between the height of the supporting pillars of the shed roof and the width of the extension. This figure usually lies in the range of 15-40 degrees, it must comply with the recommendations of the manufacturer of the roofing material and the climatic conditions in the construction area.
- The difference between the height of the support posts is obtained by multiplying the width of the extension by the angle of inclination of the roof slope. This parameter is calculated to correctly mount the structure, maintaining the calculated slope.
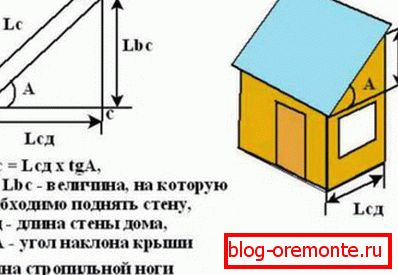
- The length of the truss foot is calculated by dividing the difference in height of the supporting posts by the sine of the angle formed by the slope and the base of the roof. This parameter helps determine how much lumber you need to buy to install a truss system.
- The area of the slope is calculated by multiplying the width by the length. These calculations will be useful when purchasing roofing material. However, you need to consider that it is bought with a margin of 15-20% for overlaps and trimming.

Note! The slope of the roof slope for extension is chosen taking into account the climatic conditions in the region of construction. If the region is characterized by a high snow load in winter time, the angle is made steeper so that the snow and melt water slipping off the roof surface by gravity. In windy areas, slopes with slopes of up to 15 degrees, with less windage, behave better.
Materials
Shed roof for extension - the most affordable solution, how to protect the structure from precipitation and wind, thanks to the low price of the materials used. All that is needed for the construction of their own hands, can be found in the most ordinary hardware store. The assembly of this design requires less materials than the construction of dual-pitch, hip-roof and hipped roofs. To begin installation work, you must purchase:
- Lumber. For the construction of the rafter frame of a single-sided roof, you need to purchase a coniferous beam with a cross section of 100x100 mm or 150x150 mm, a cut board of 50x150 mm, a non-cut board of 40x150 mm, and slats of 25x50 mm. Get quality lumber without cracks and chips, the moisture content of which is 15-16%. To protect the elements of wood from moisture penetration, the formation of mold or rot, perform deep penetration antiseptic preparations.
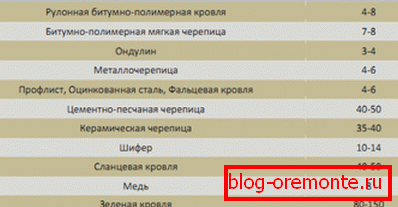
- Roofing material. The construction market provides an extensive selection of roofing materials in different price categories. The cheapest option is slate, roofing felt or corrugated board, it will cost 200-300 rubles per 1 square meter of coverage. More modern and attractive materials (metal, ondulin, soft tile) are 2-3 times more expensive. For roof extensions used as greenhouses and greenhouses, use transparent polycarbonate, which has high thermal insulation qualities and transmits light.
- Waterproofing material. To protect the wood truss frame from moisture penetration is used waterproofing material. In this capacity, a ruberoid, a polyethylene film or a diffuse membrane is used. Skilled craftsmen give preference to the most inexpensive option - ruberoid, which is stronger than its counterparts.
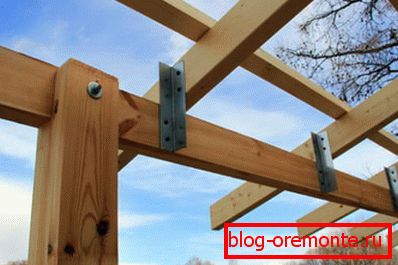
- Fasteners. For mounting the roof requires a lot of different fasteners: metal corners, linings, nails, anchor bolts and roofing screws with rubber press washers. To calculate how many screws you need, multiply the area of the slope by 10, since so many fasteners you need to fix 1 square meter of cover.
Important! To make an extension look like a part of an architectural ensemble of a house, and not to spoil the look, choose the same roofing material for the roof. If you still want to save money, choose a coating of the same color. In order not to build a complex truss frame, give preference to lightweight materials (sheeting, ondulin, roofing material).
Installation
After you have made the scheme for the future roof, calculated the main parameters of the structure and purchased the materials, you can proceed to installation work. The assembly will require the following tools: an electric drill, a screwdriver, a construction stapler, a woodworker, a hacksaw or a grinder, a cord, a marker for marking and a ruler. Installation выполняют в следующем порядке:
- To the wall of the house using durable anchor bolts or metal studs attach mauerlatny timber. We need to take care of the reliability of the attachment, since the rafter legs will be supported on it.
- On the supporting pillars or the supporting wall of the extension set the second main beam. It should be located below the first, to ensure the calculated slope of the slope. The mauerlat is attached to the supporting posts with metal corners, and to the upper wall belt with anchor bolts.
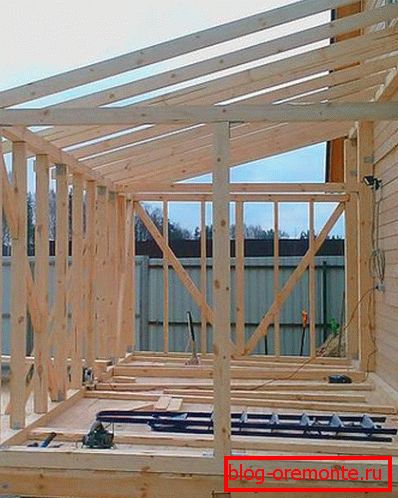
- According to the template, the truss legs of the calculated length are made, they are cut for the power plate. With the help of corners or nails, they fix the extreme rafters, stretch the cord between them and expose the others, focusing on this level.
- On stopil lay waterproofing material. If roofing material is used, then in the place of junction of the extension to the main structure, it is brought on 15-20 cm to the wall and glued, melting the bottom layer with a gas burner.
- Along the rafters, waterproofing is fixed by rivers with counter-sheathing, which are nailed with nails. On the counter-sheathing sheathed plank sheathing with gaps of 10-15 cm, which will become the basis for the laying of roofing material.
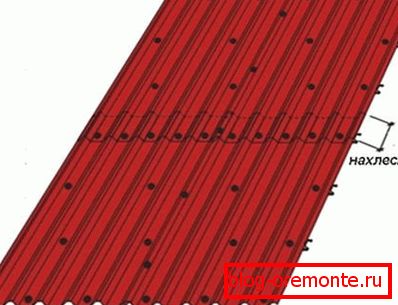
- On the crate stack roofing. All types of roofing materials are laid on the right lower part of the ramp, having sheets with an overlap of 10-15 cm. If the ramp has a small slope, the joints increase or process the joints with a special sealant.
Important! The disadvantage of lean-to roofs is that they have one-way water flow, so you need to take care of installing a good drainage system. After that, the roof can be insulated and sewn gables.