How to make a hip roof with your own hands - step by step
In the process of building a house or a gazebo, the question inevitably arises of which structure of the roof to prefer. If the building being erected has a quadrangular, and preferably square, shape, designers and architects often opt for a hipped roof. The complexity of this design with thorns pays off with its original appearance, excellent thermal insulation and aerodynamic qualities. This article will tell you how to build and assemble a hip roof with your own hands.


Hip roof design
In construction, it is customary to regard the hip roof as a variation of the hipped hip, in which the ridge joint was transformed into a ridge knot, that is, changed from line to point. The roof of the hip type is a pyramid, the sides of which are formed by four slopes in the form of isosceles triangles. Any rectangular building will be suitable for installation, but the square shape allows to achieve perfect symmetry, thus achieving the best result.

The design of the hipped four-sided roof includes the following main elements:
- Ridge knot. Peak roof, the highest point of the roof, formed by the connection nakosnyh rafter legs.
- Скаты. Hipped roof состоит из четырех наклонных плоскостей скатов треугольной формы. Диапазон их угла наклона лежит в пределах 20-50 градусов, однако опытные кровельные мастера считают оптимальным угол 40 градусов.
- Rafter system. The framework that serves to support the construction of the roof. The rafter system bears on itself and distributes the weight of the roofing pie, sets the geometry of the ramps. It is built on the basis of triangles, the most rigid and stable figures that guarantee the stability and reliability of the roof.
- Roof covering. Material in the form of rolls, sheets, individual modules or elements with high wear resistance, good waterproofing characteristics. For these purposes, use metal roofing, corrugated board, ondulin, roofing felt or slate.
- Overhang. The roof overhangs protrude beyond the base perimeter and protect the walls from water during rain and wind. Overhang length of 40-50 cm is considered sufficient for the effective performance of their tasks.
Stages of construction
Project creation
Hipped roof своими руками строится только на основании грамотно составленного проекта, гарантирующего ее надёжность. Перед тем как сделать чертежи, необходимо вспомнить школьный курс геометрии, чтобы сделать расчеты угла наклона скатов, высоты конька и площади скатов. Для выполнения вычислений есть простая инструкция:
- First of all, it is necessary to determine the slope of the slopes using the recommendations of the manufacturer of the roofing material and data of building climatology, which divides the territory of our country into eight zones according to snow and wind loads. The best is a slope of 30-40 degrees, which is suitable for almost all types of roofing.

- The next step is to calculate the height of the ridge knot. For this calculation, you need to know the dimensions of the base of the roof and the angle of its slopes. If you imagine a hip roof as a pyramid, then the straight line connecting its base and ridge at right angles will be its height, and you can calculate its length using the Pythagorean theorem.
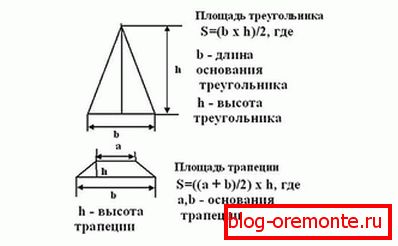
- Knowing the angle of inclination, height and size of the base, you can find out the length of the rafter legs and the area of the slopes. These calculations are needed to calculate the necessary building material - wood for the roof system and roofing.
Do not forget that the hip roof with a rectangular base, unlike the same design with a square, the slopes will have a different slope and different length of rafter legs. Keep in mind this in the calculations and installation!
The project is created manually or with the help of a computer program that not only performs the calculations for the length of the truss system elements, but also selects their thickness. The result of the design phase is a diagram with the dimensions and mutual arrangement of the roof elements, which will become the support for the installation work.
Construction truss system
Tent rafter system is made of coniferous wood and consists of the following main and additional elements:
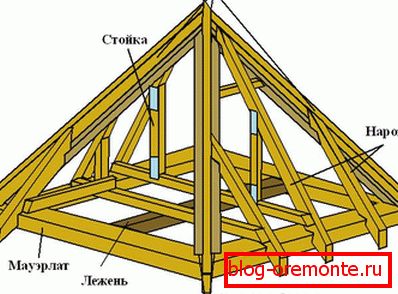
- Mauerlat and Lezh. The supports from a bar, necessary for distribution of loading on perimeter of bearing walls. Mauerlat is laid on the outer partitions, and the bed is on the inner. In wooden houses, the role of the support bar is performed by the upper crown of a bar or log. Constructions made of bricks and blocks require the arrangement of a reinforced concrete belt, in which metal studs are embedded, on which a power plate is laid through a layer of waterproofing.
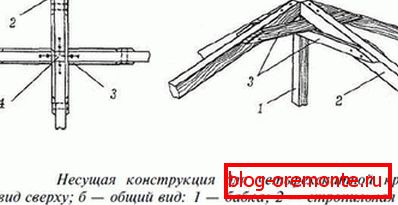
- Racks. Vertically mounted supports that support the ridge knot or truss feet.
- Sloping truss legs. They depart from the ridge knot to the corners of the structure and form the edges of the sloping hip roof. The slanting legs are longer than normal and are subjected to increased load, so their thickness should also be twice as large.
- Narozhniki. Rafters of different lengths, attached to the crooked legs and the power plate, forming the surface of the slopes.
- The struts. An element of the rafter system located at an angle of 45 degrees to the rafters, which prevents the rafters from sagging.
- Tightening bolt. A horizontal jumper between the two rafters that dampens the arching effect they have on the walls.
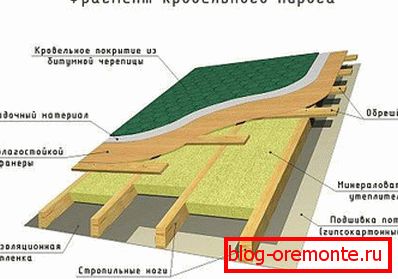
- Crate. The basis on which the roofing is laid. Depending on the type of which, use lattice or solid type of crates.
In the construction of a hip roof, a hanging or nylon roof system is used, depending on the capabilities of the building's layout. However, experienced roofing masters are not advised to use the flatbed type, if the slope of the slopes exceeds 40 degrees.
Installation progress
When the project is approved and the materials are purchased, you can do the installation of a hip roof with your own hands:
- First install the mauerlat, floor and beams of the ceiling. If the project provides take-off beams, then they are also mounted. Begin laying with the central one, stepping back and forth from it in both directions, moving to the edges.

- Exactly in the middle of a future hip roof, a central rack is installed, for it a timber is used with a thickness of 150x150 mm or more. To keep it upright, it is temporarily fixed with two trusses.

- Install the central rafter. In the upper part we fix them to the rack with metal plates, and in the lower part to the power plate. Pulling on a cord from the ridge knot to the corners of the mauerlat cord, they mount nakosny truss legs. To install them, make a double inset on the top. The overhangs of rafters are connected by a wind board If necessary, install the struts and crossbars.


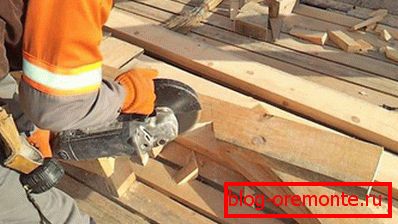
- Then they file and nail all the women workers. The scamps, relying on the exhaust beams, are additionally reinforced with stanchions to relieve them. Eaves are hemmed with a board or moisture resistant plywood.
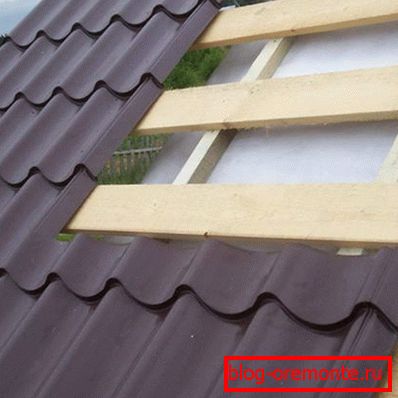
- A waterproofing film is laid on the rafters with stripes, overlapping it at the joints of 15-20 cm. Fixing the film with a construction stapler, and fixing the counter-sheathing along the rafter legs. Mount the crate. If it is planned to be solid, then plywood sheets are needed, and if lattice - unedged board of 40x150 mm.

- Lay the roof covering. To do this, first make cutting with this in mind. That sheets and stripes are attached not in the joint, but in an overlap. As a fastener, you must use special, supplied with roofing material, galvanized self-tapping screws or nails with a rubber cap, which, after screwing in, deforms and closes the hole.
- The final stage is the installation of a drainage system consisting of a water intake funnel, gutter and drain pipe, and snow holders.
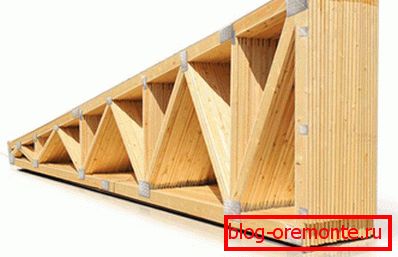
Some elements of the truss system roof hinge have a length exceeding 6 meters, the standard value of lumber. Therefore, it is necessary to produce rafters, composed of several parts, or glued.
Do-it-yourself construction of a hip roof - hard, time-consuming work, but the result obtained, distinguishing a house or a gazebo among similar-type neighbors, will reward you for your efforts and your strength!