How to make a broken roof do it yourself - device and
At the initial stage of construction, when it is far away even before the approval of the project, the potential householder considers many options of various sizes, heights, planning in the search for the most rational option. It has been tested by time and also by the experience of thousands of people that space is most fully and effectively used in homes with a mansard. Thanks to residential mansard premises in houses with a sloping roof, the cost of one square meter in them is one and a half to two times lower than in similar two-storey dwellings with similar useful area.
However, the traditional double-slope roof in the shape of a triangle is completely unsuitable for attic equipment. Since its rather steep slopes hide the available space, leaving only a narrow strip with a ceiling height suitable for comfortable life.
Therefore, most often the construction of the attic means that the house needs a broken roof. This design is technically more complicated than that of a conventional double-slope, so it is very important to understand the structure of its truss system, installation features, if you plan to do it yourself.


Basic design elements
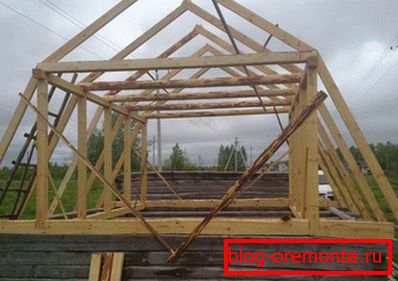
A broken roof, resembling a pentagon with a top point on the ridge, is visually divided into upper and lower parts. In the upper part, the slope of the slopes is more gentle, it is no more than 20-300, and in the lower part it is steeper, within 50-60 degrees. For its assembly uses a mixed truss system, consisting of hanging and naslonny rafter legs.
To form the necessary geometry of slopes, to give the structure rigidity, a large number of elements are used, in view of which the sloping roof has impressive weight. The main components of the roof are rafters, mauerlat, floor beams, and additional - racks, headstock, struts, tightening. All of them are made of hardwood softwood, pre-treated with a flame retardant, antiseptic.

- Mauerlat is a square bar that is laid at the base of the roof to distribute its weight evenly over the supporting walls, as well as protecting the rafters from tipping over.
- Rafters. Rafter legs, made of smooth, reliable boards form a ramp, converging in a skate. In the sloping roof, the upper rafters are nasal, as they have additional support on the racks. And the lower ones are trailing, because they are sagging between the ceiling beams and tightening. The distance between the rafters is chosen in the range of 60-120 cm, depending on the weight of the roofing material or the width of the insulation.
- Tightening. Also called a bolt, a horizontal beam connecting the upper rafters to reduce their spreading. It also serves as a framework for creating a mansard ceiling.
- Racks. Vertical supports made of timber, transferring the load from the laminated rafters to the bearing walls through the tightening. After they are surrounded by plywood, they will become the walls of the attic, so that the length of the racks is determined by the desired height of the ceiling. Although 1.5-1.7 m is enough for arranging a living space, the ceiling of 2-2.5 m is considered to be the most comfortable, which may well be provided with a broken mansard roof.
- Grandmother. Vertical suspension that binds the ridge with a puff, compensating for its deflection.
- The struts. Also known as subrafter legs, corner supports to prevent sagging of rafter rafters.


Rules for installing a power card
Before you make a broken roof, you need to lay a power plate according to building codes. The larger the area of the roof, the greater its weight, the thicker the timber should be. If for small buildings there is quite enough material with a section of 100x100 mm, then for houses of large footage, a bar of 200x200 mm is used.
Before installation, the waterproofing of the attachment site is carried out; for this purpose, folded roofing material or several layers of film are stacked. The method of installation of the power plate depends on the material from which the house is built. Most often it is installed on the block concrete screed using metal studs.

So that the strength of the broken roof mowerlat is not lost, it is necessary to make as few holes as possible in it. And the location of the studs should be calculated so that they are not between the rafter legs, and not under them. Otherwise, the holes of the frame will be too close to each other, which can lead to cracks, as well as the complete reduction of the power plate.
The sequence of assembly trussing system
Many instructions on how to make a sloping roof do not describe in detail the process of assembling a truss system, the construction of which occurs as follows:
- The first thing after installing the mauerlat is the flooring of the ceiling joists of the sloping roof. Their size is usually 100x200 mm.
- Further stands are placed in two parallel lines, which must stand strictly vertically, for which they are reinforced with temporary struts. The distance between the drains should not be more than 3 m, and the length of the racks is calculated as the desired ceiling height plus 10-15 cm.
- Racks are connected by girders of 50x150 mm planks, the resulting structure is a frame for the mansard walls of a sloping roof.

- Runs are tightened from the board 100x150 mm, fixed on the metal corners.
- The lower hanging rafters of the attic roof are installed. One bar rises to the top, the top gash is done at the right angle. This rafter is used as a template, all others are filmed on the model on the ground. In the lower part of the truss foot is mounted as a ram.

- The rafter legs of the upper slopes are laid. Also used a pattern. First, install the extreme rafters using time struts, then all the rest.
- The suspended grandma between the ridge and a tightening is established.
Additional heat insulation
Since the attic room under the sloping roof is used for residential purposes, it is imperative to insulate. Experts recommend using mineral wool on a basalt basis in the form of rolls or plates.
For central Russia, a layer of insulation of 150 mm is sufficient. You will also need a vapor barrier film, a waterproof membrane and a frame on which all this will be attached.
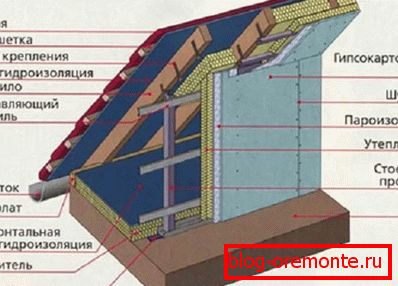
On the inside of the slopes a counter-crate is being established. For this, a board is used, the width of which is a couple of centimeters larger than the thickness of the insulation, since the insulation should not be tamped in any way.
That is, for a layer of mineral wool 150 mm, suitable board 50x200 mm. This gap is also necessary for air circulation, providing natural ventilation. Insulation fits in between the bars of the counter-sheathing, and inside it is sewn up with the selected material.
Gable construction
The gable is a part of the wall, bounded by the slopes of the roof, and below by a cornice. At the broken roof, it has a pentagonal shape. For the construction of the pediment, it is necessary to reinforce the first truss truss, supplement the construction with racks so that the frame is obtained.
- If windows are located on the gable, they leave openings for them. All the rest of the space is sheathed "inch".
- The gable roof can be mounted before roofing or after. The first method is good because the slopes will not obstruct the work, and the second one is that the geometry of the slopes is already set.
- Gable space also needs warming, which is most often done inside.
- Professional roofers are advised to use basalt mineral wool or polystyrene foam insulators for thermal insulation of a broken roof.

The next step will be the installation of eaves boards along the perimeter of the building. The size of the lumber may be 25x150 mm. Next comes the time of installation of the drainage system, which requires a broken roof.
It’s not difficult to install the structure with your own hands, but after laying the roofing material it will be more difficult. If metal gutter clamps are used, then they need to be fixed directly to the rafters under waterproofing, and if plastic - to the frontal board.
The construction of crates
Crate broken roof - a kind of foundation, which subsequently lay the roof. It can be solid or lattice, depending on the type of material.
- Solid. Carry out from sheets of moisture-resistant plywood, which are laid in a continuous on rafters. Used for mounting ondulin, shinglas, slate.
- Grid. It is made of unedged board, which is laid perpendicular to the rafters. It is applied when laying a metal tile, a professional flooring.

It is more convenient to make a crate on a sloping roof, if there are already scaffolding around the perimeter of the house, they are in any case necessary for the construction of the roof. First, a waterproofing film is attached to the rafter legs; a construction stapler is useful for this. The film is laid with an overlap of 10-15 cm. Then the laths of the counter-batten and the batten itself are attached. The length of the boards should exceed the length of the roof to form a gable overhang and gable ebb.
Roofing
The sequence of roofing work on a broken roof is determined primarily by the selected material. Let's talk about the installation of metal, as it is most popular in private construction. A powerful screwdriver, a tool suitable for metal cutting, a hammer, a tape measure, a marker, galvanized self-tapping screws with a rubber head are necessary for laying. At first they make cutting of sheets of metal tile, and then installation, starting from the ridge.
Important! Screws should be screwed into the bottom of the wave pattern. Otherwise, the sheet is deformed, the mount comes out fragile, because of which, in windy weather, the roof will “buzz”.

- In addition to the roofing material, a broken roof must be equipped with other important elements: a ridge board, a snow guard.
- The ridge is installed with an overlap of 10 centimeters on the metal tile on both ramps.
Snegozaderzhateli serve to prevent the snow melt, it is a small cornice. They are fixed at a short distance from the end of the slopes on the self-tapping screws, taking into account the fact that snow guards must withstand a large load, especially in snowfalls.
A broken roof with your own hands, will not only save on the labor brigade of workers, but will give confidence that the processes were executed correctly, as the construction was carried out in compliance with the technology.