How to fix the drain to the roof - calculating the area and
Installing the drainage system is the final stage of roofing, the main task of which is to collect water flowing from the roof of the roof during the intensive melting of snow or rain. To do the calculation, fixing the drain to the roof should be able to every homeowner, because only this way you can protect the walls and the blind area of the foundation from moisture. Ready-made kits ready for assembly, which are sold in hardware stores, greatly facilitate the installation process, so even a person with no experience or any building skills will cope with it. In this article we will describe how to fix the drain to the roof, so that it will serve for many years.
Device and functions
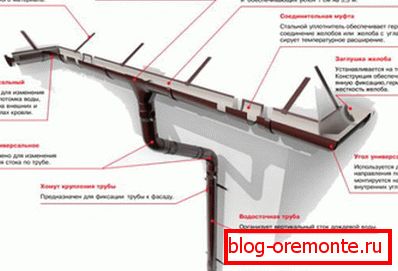
Roof drain is a structure consisting of a gutter, drains, and also water intake funnels, which are tightly interconnected. It is installed along the roof overhangs to collect and transport rainwater and melt water to a specially equipped place (storm sewer, ditch or tank). To determine the number and size of the elements of water disposal, perform a simple calculation, taking into account the slope and the area of the roof slopes and climatic conditions in the construction region. Properly calculated and installed drain has the following functions:
- Provides organized removal of thawed and rainwater from the surface of the slope. Liquid draining from the roof falls into the gutters and drains transporting it to designated areas. If the house is equipped with a drainage system, during a rain the water from the roof will not pour over bystanders.
- It protects the blind area and the foundation from destruction. Fastening the drain does not allow water falling from the height of the roof to penetrate the concrete paving and the foundation. When contacting with water in the warp of the house, microcracks form over time. To eliminate these defects, large investments of money and labor will be needed.
- Preserves exterior wall trim. Organized gutter prevents the ingress of thawed or rainwater on the surface of the facade of the house. If the calculation was performed correctly, the liquid does not leave the chute, due to which the walls retain the aesthetic appearance and integrity longer.
Note! Professional roofers argue that all pitched roofs must be equipped with a drainage system. An exception can be made if the roof overhangs of the house exceed 80-90 cm and extend beyond the concrete pavement of the foundation. The drain must be installed at any area and slope of slopes.
Selection and calculation
Before you attach the drain to the roof overhang, you need to choose a model that is best suited for specific conditions. Manufacturers offer an extensive range of components for the assembly of drainage systems from plastic, copper, galvanized steel, they produce models with a round and rectangular cross section. In order for the drain to work as efficiently as possible, you should pay attention to the following aspects when choosing:
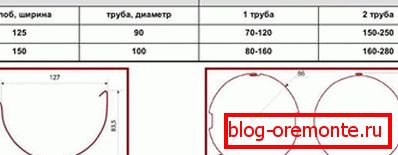
- Diameter. To determine the diameter of the gutter and pipes that are suitable for a particular roof, you need to calculate the area of the slopes. The larger the roof, the greater must be, within reasonable limits, the size of the elements of drainage. When performing the calculation, it is necessary to take into account the amount of precipitation in the region.
- Material. Galvanized models are mounted on metal tile roofing and corrugated roofing, gutters and plastic pipes “work” better with rolled materials, and copper ones are installed if the roof is made of the same metal.
- Working temperature. Plastic models operate at temperatures from -40 to +50 degrees, and metal from -50 to +150. Therefore, metal drains are considered universal: they withstand the harsh climate of the far north and the heat of equatorial countries.
- Lifetime. The service life of drainage elements made of plastic is 25-30 years, galvanized drains serve only 10-15 years, and the copper ones retain their performance qualities over 100-150 years.

Important! The material and size of the elements of the drain affect the price of products. Plastic models are considered the cheapest, with galvanized gutters occupying the next place at a cost. Cost also increases due to additional functions: painting, coating with polymer films, heating, installation of filters. The diameter or number of elements that will be needed for installation determines the calculation.
Installation
After buying drains, it is necessary to fix the elements to the roof of the house. It is produced during roofing work. The order of installation depends on the design of the drain, it is described in detail in the instructions provided by the manufacturer. In order for the drainage system to serve for a long time, not to break at the most inopportune moment, the fastening is carried out as follows:
- First perform design work. Measure the length of the overhangs of the roof, perform the calculation of the required number of gutters, drains, funnels, plugs, and brackets.
- Carry out the markup. First determine the installation location of the water intake funnels, they are located in the middle or along the edges of the overhang of the roof. From these points to the opposite corner of the house stretch the tracer cord, given that the slope of the drain should be 3-5 degrees. The calculation of the required number of sinks is determined by the number of external corners of the house.
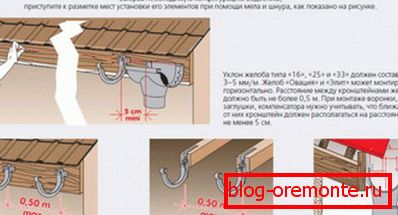
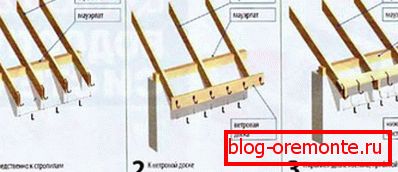
- At a distance of 15 cm from the place of fastening of the funnels on the ends of the trusses with brackets fix the brackets. After mounting the first holder, they are fixed every 50-60 cm. The heavier the drain, the smaller the step between the brackets. If the elements of the drain are metallic, then a waterproofing layer is laid between them and the rafters.
- After installation on the roof brackets install water intake funnels and begin assembling the gutter. Fastening between plastic elements is made with the help of compensators, which level linear changes in the size of the gutter during temperature fluctuations. The end of the gutter, which is located opposite the funnel, closed with a plug.

- They add plums of such length to drain funnels so that the distance from the tip of the pipe to the ground does not exceed 40-50 cm. The pipes are inserted into the brackets and then attached to the wall of the house. At the end of the plum put on a rounded tip, which is called a drip.
Note! After installation, drainage check for tightness of connections, compliance with the slope. To do this, pour a bottle of water on the slope of the roof, and then watch how it moves. If all the water has reached the storm sewer, the roof drainage system works correctly. If a part of the water remains in the gutter or has flowed through the joints, it is necessary to work on the elimination of defects.