How to build a mansard roof do it yourself - installation
The construction of houses always begins with the determination of the necessary living space, the depth of laying the foundation and the total cost of construction depend on this parameter. In order for a small plot of land to be enough for organizing a vegetable garden, a bathhouse and a gazebo, it is impossible to expand the house in a horizontal direction, the construction of an additional floor is too expensive. Increase living space in such a situation will help mansard roof with his own hands.

Mansard Roof Types
Attic - heated or cold space under the roof, which is used as a residential. According to building regulations, in the attic room it is necessary to equip windows for natural lighting and ceilings of sufficient height for a person. Rooms under the roof in which these conditions are not met are called the attic. The following types of roofs are suitable for the attic device:
- Dvukhskatnaya. The simplest design for attic equipment. It consists of two rectangular slopes and triangular pediments. To achieve the desired ceiling height for living space, it is necessary to lay a very steep angle of the slopes. This increases the area and weight of the dual slope roof, making its installation economically impractical.

- Hip. The hip roof design consists of two trapezoid slopes and as many triangular ones located above the end walls instead of the gables. The height of the ceiling under the hips is not enough for residential premises, so the attic area is too small. However, it is enough to organize the storage of things or winter storage of supplies, if it is not heated.
- Half-hardened. The peculiarity of the half-hinged roof is that its end slopes do not completely replace the gables, but partially. Hips of small size do not reduce the height of the ceiling, so the installation of a half-folded roof as an attic is quite possible. The only disadvantage of this option is the complexity of the truss system and the high consumption of roofing material.

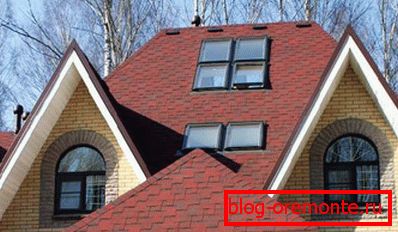
- Broken. This is a kind of dvukhskatnogo type of roof, the slopes of which consist of two parts, having a different angle of inclination. The upper part of the broken roof is flatter, and the lower - steep. This configuration allows for more efficient use of space without increasing construction costs. Broken roof - the most affordable option of how to build a mansard roof with minimal investment.

The installation of a mansard roof suitable for living provides for compulsory thermal insulation, the organization of natural light with skylights or vertical windows and forced ventilation.
Advantages of a broken roof roof
To make a spacious residential attic, it is necessary to build a broken roof. Its design is best suited for this purpose, because:
- It is suitable for already built houses, in which they carry out reconstruction of the roof in order to equip a residential attic. The broken roof is only slightly heavier than the usual double-slope, so this alteration does not need to strengthen the foundation.
- Under this type of roof, installation of a two-level attic is possible, if the ceiling height is 5 m or higher.
- Improving the energy efficiency of homes. Installation of a broken roof, even if it is not heated, creates a thick air gap between the ridge and the ceiling of the first floor, due to which heat is saved in heated rooms.
- The possibility of arranging a balcony. The trapezoid pediment of the broken roof seems designed to install a spacious balcony on it.
Please note that the construction of an attic roof of any type is more expensive than usual, in order to make it suitable for living, installation of expensive roof windows, insulation and installation of a ventilation system will be required.
Construction
Before building a mansard roof, it is necessary to perform calculations of its parameters and draw a diagram of the relative position of the elements. Since the central criterion is the useful area of the attic, it is necessary to build on it:

- On a piece of paper, draw a box of a house under construction with dimensions, making sure to respect the scale. Determine the middle of the end wall, put up from this point the desired height of the ceiling. The minimum value of this parameter is 2, 5 m. Do not forget to take into account the thickness of the slabs.
- Go back to the middle of the end wall, to the left and the right, measure the desired width of the attic room. Up from these points, draw lines of a length equal to the height of the ceiling. Connect them together. The resulting rectangle denotes the boundaries of the attic.
- From the middle of the end wall up measure the distance to the ridge of the roof. The ridge is placed at a height of 1.2-1.5 m from the attic ceiling. From the ridge to the corners of the rectangle denoting the attic, draw straight lines, the upper parts of the slopes of the broken roof. Then draw the lower, steeper part of the slope, and the roof scheme is ready.
To determine the angles of inclination of the slopes of the broken roof, you can use the protractor or look at the table of ready values of the ratio of the length of the slope to width.
In addition, you need to make sure that the resulting angle of the slope corresponds to the weather conditions in the area of construction of houses and roofing material, installation of which you plan. Construction climatology makes recommendations on the choice of the slope of the slopes, based on data on wind, snow and rain loads.
The construction of a broken roof without compliance with these standards is fraught with tearing down the roof with squally wind, collapse of the structure during snowfall and leakage from heavy rains.
Construction truss system
Before building the roof of the attic, it is necessary to figure out what elements it consists of. The cawning of any roof is a truss system, like a skeleton bearing the weight of a structure. It consists of the following parts:

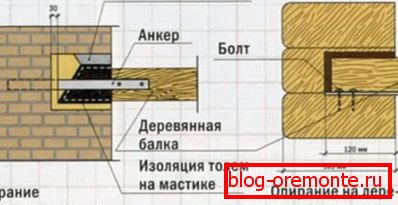
- Mauerlata. Mauerlatny bar laid on the upper edge of the masonry at home to soften the mount with truss and evenly distribute the load. Wooden houses made of lumber and logs do not require installation of a mauerlat, since this role is performed by the extreme rims, reinforced with braces made from brackets or dowels.
- The rafter. Rafter legs form ramps. The broken roof has two types of rafters - upper and lower. The upper ones range from the ridge to the puff, and the lower ones from the puff to the mauerlat.
- Skate. The ridge compound is located in the place where the legs of one truss pair are connected by a patch of metal or a bar. This is the highest point of the roof.
- Tightening. Puffs are horizontally mounted boards that tie together the rafters of one pair. The upper puff, located under the ridge, is called a bolt and has a thicker section. The construction of a broken roof also involves the installation of a lower puff, which serves as floor beams and is the basis for the attic flooring.
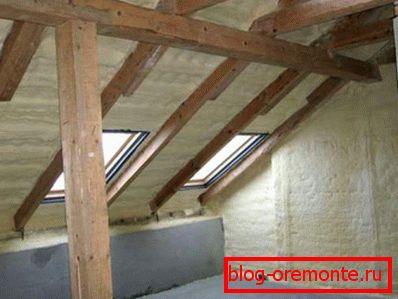
- Racks. Racks of thick timber set to tighten to support skate or rafters. Installation of racks performs only vertically.
- Strut The struts are mounted diagonally, at an angle to the trusses, resting against a tie or stand. These elements are needed to support long rafters, which bend from their weight.
- Fights. Contractions are boards that connect two adjacent vertical supports.
- Grandmas Grandma is a hanging element of the truss system that connects the ridge and the upper puff.
All parts of the truss system are made of high quality wood, the cross section of which is calculated in the calculations, for the convenience of those who do the installation with their own hands;
Sequence of work
In order to build a mansard roof with high quality, it is necessary to strictly observe the technology and sequence of installation. Please note that even an experienced master can hardly cope with installation alone due to the heavy weight of the rafters, so that a beginning craftsman will need the help of 1-2 part-time workers. The construction of a broken roof is carried out in the following order:
- Installation of mowerlat. The mauerlat timber is fixed on the upper part of the frontal walls along the future slopes. If inside the house to be covered there is a bearing partition used in the construction of the truss system, a level gauge is installed on it. Mauerlat is laid on the waterproofing, and the timber is covered with an antiseptic composition to increase its service life.

- Installation of floor beams. This can be done in two ways: on top of the mauerlat or on previously prepared protrusions in the wall. The first option allows you to expand the space of the attic with the removal of beams around the perimeter of the box at home. On top of the ceiling beams, temporary flooring is constructed of planks without fixing them with nails. Flooring is needed for ease of assembly truss system.
- Mounting racks At an equal distance from the middle of the ceiling beam, the first stand is installed vertically and secured with 2-3 metal angles. Perform the same actions with the latter and pull the cord between them. Focusing on the cord, fix all the remaining racks on each floor beam. To prevent the verticality of the elements from being disturbed, they are temporarily mounted on the lashing nails.
- Installation bolts. A bar of the same section is placed on two drains on top and fixed on metal corners. Perform this operation with each pair of racks.
- Fix the lower truss elements. The upper end of the leg is attached to the rack, and the lower end is attached to the ceiling beams or the main beam. Fastening is done with staples, screws or nails. If the house is wooden, did not shrink, the lower connection is performed using metal fasteners of the slider type so that the roof is not deformed in the process of drying the wood at home.
- Fix the upper rafters. Make legs on one piece. In the upper part of them from two sides is fixed with a metal plate, and at the bottom use nails or staples.

- Between the bolt and the ridge connection hang the grandmother, adjusting its tension so that the bulk of the puff falls on the ridge.
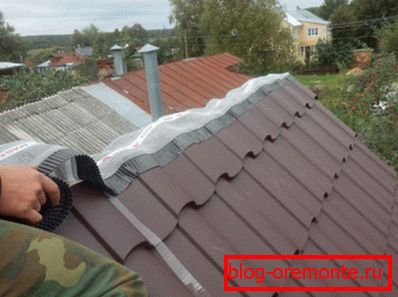
- They nail the counter-batten slats, a waterproofing film and a batten are fixed on top of them with a construction stapler. Laying roofing material.
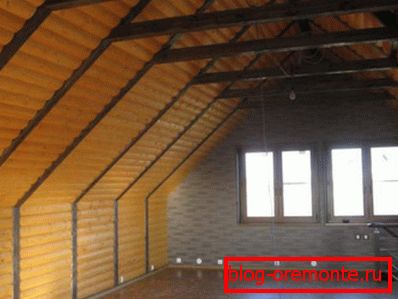
- Sheath gables, not forgetting to leave openings for windows. Insulate gables and slopes of the roof from the inside. Construct a frame, sheathe the walls and ceiling of the attic. Perform interior trim and window insertion.
- On the slopes of the roof install gutter and pipe that drains water into the storm sewer. Equipped with a forced ventilation system and a ridge aerator.
A mansard roof with your own hands is a good way out when the house is cramped and there is no possibility of a major reconstruction or superstructure of the second floor.. The attic made with the mind is a cozy room, which is not inferior in comfort to the other rooms in the house.