How to build a hip roof with your own hands - the device and
Beginner craftsman can make many mistakes during the construction of the hip-type roofing. The reason is not even the complexity of the design or installation, and the incorrect implementation of preparatory design work. Every professional builder knows: to cut once, you need to measure at least seven. Therefore, the hip roof is built with its own hands only on the basis of engineering calculation and a plan drawn up on it. Next, read how to calculate the basic parameters of the roof, select the cross section of its elements and perform the installation qualitatively.


Design features
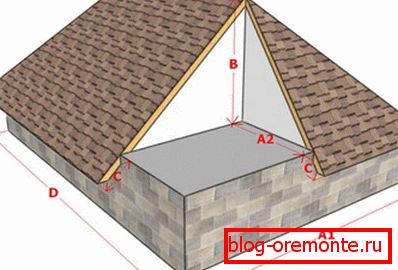
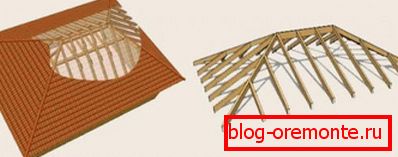
Hip roof – одна из разновидностей четырехскатной. Если посмотреть на дом с такой кровлей сверху, ее форма напомнит запечатанный конверт. Два ската меньшей площади в виде треугольника называют вальмовыми. А остальные два имеют трапециевидную форму и больший размер. Устройство кровли вальмового подтипа состоит из следующих узлов:

- Skate. This is the top of the roof, the line that the trusses form at their junction. The peculiarity of the ridge of the hip roof is that its length is less than the length of the overlapping structure.
- Hip. Valms are called triangular ramps, which are located above the end walls. They replace the pediment and are formed by diagonal and intermediate rafters.
- Скатов. Hip roof помимо вальмовых имеет два трапециевидных ската, которые начинаются от конька, а заканчиваются свесом.
- Ribs Ribs are angles formed at the junction of the hips and trapezoid rays. The number of edges of the hip roof coincides with the number of diagonal rafters, that is, there are a total of four.
- Drainpipe system. Drainage, consisting of funnels, pipes and gutters, is necessary for the discharge of excess liquid from the surface of the hip roof into the storm sewer.
Please note that the hip-type roof device does not allow making an attic in it, since two additional slopes significantly reduce the ceiling in the under-roof room.
Rafters and supporting elements
The hip truss system is somewhat different from the dual-slope, the complicated construction of ramps requires a larger number of elements. It includes:

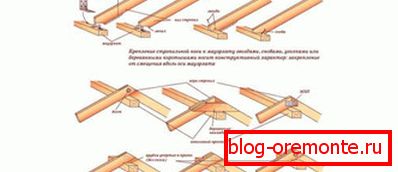
- Ridge run. Beam, which connect the truss pair.
- Diagonal rafter. Four truss legs forming the ribs of the hips. From the end of the skate, they move to the corner joints of the mauerlat, connecting with the mauerlat. Their length is longer than that of ordinary rafters, so for their manufacture they use double boards or larger material. Interestingly, the angle of the diagonal truss legs is more gentle than the intermediate ones, one should not forget about this when drawing up the drawings.
- Intermediate or ordinary rafters. Rafter legs, which fix the tip on the ridge, and the end on the mauerlate.
- Central ordinary rafters. Six rafters, which dock with the end of the skate and diagonal rafter foot. The laborious unit of the truss system, the installation of which requires attention and accurate marking.
- Short legs or ladies. Short truss legs are not in contact with the ridge in the upper part, they are attached to the diagonal rafters. The lower the ladder, the less its length.
- Tightening. Jumper between the ordinary truss pair, made of timber. Tightening located at the top of the roof, under the ridge, called the bolt. And as the lower tightening, fixed at the base of the rafters, use the floor beams.
- Rack. Vertically installed timber that supports the ridge, transferring the weight of the roof to the bearing partitions. In some embodiments, the truss system of the rack is installed in the middle of the rafters to free up the center of the attic room.
- Strut or subrafter legs. The support fixed perpendicular to rafters. The strut protects the rafters from sagging, it is necessary if the length of the roof slopes is more than 4.5-5 m.
- Sprengel Sprengelnoy farm called a device that is necessary to support the diagonal truss feet. It consists of two beams: one connects the two sides of the mauerlat, and the second rests against the first and diagonal rafter.

Experienced master roofers say that the truss system will be reliable only if you use the same material, the same section and the same method of fastening for the manufacture of elements.
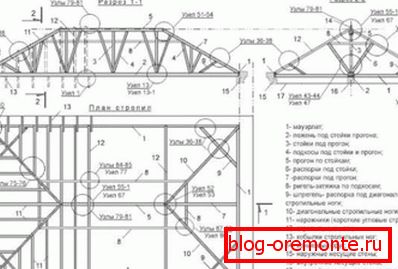
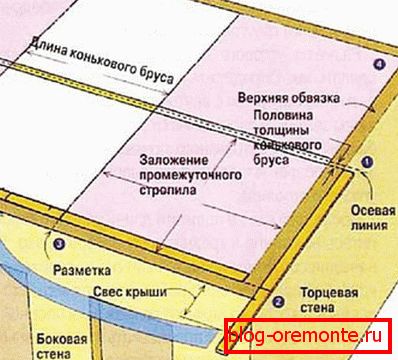
Calculation and design work
Before building a hip-type roof, it is necessary to perform a calculation of the elements of its structure. Before starting the calculations, a scheme of an overlapping house with all known dimensions is planned. Next, using simple geometric formulas on the basis of the Pythagorean theorem, determine:
- The height of the skate. h = b x tg? / 2, where b is the length of the structure between the truss legs from the front side, eh? - the angle of the slopes.
- The length of the ordinary trusses. e = b / 2 x cos ?, where b is the length of the structure between the truss legs from the front side, eh? - the angle of the slopes, e - the length of ordinary truss legs.
- Square skates. S = 2ea, where S is the total surface area of the sloping gambular roof, e is the length of the ordinary rafters, and is the length between the rafter legs along the length of the structure.

For the standard values of the slope of the slopes of the hip roof, there are tables with coefficients with which you can calculate the length of the diagonal rafters without calculations, knowing the dimensions of the rank and file. The step between truss pairs is also viewed in reference materials, focusing on the type of wood, its thickness and the length of slopes. The results of the calculations are applied to the drawing, according to which the markup is subsequently made.
Mount Maurlat
Mauerlat - the basis on which install the roof. Mauerlat is needed in order to distribute the weight of the roof around the perimeter of the bearing partitions. Most often for its manufacture use timber from hardwood. The heavier and more complex the roof structure, the larger the section must be. In most cases, suitable pine timber, which size is 150x150 mm or more. Mauerlat set before you build a house in the following order:
- Measure and saw off the bar of the required length. In the corners, the mauerlat is interconnected "in the paw." To cut a groove under the mount, you need to put a markup.
- On the top row of the masonry a timbering is constructed of planks and poured with viscous concrete into which metal spiers are inserted for fixing the core bar.
- After the concrete has set, it is necessary to create a waterproofing layer between it and the mauerlat. To this end, bitumen mastic can be applied to the concrete or the screed surface can be lined with roofing material.
- Treat the timber with an antiseptic preparation, a deep penetration fire retardant and a waterproof varnish.
- Mark and drill holes in metal plate for metallic studs.
- Slide the bar onto the studs and firmly tighten the anchor bolts.
It is important that each hole made reduces the strength of the power plate, so you should not use a large number of studs, and it is strictly forbidden to cut into it for mounting rafters!
Construction process
Hip roof своими руками строится по четкой инструкции, которая описывает последовательность каждого шага. Чтобы результат оправдал затраченное время и материалы, работы следует выполнять согласно технологии:
- Installing puffs. Overlapping beams can be used as drawbars; we need at least two such elements in order to install racks on them. Experienced craftsmen build a boardwalk over beams to build a truss system more convenient and safer.
- On the mount two racks are mounted. Racks can be more if necessary, but without the need to make the structure heavier. While the system has not acquired stability, the racks are fixed vertically with temporary struts.
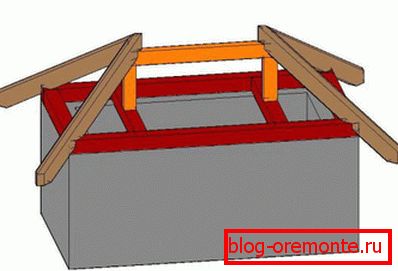
- A ridge girder is installed on the racks, fastening it with long nails. Ordinary truss feet are attached to the girder with metal linings or corners.
- Mounted central intermediate rafters on the hip slopes, and then the diagonal truss legs of the double boards.
- Fix end buttress rafters, darks, fillies and wind board on one or two ramps.
- The counter crate is mounted, and a vapor barrier membrane is laid on it with strips and secured with a construction stapler.
- To build a hip roof, soft roofs are more often used, since with its help it is easier to cover the slopes of complex geometry. For roofing materials of this type it is necessary to make a continuous crate from sheets of moisture-resistant plywood.
- With the help of a special stainless steel fastener with a rubber cap, the roofing material is fixed on the batten. They have sheets with an overlap of 10-15 cm to protect against moisture penetration. Note, the steeper the slope of the roof, the more overlap must be observed.
- After the roofing material is laid, the roof can be insulated from the inside, equipped with windows, gutter and chimney.
A hip-type roof is best suited for honest construction, but in order to build it yourself, calculations, design and patience are needed, without which it is impossible to succeed.