Gable roof yourself
Building a private house is a long-term business, but so desirable for most people. It is important not to hurry and properly plan not only the interior, but also take care of the external attractiveness of future housing. In this article, we will describe how to properly make a gable roof, and present step by step instructions for its construction.
Having a simple construction (consists of planks and beams, mounted without much physical effort), this roof is much more often chosen for private houses than the hipped (man's) or mansard roof.
Design

Before you make a gable roof, you need to familiarize yourself with all its constituent elements and understand how they interact with each other.
This type of roof consists of the following components:
- the horse;
- fillies;
- racks;
- sill;
- подкосы;
- rafter foot;
- arbitrator;
- sves;
- Tightening and crate.
Now about each element in more detail.
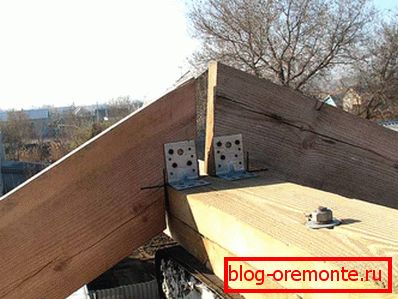
Little horse - the highest horizontal part connecting the two slopes of the roof. The upper ends of the rafter legs are supported on the ridge board.
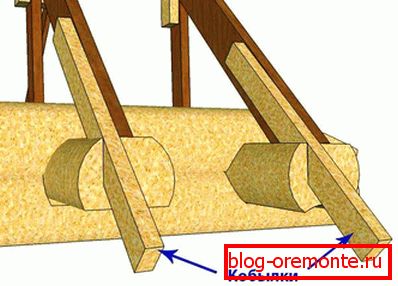
Filly - a piece of board forming the overhang of the roof and being a continuation of the rafter. Fillets are needed when the length of the rafter leg is not enough to form an overhang. Under the mare use a board smaller than for the rafter. The use of fillies facilitates the installation of the overall design, as they enable the use of a smaller rafter.
Stand - a vertical frame element that transmits the load to the ceiling and the bearing part of the wall from the ridge. It is made of timber with different sections (100x100mm and 150x150 mm)
Sill - horizontal bar on which the rack rests. Its main purpose is to distribute the load from the roof through the ceiling to the bearing walls. Usually used bendings of 100x100 or 150x150mm.
Подкосы - these are the cut parts of the boards, mounted at a certain angle in order to transfer the load from the rafter leg down to the supporting elements of the structure. Collectively, several strut-heads create a system called a farm. The farm is able to withstand increased load during long spans.
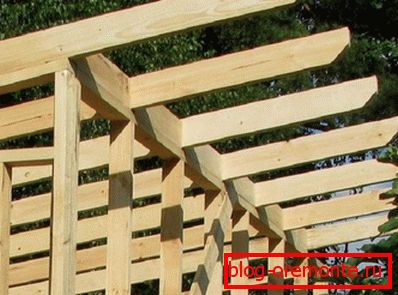
Rafter foot (rafter) - board or timber with two types of sections: 50x150mm and 100x150mm. Installation of a gable roof without this element can not do, since it is needed to form a contour that has the shape of a triangle in cross section. The main purpose of this element is to evenly transfer the load on the structure arising from the weather (hail, snow, wind), as well as the weight of the roof covering on the power plate. The installation step of a truss foot is selected depending on the type of roofing and varies from 60 to 120 cm. Accordingly, the heavier the coating, the more often rafters are mounted.
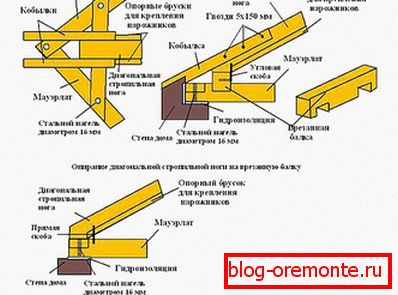
Reward - a bar laid along the entire perimeter of the building and fastened to the bearing walls with the help of threaded rods or imbedded anchors. This strapping is needed to transfer the load from the rafter legs to it. Often for tying use coniferous timber with a square cross section. Mauerlat sizes are standard: from 100x100mm to 150x150 mm.
Sves - element of the gable roof, designed to divert rainwater from the building, keeping surfaces from getting wet. The overhang by construction standards must have a projection from the plane of the wall at least 40 cm.
Tightening - an integral part of the structure, forming a triangle together with the rafter legs, which allows to significantly increase stability.
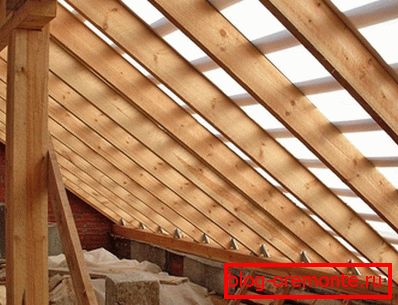
Obesity - construction of planks and bars, fixed perpendicular to the rafter legs. It contributes to a uniform distribution of the weight of the roof on the building, and also protects the rafters from the effects of weather conditions. In addition, this element holds the entire roof frame into one coherent system. For obreshetki used unedged board, with pre-stripped bark. Under the soft roof of bitumen shingles the crate is made of moisture resistant plywood.
Note! All components of the frame are made exclusively from coniferous woods. Each frame element is pre-coated with an antiseptic to prevent decay, which ensures a long service life of the entire structure.
Rafter systems
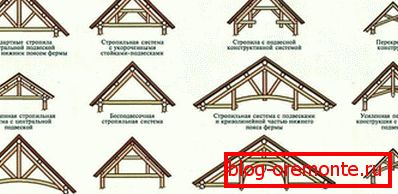
For the construction of gable roofs, suspended and hanging rafters are used.
Rafter rafters - it is a design with a support beam in the middle. The beam is needed to transfer the weight of the roof bearing wall from the ridge. It is equipped exactly in the middle between the outer walls.
Note! In that case, if columns are used as internal bearing elements, hanging and napsled rafters can be alternated. Suspended rafters are supported by columns, and hanging rafters are installed between the columns.
If the gap between the walls is not more than 10 m, and if there is no carrier support between them that divides the internal area of the building in half, hanging rafters are used:
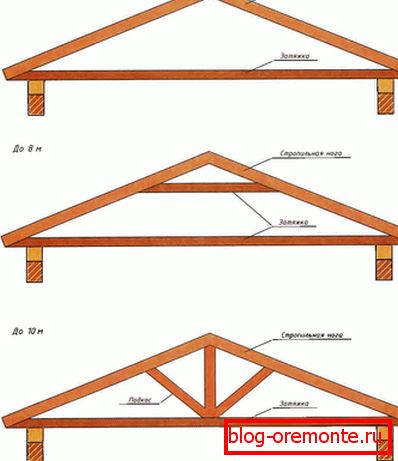
Hanging rafters rely on the side walls, creating a tearing effect that adversely affects the supporting structure of the building. To neutralize the arching action, the rafter legs are joined by puffs, forming a triangle (the strongest geometrical figure that does not undergo deformation under different directions of loading). In the role of puffs can act as beams.
Note! Tightening make the top and bottom. The upper must be at a distance of not less than 500 mm from the ridge.
Stages of work
Having dealt with the design of the gable roof, you can proceed to its direct construction.
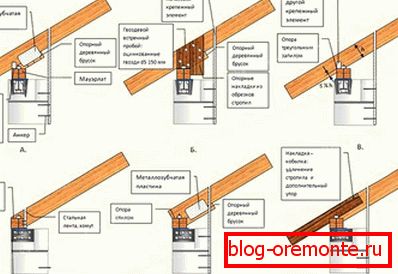
At the first stage of installation should equip mauerlat. There are two options. If the walls of your building are made of timber or logs, then the topmost bar will play the role of a trim.
For a house made of brick, it is necessary to wall the rods of metal with a threaded thread into the wall. They will be needed to secure the power plate to the bearing walls. With this mounting rods are installed from each other at a distance of 1-1.5 m specifically to enhance the strength and durability of the structure. The diameter of the rods may be different, however, it should not be less than 10 mm. Fastening is carried out with the help of nuts with washers or bolts. Between the strapping and brickwork waterproofing is done (a layer of roofing material).
Note! If the load-bearing walls of the house are made of foam concrete, then to mount the mauerlat it is first necessary to create a belt of reinforced concrete (height from 200 to 300 mm) over the blocks. Before concrete is poured, metal rods are inserted into the reinforcement.
In order for the length of the truss legs to be the same, the Mauerlat beams located on opposite supporting walls must be strictly parallel to each other.
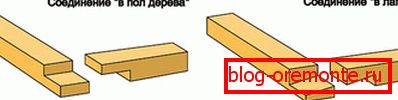
After completing the installation strapping, proceed to the installation of rafter legs. Previously it is necessary with the help of a tape measure and a pencil to mark the position of the rafters on the mauerlate. Then you should prepare yourself rafters. To do this, a cut is made at the lower end of the rafter to create a better grip. The cut should be about 1/3 the width of the rafter. To accurately calculate the location of the cut and its angle, you can use a pre-prepared template or drawing.

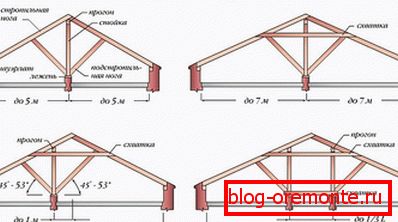
The slope of the roof should not be too gentle and not too steep.
Note! There are two main factors that determine which particular bias to choose. So, if a house is being built in an area with strong gusts of wind, then the slope should be around 15-20 °. This will protect the roof from breaking the roofing material during the bad weather. If you decide to settle in an area with a lot of annual precipitation, then do a slope of 35-40 °. This will ensure the rapid precipitation of precipitation from the coating and extend the life of the roof.
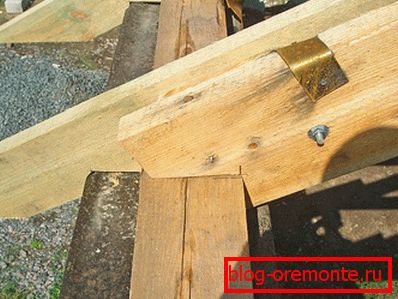
When installing hanging trusses, all trusses are assembled in advance. They are fastened to each other with metal pads or bolts. After assembly, the extreme truss triangles are mounted first, and after that all intermediate ones are installed. All rafters must be fixed with stitches, dismantled after work. At the next stage, fillets are attached, forming a roof overhang. And after installing all the rafters and fillies the crate is attached, and massive sturdy boards are mounted to the ridge. The rafter system is assembled and ready for operation.
When installing naval rafters, the assembly begins with the installation of the bench on which the supports are mounted. Then, mounted ridges are installed on the mounted supports, strongly fastened with laths. And only after that, the rafter leg is installed on the timber, the length of which should slightly exceed its length.

After mounting the truss system, it remains only to sew the overhang and the gables, and then install the roofing material. At this installation gable roof can be considered complete. And in order for you to decide on such a crucial and important step, we bring to your attention a video that shows the entire workflow described above.