Ceramic chimney - design and installation
Clay is the oldest building material, which was used for the construction of the first residential buildings, manufacturing household utensils, as well as dishes. After a year, ceramic products do not lose their relevance, they are being introduced into new areas of application. Recently, ceramic chimneys have been replacing brick or metal, the main advantage of which is environmental safety and the absence of harm to human health. This article will tell you when the chimney duct of ceramics is suitable, how to install and operate it.
Design
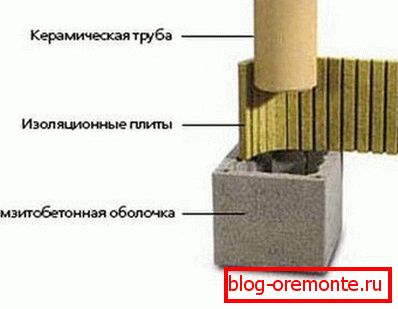
Ceramic chimney combines the strengths of analogues from other materials: the ease of steel pipes and the excellent insulating properties of brick. Its design consists of three layers:
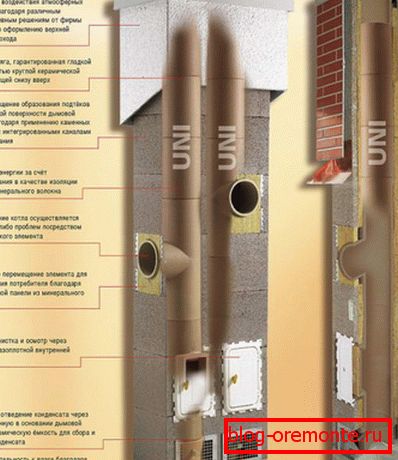
- Frame This element is made of hollow lightweight aggregate blocks of light weight. In the middle of each block of square section there is a round hole into which a ceramic tube is inserted. In each corner of the block, holes are made into which reinforcement is inserted during installation.

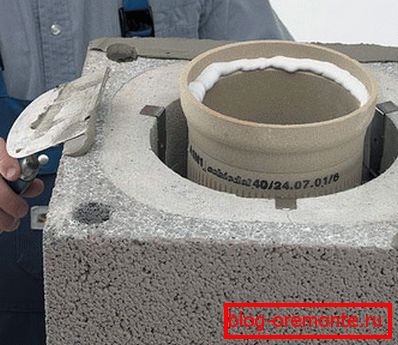
- Ceramic tube. It is a hollow cylinder of high quality heat-resistant ceramics. Each pipe segment has a length of 50-100 cm, during installation it is inserted inside the previous one. Different models of ceramic chimneys are completed with pipes with different wall thicknesses. When choosing, the stove is advised to follow the rule: the higher the temperature of the gases in the smoke exhaust channel, the thicker the walls should be.
- Insulation. Between the frame and the pipe there is an insulating layer that “blocks” the heat inside, not allowing the external shell of the chimney to heat up. To do this, use fibrous non-combustible insulating materials, most often basalt wool. This measure improves the fire safety of the ceramic smoke exhaust duct.
Note! When mounting a ceramic chimney, it should be taken into account that it is positioned strictly vertically, turning or bending of the channel is not allowed. This feature of the smoke removal system is taken into account when designing and selecting a site for the heater. Under the chimney pour a separate foundation, not communicating with the main, to prevent its deformation and overload.
Benefits
Ceramic chimneys of a three-layer structure were first used in France in the 1980s, a decade later they covered the American construction market, and in Russia they came only in the early 2000s. Russian experts met the novelty with caution, but after a deep study of performance, testing the winter cold came to the conclusion that the ceramic chimney pipe has the following advantages:
- Versatility. Due to the high therm stability and the change in wall thickness, ceramic pipes withstand temperatures up to 1000 degrees. Therefore, they are used for stoves, fireplaces and boilers operating on any type of fuel. Especially for low-temperature boilers they produce pipes with thin walls, in which there is no reduction in thrust.
- Fireproof. The refractory qualities of ceramics and the use of insulating material reduce the risk of fire.
- Energy efficiency. Due to the high thermal insulation qualities of ceramics, the pipe does not cool down during operation, thereby maintaining a normal level of traction and saving fuel.
- Durability. Declared by manufacturers, the lifetime of ceramic chimneys is 50 years or more. Resistance to corrosion, mold and fungus makes this type of pipe the most durable and easy to clean.
- Fast warm up. Even after a long idle time, with the help of a ceramic chimney you can kindle the fire and heat the house in a matter of hours.

Important! Significant lack of ceramic chimney pipes - high price. Models of Russian production are cheaper than their foreign counterparts, not inferior to them in quality. Domestic manufacturers, playing the role of catching up in this niche of the construction market, focus on the adaptation of products to the conditions of the Russian winter. To do this, they have provided additional fastenings for external insulation, increased the length of the additional elements, reduced weight and increased the diameter of the pipes.
Installation
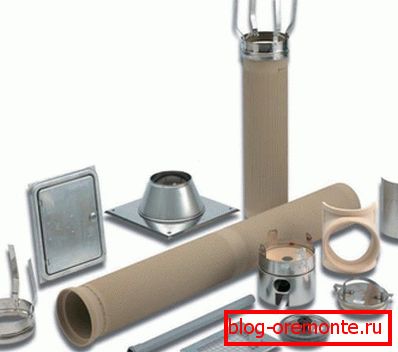
The technologies for installing chimney pipes made of ceramics of domestic and foreign production are not different, they always supply products with annotations with a detailed description of the sequence of works. Chimney assembly is a complex task, the quality of which affects fire safety and the time of its service. To be sure of correct installation, it is better to turn to professional craftsmen who will do the work faster and more accurately. The technology for building a ceramic chimney is as follows:
- Under the pipe installation site, the foundation is poured to a depth of 30-50 cm. The foundation area should be 20-30 cm larger than the pipe. After solidification, waterproofing is performed using roofing material or coating with bitumen mastic.
- Prepare a thick solution of cement, sand and water in the tank for mixing. Steel rebar cut into 1.5 m.
- Begin assembly of the pipe with the installation of a tee with a tank for collecting condensate, through which they control the state of the chimney and clean it.
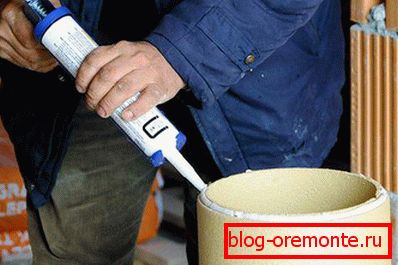
- After the tee install the stove liner. Each frame unit is installed on the previous one, and the tube is inserted inside the lower segment. The joints are coated with a special heat-resistant composition. To ensure that the seams are smooth on the outside, excess grout is removed with a cloth.
- When the height of the blocks reaches 1.2-1.4 m, reinforcement rods are inserted into the holes and filled with a solution so that no cavities remain. If the holes are large in diameter, use 2 rods at once.

- Next, the chimney is collected according to the outlined scheme, not forgetting about revisions and tees. In the places of passage of the overlap pipe there should be no joints between the blocks. These areas outside are additionally insulated with heat-resistant material.
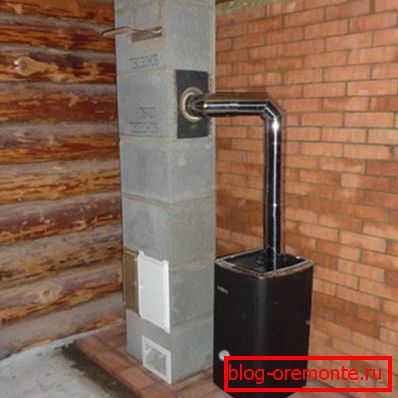
- External warming is carried out in places of pipe passing along the street and in unheated attics.
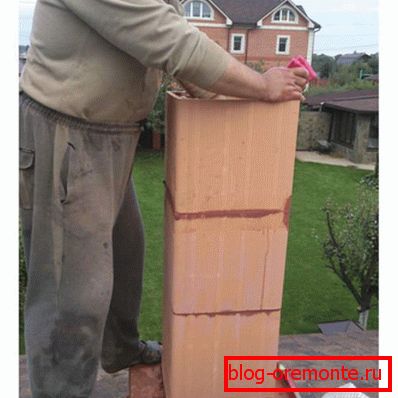
- The pipe section overlooking the roof is lined with clinker brick or artificial stone. On the tip put on the deflector.
Note! There is a more time consuming method of installing a ceramic pipe using a metal grid and corners. At the same time perform reinforcement outside the chimney.
It is better to perform the installation of the ceramic chimney before the start of finishing, before the erection of the rafter frame. This will allow you to easily fill the foundation, to request the passage of the channel through the ceiling or the roof. However, after the completion of work, it is no longer possible to change the installation location of the furnace, so carefully plan and coordinate the design of the chimney.