Balcony roof yourself
Most multi-storey buildings have balconies, but not all balconies have roofs. Because of their absence, snow, rain, sun can negatively affect the wall of a building, and as a result, destroy it. That is why it is worth considering to make the roof on the balcony. We will list the possible building materials that can be used to make it, what types of roofs there are, and what you should pay attention to at the very beginning.
To be or not to be the roof on the balcony?
So, first of all, you should realize what benefits the roof of the balcony will bring. Here are a few positive points:
- Dust protection in windy weather.
- Protection against water during rain, as well as against dirty stains on the wall.
- Sun protection.
- Protection against icing in the winter.
- Protection from conflict with neighbors.
If it is decided to make a roof on the balcony, then it is worth settling this issue with the competent authorities. For example, this or that roof structure can spoil or disrupt the design of the entire building. Therefore, it is first necessary to make a drawing of the future roof and go with him to the housing office. And then to act already starting from the decision of the housing department.
With the construction of the roof, there is a real opportunity to add a few square meters to the living space by glazing the balcony.
Note! You should be careful, because work at height is always associated with the risk of falling. It is necessary to think through each stage of work.
The choice of building materials for the roof of the balcony and their dignity!
There are a number of roofing materials that are ideal for installing them on the balcony, namely:
- Polycarbonate.
- Onduin.
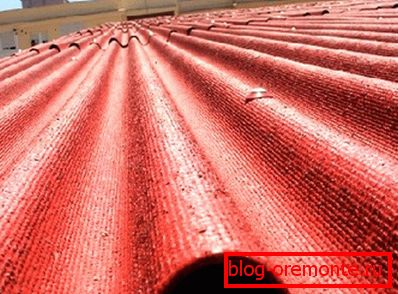
- Decking.
- Metal tile.
Polycarbonate.
This is a heavy-duty material. The structure is a transparent honeycomb polymer. The weight of one sheet can reach up to 10 kilograms, while its size is as follows: length - 6 m, width - 2.1 m, thickness - 4 mm.
Onduin.
For a long time this wavy bitumen sheet was in great demand. However, now experts do not recommend its use. It consists of many layers of paper that are saturated with bitumen. Its service life is not more than ten years. It should be noted that its color fades very quickly, and if moisture gets inside the sheet, there is a risk that your ceiling will warp. For these reasons, he is not very popular, even though his weight is only six kilograms.
Decking.
Decking представляет собой оцинкованную гофрированную сталь. Идеально подходит для покрытия кровли. Более того, дополнительным преимуществом является и тот факт, что его структура придает большую жесткость покрытию. Например, значение НС 16 указывает на высоту гофры в 16 миллиметров. А этого достаточно для создания прочной и надежной крыши.
Metal tile.

Metal tile – это универсальный материал, который обладает защитным покрытием. Главное его преимущество, это высокая устойчивость к перепадам температуры. При этом его вес составляет до 5 килограмм, а толщина 0,7 мм. Что касается покрытия, то их существует несколько видов:
- alumina,
- zinc,
- алюмоzinc,
- железоzinc,
- plastisol,
- polyester,
- polyvinyl denfluoride,
- polyurethane,
- acrylate
- polymeric various flowers.
Features and types of roofs
The balcony is always exposed to rain and wind. As a result, icicles can form with sudden changes in temperature. As a result, it can deform the roof, and, worst of all, bring it down. If you want to prevent something like this, then you should seriously consider the type of roof structure for a balcony. The choice of type of construction affects the slope of the roof of the whole house. Here are the possible options:
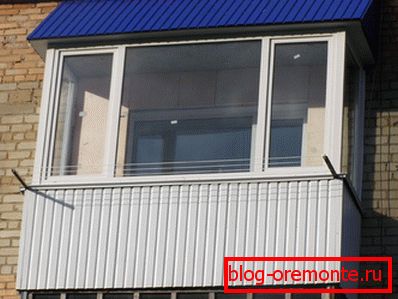
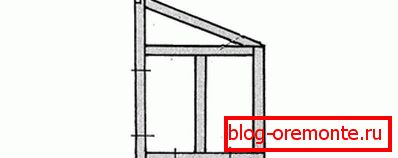
- In the case when the roof of the house has a small ramp, the roof of the balcony will be its continuation.
- If the roof of the house is flat, then the canopy over the balcony should have a slight slope when the ratio of height to length is 1: 3.
- The design can be directly attached to the wall or the wall and the balcony itself.
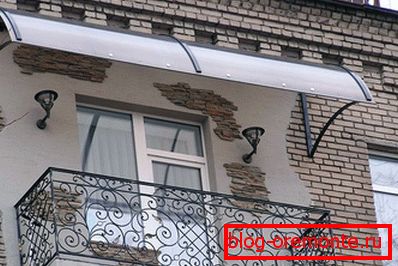
Sheds may vary in shape as well as installation method. For example, the shape may be semicircular or direct, and the installation is independent and dependent. So now more:
Installation method
Installation dependent design requires great investment and effort. Gather a frame that is made of wood, plastic or metal. After the frame is mounted, and it remains only to put the roof. Advantages of dependent design:
- Just warm and glaze.
- Sturdy construction, so that the wind does not tear the roof.
- You can create different forms.
- Does not affect the size and weight of the material used.

Installation of independent roof carried directly to the wall. It does not build a frame and rack. His device is simple, respectively, does not require large investments. The roof is fixed with dowels, but this simple design has several disadvantages:
- During the period of melting snow there is a risk of structural collapse due to the heavy weight.
- Structural deformations are possible, especially if the balcony is wide.
- Unable to insulate the balcony.
- If lightweight material is chosen for the roof, there is a risk of its breaking by strong gusts of wind.

The form
Semicircular. Due to the complexity of the design it is difficult to make it yourself. For this reason, you have to buy a ready-made form. It is made by different methods: gluing together several layers of glass cloth, heating the polymer or bending the metal.

Straight. Due to the simple design is most in demand. To make a roof for the balcony, it is best to consider a preliminary draft. In the project you need to specify the type of material and calculate its consumption. Then decide on the method of installation - dependent or independent, as well as the most important, what and how the balcony will be insulated.
We start training. The necessary material and tools for work
For work you need the following building material:
- a sheet of the coating of your choice, for example, a sheet of corrugated sheet, galvanized, etc.,
- metal square,
- corner shapes
- grinding wheels,
- aluminum profile for drywall,
- insulation,
- for the ceiling and walls plastic profile,
- polyurethane foam
- cement,
- antiseptic,
- dowels, screws, etc.
You will also need the following tools:
- drill,
- Bulgarian,
- electric drill,
- metal shears
- set of screwdrivers,
- screwdriver
- knife,
- hammer,
- pliers.
We start the manufacture of the roof of the balcony
It should be noted that the choice of the option of the visor depends on your desire and capabilities.
Dependent roof
This type of roof is much more reliable as opposed to independent. This design can withstand a large load. It is worth noting that the materials and dimensions may be different:
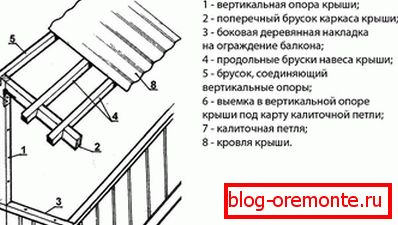
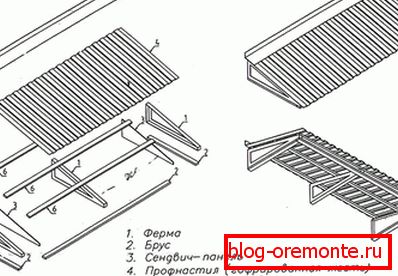
- On the perimeter of the balcony racks are installed. They can be made of metal profile, PG, square pipe, etc. It is important to immediately cut off the racks of the desired height. If the roof is flat, then everyone is the same, if not, then the racks will be longer near the wall, and shorter at the edge of the balcony.
- With the help of dowels, a metal truss is fixed to the wall. Then, with the help of bolts or screws, it is also attached to the installed racks. It is on them that a large load will go.
- Top racks and the edges of the farm are connected to the profile pipe.
- The obreshetka is made by bars.
- On nails or dowels depending on the type of flooring is fixed coating.
- The gap that formed between the wall and the stand is recommended to blow the mounting foam. Outside these slots can be puttied.
- After it remains to glaze the balcony, as well as to insulate, taking care of sound insulation and waterproofing.
- The final stage of the work will be covering the ceiling and walls outside and inside. Immediately carried out all the necessary finishes.
As a result, you can make an extra warm room in your apartment. Some use the balcony for storing important things, while others carry out heating and make their own office. There are no restrictions on this issue.
Independent roof

This type of roof will significantly differ from the previous one in its design. Moreover, its installation is much faster and less expensive. Here is the sequence of works:
- A finished truss made of metal is applied to the wall. There are places for drilling under fasteners. Instead of farms you can use PG. In the required places it is cut by a grinder and bent.
- The farm is secured with an anchor. At this stage it is recommended to use gaskets with a thickness of 2 mm. This will allow the gap formed to be well filled with sealant or assembly foam.
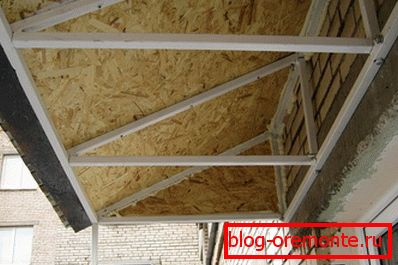
- On the established farm from a bar the obreshetka is mounted.
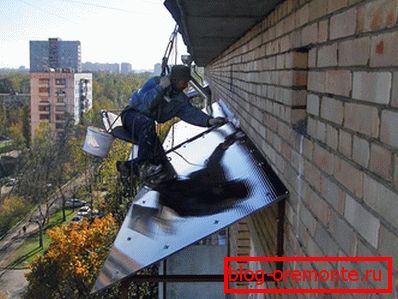
- The material you have chosen for the roof is measured by size. When measuring, consider a small departure to the side and forward.
- The flooring is fixed with screws.
- All the cracks formed are blown out with foam.
- Inside, decorative walls and bottom of the roof are made.
This option is perfect for the balcony of the last floor. From the side it will look quite aesthetic.
Tips and tricks for installing a roof onto a balcony using these methods:
- If your balcony has at least three meters, then it is recommended to use three fixtures, and for greater reliability, four. Set up three trusses accordingly.
- To connect trusses, it is best to use a 40? 40 metal square tube. The crate will be attached to it.
- All metal construction is best made using electric welding. After the metal is cleaned, primed and painted. And only then finishing works are carried out.
- As the crates is best to use boards of 20? 120. They must be pre-treated and painted.
Note! When working with polymers or plastic you should not use nails, otherwise the material will crack.
This is how the main works on the production of the roof on the balcony of the last floor are carried out. Now consider in detail some of the recommendations and tips on insulation, sealing and waterproofing the roof.
Sealing and waterproofing balcony roof
To prevent the leakage of the roof during the spring-autumn period, it should be sealed and waterproofed. This is especially important if you perform interior trim balconies.
With regard to sealing, in this case between the window and the fence or walls and the floor are closed all the joints and seams. For this special sealant is used. If these joints are outside, it is recommended to seek help from climbers. There are many types of sealants, for example, silicone, thiokol, acrylic and polyurethane. Each of these types has its own advantages and disadvantages.
If you live on the top floor or below, and the neighbors' balcony is not glazed, then there is a risk that all precipitation may penetrate to you. That's why there is a need for the manufacture of waterproofing. If you do not plan to glaze your balcony, then just make a slant with a slant to the street. After all, a roof made without glazing will not save from snow and rain. Waterproofing can be done in two ways: using mastic or using rolled material. As for the latter, its use is not entirely practical. The rolled material is made on the basis of polymers or bitumen. As a rule, when using roll waterproofing in places of bending over time, leakage may occur. Moreover, this material is difficult to tolerate sudden changes in temperature. For laying roll waterproofing on a bitumen basis, a gas heater is used, and for polymer special glue. The work is very laborious.
It is quite another matter to use special mastic. It is great for waterproofing visor and plates. Such mastic is resistant to mechanical and chemical influences. Easily transfers ultraviolet rays with temperature drops from -50 ° C to + 90 ° C. Mastic is applied with a roller or brush. Polyurethane mastic does not flow when applied and forms an elastic and seamless coating. The life of such a waterproofing is twenty-five years.
We warm the roof

To insulate the roof, it will be necessary to use a double layer of penofol, foam plastic, foiled glass wool, as well as other materials at hand. So, laying the rolls is as follows:
- The entire length of the balcony ceiling is closed with a single layer of insulation. If there are no windows, then lower the first layer of insulation to the floor.
- By means of laths and self-tapping screws the first layer is fixed.
- From the tops of the front windows, a second layer of insulation is laid perpendicularly through the ceiling to the opposite wall.
- Fixed with rails, which are pre-fastened to the crate in several rows. If there are no slats, you can do with a stapler.
- On the wall, staples or slats strengthened penofol.
- At the last stage, wall cladding is performed. To do this, buy the necessary decorative material.

If you decide to use special sheets for insulation, then the work is carried out according to the following principle:
- In most cases, these sheets have a standard size of 1? 1 m. Therefore, based on the parameters of the balcony, you need to fit the sheets in size. If the width of the balcony is more than one meter, then add separate pieces along the edges.
- If the ceiling is made obreshetka, cut the sheets to size and insert them between the bar.
- If not, then make the crate with the necessary step, so that less had to cut sheets of insulation.
- These sheets are fixed with screws with washers.
- After that, it remains to simply install the facing material. Some choose plastic panels or suspended ceiling.
Note! When choosing insulation, pay attention to its quality. It should not absorb moisture.