Warm electric floor under the laminate itself
One of the factors of comfortable living in the apartment is the temperature in the rooms. Warm electric floor under the laminate is used as an effective source of additional heating of the room. It can be mounted in country houses and apartments, under various types of finishing coating, including laminate. Previously, such a combination was not available due to the low thermal conductivity of the material and the negative effect of the heating process on it. Modern models of laminated panels, produced with the label "Warm Wasser" are perfectly combined with electric heating elements, especially film, emitting infrared waves.
Types of electric floor:
- The heating cable is a high resistance wire. Fitted with a snake and filled with a layer of concrete screed. This is a budget option, and to make such a warm electric floor under the laminate with your own hands is quite simple. The disadvantage of the design is slow heating, which requires time to increase the temperature of the screed and the substrate under the laminate.
- Heating mats are a cable construction attached to a fiberglass web, so laying is quick.
- Film infrared floor - this model is optimal for use under the laminate, the strip with a thickness of 3 mm does not hide the height, it is easy to connect.
Layout layout
It is necessary to draw a scheme for laying a heated floor. In the locations of the massive furniture heating elements are not installed.
Note! When installing coolants, it is necessary to retreat at least 10 cm from the pipes and radiators in the room. This is done to avoid overheating and failure of individual sections of the system.
Indents from the walls, which are from 5 to 10 cm, are also taken into account. According to the ready plan, the area on which the electric floor will be laid is calculated.
Installation of heating mats
.jpg)
The process of installing heating mats includes the following steps:
- At the selected location in the wall at a height of 30 cm, a hole is made for the thermostat, and in the screed, a wire groove is cut out.
- The surface of the base is thoroughly cleaned before laying the electric floor.
- The surface is primed to improve adhesion with glue.
- It is necessary to mark the placement of furniture or plumbing, as well as to make indents from the walls.
- Mats with a cable are cut to the required length, while the cable itself is prohibited to cut. It is important to avoid overlapping the cable coils.
- When installing a temperature sensor, place it at an equal distance from the heating elements.
- The assembly ends of the wire are led through the groove to the place of installation of the thermostat.
- The temperature sensor is placed in a corrugated tube, this end is closed with a plug, and the second is fed to the thermostat. The tube fits into the mounting groove and is smeared with tile mortar. The ends of the wires are connected to the device.
- To check the correct installation, the system is turned on for a minute, this is how the thermostat and mats are controlled.
- The screed is made from the tile laying solution, its height is 1 cm.
- After the base has dried, an electric floor is checked. After shutdown and cooling, the substrate is laid, and the laminate is being installed on it.
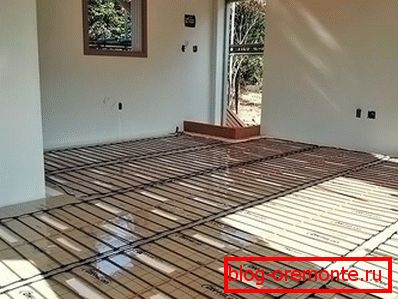
Electric cable laying

Before you make an electric floor heating, you must perform the preparation of the base. It consists in leveling and cleaning the surface. Next, waterproofing is performed, it is laid with an overlap on the walls.
A damper tape is glued around the perimeter. Base insulation is produced by shielding material, such as penofol. A layer of thermal insulation will prevent temperature leakage into the concrete of the ceiling.
Note! If necessary, a layer of mineral wool or polystyrene foam up to 10 cm is taken as insulation. A reinforcing mesh is laid on top of the insulation.
To fasten the cable, it is necessary to fix the metal mounting tape on which the turns can be laid with any step, obtaining the necessary heating power. Without starting installation, the resistance of the wire is checked and compared with the passport indicators. Laying is made according to the scheme, indented 5 cm from the walls and 10 cm from the heating pipes. The minimum diameter of the bend of the coil is 5 cm, the wires should not be in contact with each other.
At a convenient place at a height of 30 cm, a hole is made for the installation box of the thermostat and a groove penetrates the wall and floor for laying wires and a corrugated tube into which a temperature sensor is inserted. The tube is fixed at the same distance from the cable coils. Its end with the sensor is securely closed with a plug from getting into the solution.
The cement-sand mortar is carefully laid out on the finished system and distributed over the base.
Note! The screed is well compacted so that no voids are left that impair heat transfer. The solution layer reaches 5–8 cm.
Three groups of wires are assembled in the installation box - contact from the electric floor, temperature sensor and voltage supply from the network. Before installing the thermostat, the resistance of the wires is checked; if the result is satisfactory, the wires are connected to the device in accordance with the existing circuit. Laying laminate can be after complete drying of the screed.
Infrared warm floor

Installation of film floor does not require additional work. It is enough to lay the heating strips on the insulating coating, glue tape to the base, connect them with fasteners and wires and connect to the thermostat.
Note! For isolation of places of cuts and connection of contacts in a set bitumen isolation is attached.
Before laying the laminate infrared floor covered with a thick plastic wrap.
Video
This video provides a step-by-step instruction for laying the film floor under the laminate: