Screed under the laminate itself
When installing flooring, floor leveling plays an important role. This may be due to material features or laying technology. Particularly important is the preparation for laying laminate, when allowed only minimal irregularities. When this is achieved the maximum strength of the coating and significantly increases its service life. Most construction firms and brigades perform such work, but their cost is high. Output - making screed under the laminate with their own hands. The alignment process will take a long time, but the desired result will be obtained.
Features of the screed
The coupler should be performed with the assumption of minimal deviations from horizontal position no more than 1 mm / m2. If this condition is not met, then the laminate will bend and creak under load. Over time, locks may break and you will need to replace all damaged slats.

If the substrate is damaged, it will only be subject to replacement. On the other hand, with the correct implementation of the screed technology, but with the use of a too thin leveling layer, it can crumble and, under frequent loads, wear out under the action of solid particles much faster. Therefore, the thickness should be sufficient to provide the necessary strength, and reinforced with an additional reinforcing layer. Over the entire thickness of the floor, the density of the material should be about the same.
What tools are needed

To qualitatively perform the coupler will need the following tools:
- Building level to check the horizontal floor.
- Profile of galvanized metal.
- The rule for leveling the solution.
- Spatula and / or trowel for applying to the surface of the solution.
- Drill for forming holes for markers.
The construction level plays a particularly important role, so it must be selected carefully. Although it is inexpensive, the quality of the entire work depends on its accuracy. Typically, the measurement error can range from 0.5 mm / m2. This is quite enough, but even with a scrupulous approach to achieve a better result will not work. Therefore, many are trying to use the level.

It is more expensive, and therefore will require a more careful attitude to the tool. There are two types of leveling - bubble and laser. The first option refers to outdated models, but, nevertheless, it meets all building codes and can be successfully applied during leveling. The deviation from horizontalness will be several times less than when using the usual level. The laser works with an accuracy of tenths and hundredths of a millimeter. To carry out one-off works, you should not buy a professional tool, but rather rent it or take it from friends.
Types of lighthouses and features guides
Creating beacons will require the use of galvanized profile. They are made of metal and have a fairly flat and durable surface so that you can navigate through them. The level of roughness and marriage is minimal. It is selected taking into account the irregularities of the floor. That is, with significant surface defects, it is taken thicker and more in cross-section in the form of a corner, otherwise the profile is selected in the form of a tape to save the leveling mixture. Wood guides have become obsolete a long time ago and are currently not used in construction work requiring smooth and durable surfaces. This is due to the fact that the tree is able to absorb water from the solution, as well as swell from moisture and have a fairly rough or uneven surface.

To create beacons usually use a concrete solution, but you need to wait until it acquires the necessary strength. Therefore, to speed up the screed process, ready-made beacons of durable material are used. The most common are U-shaped ceiling mounts, which are used to install drywall. They have high rigidity and reliability. In addition, they are easy to put on a certain level and firmly fastened to the screws. Another, more economical option for lighthouses is to install metal profiles on self-tapping screws. They must have a sufficient thickness of 3 mm so as not to bend when applying a load to them, and have sufficient width for secure fastening.
Elimination of possible defects in the floor
Before you make a screed under the laminate, you must clean the entire surface of the floor from dirt, dust and debris. Old flooring will need to be dismantled. To do this, remove the plinth, and then with a hammer or screwdriver removed attachment, which holds the floor. If it is not planned to be used in the future, then it is broken, and the roll coating is stripped off. After that, the strength of the floors is evaluated, various defects are identified, such as cracks, chips and blisters.
Note! If there are significant drawbacks, you should think about pouring floors from scratch, or else try to make reinforcement and extend the life of the floor.
Cracks without fail are filled with concrete. The blisters are ground, but it is better to find out the reason for their appearance. In some cases, the floors on the first floors can pierce the roots of a number of growing trees, so they are dug up and cut with a chainsaw.
Note! Paint from the floor must also be torn off or cleaned. If this is not done, the screed may eventually collapse along with the laminate coating.
Installation of beacons and guides

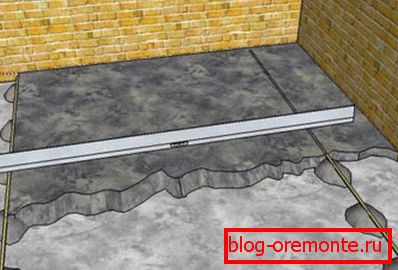
Installation of lighthouses begin with the search for a zero level of the floor. To do this, it is enough to visually find the most prominent point of the floor in the horizontal direction and install the beacons. If visually this procedure is impossible to perform, then proceed in this way: take two screws and screw in one and the other end of the wall. They attach the guide with the level in a horizontal position. On the opposite side of the wall, they perform the same operation. Then put on them a transverse metal profile guide and also level horizontally by unscrewing or twisting the screws on one side.

Next, check the horizontal position of all guides and the transverse bar is carried out along the guides along the whole room. If on the way the plank touches the floor surface, then all the planks are raised to a suitable height and the operation is performed again. When the plank is free throughout the room, the zero level can be considered found. After that, additional beacons with a distance of 1 meter are installed along the guides. To simplify the work, you can use the level, which will help you easily find the zero level and significantly reduce the search time. Work on finding a zero level will become clearer after watching the video.
The next step is to install additional beacons and guides. They are installed with a distance of 50 cm - 1 m strictly parallel. The more often they are put, the more reliable the alignment process will be. They are installed as follows: a transverse guide is placed on both sides of the room, then beacon with profiles are aligned with it, and they are centered and horizontal. Along each guide beacons are installed. When all installation procedures are completed, all the structural elements are checked by level.
Flooring
Before carrying out concrete work, the floors must be cleaned and the surface treated with a primer in order to improve the contact and adhesion of the new layer to the old one. If necessary, conduct waterproofing and floor insulation. Then proceed to the preparation of the solution, which consists of 5 parts of purified sand and 1 part of cement M300. First, thoroughly mix the dry ingredients to obtain a mixture with high uniformity, and then, without stopping the mixing, add a little water. The resulting concrete solution should be of medium thickness.
Note! Excessive addition of water leads to an increase in the time of hardening, as well as to cracking the floor. The strength is also reduced.
The prepared solution must be worked out at one time, and the entire surface of the floors should be poured in one day in order to simultaneously ensure high strength and uniformity. Work is carried out at a temperature of at least + 5 ° C, so that the concrete can grasp and harden in normal conditions. At the same time avoid the appearance of drafts and do not create a special moisture unnecessarily.

Laying start between two small guides with a distance of up to a meter, so that you can access the entire surface. After laying out the solution, it is immediately spread in the following way: by moving the rules to the left and right along the surface of the guides, it is moved towards itself. In this case, the excess solution immediately removed. If, after the first move of the rule, many defects remain, then another small layer of the solution is applied. After the next pass, they should remain the minimum amount and therefore produce a further leveling trowel or spatula. Thus, the screed is made and leveling under the laminate of the entire floor surface. The next day, when the solution hardens, the guides should be removed, and the resulting grooves should be sealed and leveled. If necessary, the surface should be watered abundantly with water to prevent cracking.
Note! If the area of the room is more than 25 m2, then you need to make expansion joints along the walls, as well as on the surface itself. To do this, every 5 meters in width or length of the room with a grinder, a gate is cut through with a depth equal to the layer thickness. If this is not done, then with temperature expansions the floors may swell or crack, which will adversely affect the laminate.
The implementation of screed under the laminate is a rather serious complex of works that require care and scrupulousness. From the quality of their conduct will depend directly on the life of the flooring.