How to put laminate on wooden floor
One of the most popular flooring is currently considered to be laminate. It perfectly imitates parquet, is convenient and easy to use, durable and easy to dismantle. The material has a beautiful texture, refers to environmentally friendly materials. It can be put independently, without having certain professional skills. It is only necessary to have the desire and instruction. This article describes laying laminate on a wooden floor, and offers a video tutorial on surface preparation from a professional.
If the wooden floor has no flaws, it itself can be considered an ideal option for the surface in the house. But if the boards are already worn out and do not have the original neat and beautiful look, then it is best to improve this floor by laying laminate on top.
Purchase of material
Having previously determined the area of the surface to be repaired, we acquire the necessary material: particle board or plywood, baseboards, powders, laminate.
Note! When choosing a finishing material, it is necessary to pay attention to the strength class corresponding to the purpose of the room. For rooms with a high degree of load (walking), laminate 23 class is excellent. For bathrooms and other rooms with high humidity, it is best to purchase laminate 33 classes.

Given the unforeseen consumption of material, you should buy it in the amount of + 10% to the calculations. According to the technology of laying laminated panels, an offset is assumed, therefore it is necessary to have at least 4 boards in stock.
Laminate, having a locking connection, groove and spike, is more expensive than usual, but more simple and reliable, does not require additional fastening. When purchasing cheaper models of laminate, you should immediately buy a special glue.

The coating needs to get used to the room temperature. Laminate should be laid out on a horizontal plane, removing the packing film for ventilation of each box. In this state, the material must be within two days.
Preparation of wooden floor surface
Before you put the laminate on a wooden floor, the surface must be cleaned from dirt. It should be perfectly flat and smooth.
The surface relief should not have differences exceeding 2 mm mark within 2 square meters. meters And the maximum allowable slope is 4 mm per 2 meters of surface.

Several methods are used for alignment:
- grinding;
- processing with a plane (electric);
- adjusting the support lag;
- leveling with plywood (or chipboard).
Note! Boards and logs under the influence of atmospheric phenomena and time crack and change their parameters. If the floor requires a large amount of work, that is, it is very worn out, then it is easier to carry out a complete dismantling of the base.
If you have not very serious defects, you can do it by using cheaper and simpler methods. And do it all with your own hands.
So, what needs to be done before laying laminate:
- reliably and firmly connect the boards so that there are no large gaps and drops;
- check the presence of fasteners on certain parts of the subfloor;
- connect the boards together so that they do not diverge;
- polish ridges and irregularities, putty gaps, gaps and cracks.
Grinding alignment

This method is perfect for leveling floors with roughness or minor defects. A grinder and other tools will be useful if the irregularities differ from 3 to 5 mm.
Alignment Planer

More significant flaws on the boards are removed using an electric planer. Before starting to work with the tool, remove nails and metal fasteners that may damage the knives of the device.
Note! After each treatment with a plane, the surface level should be checked using a rule. If the height is insufficient, then the work must be repeated, and so on until the surface becomes flat.
Floor treatment by grinding and leveling with a plane is used if the wooden surface is durable and has no large defects.
Fitment of support logs

Immediately make a reservation that this is a rather complicated and time-consuming process. Here you need a level that determines the minimum and maximum points of inclination. Boards are removed, opening access to lags. Only after it became clear how durable are the lags for further work, is their buildup done in bars of the required size. After that boards are mounted in place.
This method, based on the use of available tools, is less expensive than the method of leveling the floor with plywood.
Plywood leveling

The method requires the purchase of additional material - plywood (DSP), which fits on the boards, previously tested for strength and suitability.
Need plywood, having a thickness of not less than 10 mm. It is advisable to treat it with linseed oil, which will protect the material from premature wear due to debate sheets. If the floor is not flat enough, you can put racks or planks of the desired thickness under the plywood, but so that the sheet does not “play,” it does not bend. For the strength of the rail and plank should be attached to the flooring boards with screws or nails. When the floor level is perfect, the sheets of plywood are laid and fixed with screws.
We lay the plywood correctly:
- sheets relative to each other are laid into a run-up, which allows the most evenly distribute the operational load on the surface in the future;
- a gap of 5 mm between the sheets is necessary to prevent displacement and deformation of the plywood under the influence of moisture and temperature;
- glue and screws are two fasteners used when joining sheets: glue is applied around the perimeter of the plywood, then the screws are also fastened around the perimeter.
Laying insulation material
After the floor surface is in the desired form, it is necessary to lay the substrate.

The functions of the substrate perfectly perform foamed polystyrene, which has insulating, noise-insulating and damping properties. The latter quality allows you to distribute the load exerted on the laminate evenly between all panels. Acupressure is dangerous to cover the fact that each irregularity deforms the panels and joints.
Rolled insulation material is laid along the longest wall. The instructions from the manufacturer say how to lay the substrate - butt or overlap. Different joining methods are used for each material. If you are laying butt joint, you should fasten the sheets with each other using mounting tape.

In the market of building and finishing materials cork substrate is in great demand. The coating is considered universal because of its rigidity and heat resistance. It perfectly conceals the roughness of the surface on which it fits. The price of such a substrate is high. But the real master knows that the material is environmentally friendly and harmless, perfectly retains heat and absorbs noise.
Note! It is important to know that in no case can one cover the base of steam and waterproofing materials that interfere with ventilation. Below them will accumulate moisture or condensate, which will cause debate and rotting boards.
Laying laminate
Before you proceed directly to performing the laying of the floor covering, it is necessary to trim the door jamb. The laminate is pressed against the joint by an edge and at the point of support a label is applied in such a way that the coating subsequently lies under the joint. The label can be made a saw. The cut must be made parallel to the floor.
Installation of panels is carried out according to several schemes: along the room, diagonally, across, and drawing. The easiest and most convenient stacking option is running along the room. There are several other advantages to this method:
- no waste;
- the joints of the panels laid in this way will have a direction perpendicular to the light source (window), and the floor, due to the lack of shadow in the place of the locks, will look solid.
It should be remembered that you need to start work from the far corner of the room, from the window and along the wall. The grooves of the first plank laid on the floor should face the wall. Straps are connected with end locks. It is convenient to make this connection by bringing one panel to another half an angle of 25–30 degrees. For reliability, you need to knock on the attached panel with a special hammer.
In order to allow the floor to "breathe" and not deform, a centimeter spacer is placed between the wall and the floor. Spacers or wedges are made of wood or plastic. You can buy them with laminate or make them yourself. At the end of the work, this gap will be closed by the plinth.

Next, the laminate is mounted using a system of projections and grooves (locks). Be sure to follow the tight fit of the slats to each other. There should be no gaps and cracks. The boards are stacked in a “staggered” order: a piece of about 20 cm is cut off from the strip of one row, which can be added to the next row.

At an angle of 30 degrees, the panel of the second row is brought to the first. After the spike has entered the groove, the panel should be lowered until it clicks, which will inform about the lock connection that has occurred. Further installation is performed according to the above technology.
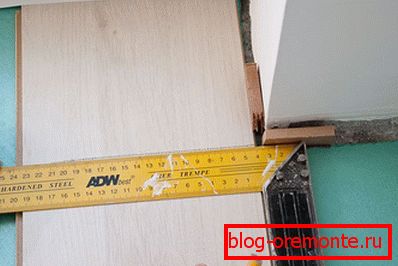
Sometimes the strips of the last row do not fit in width to the remaining gap, it becomes necessary to fit. This can be done by attaching one bar to the last one laid, and at the top close to the struts put another one on which to draw the line corresponding to the bottom plank, and cut it. Trimmed bar and will be the last installed.
After the laminate completely covers the floor surface, it will remain to remove the spacers and attach the weights and baseboards.
Additional recommendations
- Plinth should not press laminate to the floor.
- In a room with an area of more than 10 square meters, the need for expansion joints, which are hidden under a special threshold. This should be done so that the laminate does not rise or walk.
- When protruding from the floor of the pipe at the junction of communications and laminate need to cut a hole in view of the gap: for example, if the pipe diameter is 32 mm, the minimum diameter of the cut hole will be 42 cm.
- There is a special laminate, which according to the scale of wear resistance is classified very high - 33 class. It has a high cost, but for rooms with high humidity is the most suitable option.
- The direction of the laminate to be laid directly depends on the direction of the existing floorboards. Laminate should lie across the floorboards.
Video
We bring to your attention a master class on preparing a wooden floor for laying laminate.