Finishing the balcony with laminate
To expand the living space of the apartment often use glazed and insulated balcony. Transformation of a balcony into a full-fledged, albeit small, room requires an interior decoration of the walls and the floor. Among the variety of options attracts attention laminate. This reliable and durable material has an attractive appearance and with its help you can create an original decorative design in the room. Independent finishing of the balcony with laminate is a feasible task, thanks to the ease of installation of the coating.
Properties and advantages of the material

A laminate panel with a base layer of fibreboard has at least 4 different components, and in modern models manufacturers create additional layers, for example, with an attached substrate. The performance of the material depends on the density of the plate; the higher this indicator, the less the panel is subjected to deformation. An important role in determining the class of wear resistance is played by the thickness and composition of the upper protective layer based on melamine or acrylic resins. The bottom layer stabilizes the structure and gives it rigidity. It is made from polymer or paraffin-impregnated paper. The decorative properties of the laminate are determined by drawing on special paper located under the acrylic coating. All layers are impregnated with resins and glued at high temperature. The thickness of the panel depends on the base and can be from 6 to 12 mm. Among the advantages of coverage:
- Large selection of colors for decorative decoration of the room.
- Easy installation and mounting panels.
- Environmental safety at room temperature.
- Acceptable cost.
- Resistant to high temperatures.
Note! Laminate is demanding on the quality of the preparation of the base, because each height difference and other defects lead to creaking, discrepancy of locks or deformation of the panels.

By aligning the surface horizontally, you will get rid of these shortcomings. Low sound insulation of the laminate is compensated by the use of the substrate. The material is sensitive to moisture, if it is not a special moisture-resistant material that should not be protected from water. The high thermal conductivity of the laminate when laying on a warm floor is a positive quality, and when finishing the balcony this property becomes a disadvantage.
Note! Before finishing the floor, walls and ceilings on the balcony should be insulated so that the temperature does not fall below 5 degrees.
Choosing a laminate class

If the balcony is glazed and the humidity level is close to the room index? 23 class laminate can be used, it is an inexpensive option for a living room. If the cost of the material is not the deciding factor, then it is better to buy panels of 31–32 class. Among the models of high-end durability there is a large selection of original decorative coatings that realistic imitate expensive woods.
Tools for work
- A hacksaw for sawing battens and laminate panels.
- Screwdriver or screwdriver.
- Perforator for punching holes in concrete.
- Hammer for backing laminated boards.
- Building level.
- Roulette.
Preparatory work

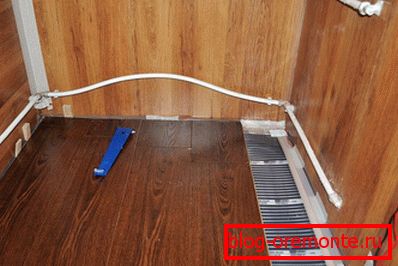
The main condition for reliable and durable laying laminate - a flat surface. Before finishing the floor and walls, it is necessary to warm the balcony. As a heater it is possible to pour a layer of expanded clay of an average fraction on a concrete plate. Over it is poured a layer of concrete screed. Work continues after its complete drying. In the cold season or, if necessary, to reduce the time of work, you can perform warming and leveling the floor on the balcony, putting wooden logs filled with claydite of a large fraction. Sheets of moisture resistant plywood or OSB slabs are laid over the insulation. The equal and strong basis without wet processes turns out.

The preparation of the surface for insulation starts with laying a layer of waterproofing from a 200 mm thick plastic film. In addition to the film, you can use the liquid waterproofing. With the help of the construction level, the guides are made of wooden beams or aluminum profiles and are attached to the floor. Between them, the chosen heater is laid: expanded clay, mineral wool, foam or rigid foam. Top screed is poured. The film is again laid on the dried surface to isolate the laminate from moisture. Over waterproofing the substrate keeps within.
Walls and ceilings on the balcony are insulated with the same material as the floor, excluding expanded clay. Previously all the cracks are blown with construction foam. A crate is placed on the walls, set vertically using a level. Insulation plates are placed between the guides, to reduce heat loss, you can fix the foam layer with the foil side facing out.

Installation of laminate on the walls is carried out in two ways: by gluing to the surface of drywall sheets or laying on the sheathing with clamps. If the first method is chosen, the drywall is fixed on the metal profile, the sheet joints are plastered with putty, and the surface is primed.
Laying on the floor
The substrate is necessarily laid on an even base. This material can reduce the thermal conductivity of the coating, reduce the effects of moisture, level the floor surface. There are several types of substrate: an inexpensive and moisture-resistant polyethylene foam, well cork substrate that is well-preserving heat, foam polystyrene, which is resistant to stress, is suitable for a balcony. The best option is to buy a substrate and laminate from the same manufacturer.
Two days before laying, the unpacked coating is carried out onto the balcony. Laying starts from the far side. Installation of laminate is carried out in several ways, at the request of the owner: along or across the balcony, "herringbone" or diagonally. Between the walls and panels leave a gap of 10 mm, necessary for the free expansion of the floor covering. Laminate boards have two ways of connection: Click - requiring the installation of the panel at an angle, then pressing until it clicks, and Lock - the boards are joined end to end. Any option is suitable for a balcony so that the connection lasts longer, the edges are coated with sealant.
Note! Work begins from the far edge of the balcony, if the panels are laid perpendicular to the direction of light, the joints will be invisible.
The complete connection of the boards is ensured by tapping the hammer through the substrate, it serves as a piece of laminate. The last board sawed with a hacksaw to the desired size. The gap left at the walls is covered with a plinth.
Installation of laminate on the wall

Adhesive way. On the prepared plasterboard surface, laminate panels are glued horizontally or vertically. The first horizontal row is fixed with an indentation of 8–10 mm from the floor. Laminate is coated with glue or liquid nails, the composition is applied in the form of a wavy line. The second strip is attached to the first strip, the joint is treated with a sealant, and glue is applied on the panel. Knocking boards is done carefully so that the previously glued parts do not fall off. You can assemble a shield of several rows and stick it on the wall. At the completion of laying the last panel should not reach the ceiling by 10 mm.

Dressing the dress. The installation of the batten begins with the installation of the profile, it is placed along the edges of the walls and set on a level. Between the elements, they tighten the cord and, guided by it, fasten the rest of the metal profile in 40 cm increments. Holes for fasteners are drilled with a perforator. Horizontal slats are made of wooden slats 40 mm wide. The crate can be completely made of wooden bars. The material is pre-treated with an antiseptic composition.

Laminated boards are fixed on the crate clamps. Galvanized brackets with special protrusions are driven into the end of the board, and fastened to the crate with self-tapping screws. There is a fastener with a flat protrusion, it is pressed against the lock panel. With the vertical mounting method, clamps are installed at the top and bottom of the laminated board. The connection of the laminate is the same as on the floor, the joints are treated with sealant. The pitch of the horizontal guides should ensure that the ends of the panels hit the middle of the wooden plank. Docking of the upper and lower rows should occur on the rail.

Note! Sometimes the laminate is attached to the wooden lattice with self-tapping screws, but rigid fixation is not the best option for this material. Manufacturers of laminate offer special sets of profiles and fasteners for mounting laminate on the wall. This is an expensive but technologically advanced option that allows you to quickly and accurately finish.
Installation of laminate on the ceiling

Along the perimeter of the ceiling, a 50-mm-wide rail is crammed and lathing is made of aluminum or wooden bars. The cell size of the batten can be 500 × 500 mm or 400 × 400 mm - it depends on the size of the laminate board. A reliable method of attaching panels is the use of clamps and additional fixation with plastic glue.
Note! Between the panels and the upper part of the walls leave the expansion joint.
Lighting wires are laid between the crate, and holes are sawn into the wooden bars if necessary. The gap under the ceiling is closed with an aluminum corner, previously well-treated with sealant. Between the floor and the wall is fixed plinth.
Video
Detailed instructions for installing laminate on the balcony, see below: