The device of a floor in the frame house
Thanks to the development of building technologies, building a house is no longer a lengthy process. With the advent of the possibility of manufacturing frame buildings work takes a minimum of time. However, each of the stages of construction requires separate attention, as it has many intrinsic nuances and peculiarities. For example, the device floor in a frame house is a very complex process, the main points of the implementation of which will be discussed further.
General rules of work

First of all, it is necessary to note a number of general rules, in accordance with which the work should be carried out.
- For installation of a subfloor of a frame house, a perfectly level base is required. The presence of even the slightest distortions is not allowed. Maximum attention should be paid to this issue, since the success of all other works will depend on the correctness of the foundation.
- Installation of frame houses should be carried out only in a dry time, and in particular this applies to the installation of the floor. All necessary activities should be carried out in accordance with this rule.
- Among other things, it is necessary to add that when installing the floor of a frame house, it will be necessary to arrange concrete supports, which should be located no more than 2 meters apart from each other, if the bars are 10 × 10 cm. If the bars are 15–15 cm, then the distance between supports should be no more than 3 m.
- Before starting work, the foundation must be waterproofed. At the same time both rolled materials and liquid compositions can be used.
In addition to the above, it can be mentioned that all the bars and planks used to build the framework must be treated with antiseptic solutions.
Foundation preparation

As mentioned above, before installing the subfloor of a frame house, it is necessary to prepare the foundation. The idea is that a leveling sand-cement screed, about 5 cm thick, should be made over the perimeter of the foundation. Care must be taken to ensure that it is located strictly horizontally. Along with other things, before work it is necessary to check whether the length of the base diagonals is equal. The length of the diagonals must match.
In addition to the screed itself, the installation of anchor bolts, which will be necessary for fixing the following elements, is also carried out at this stage. It should be added that the bolts should be as aligned as possible in all planes, and the distance between them should be no more than 2 m, while the elements at the extreme from the corner should be located no more than 0.3 m from it.
Note! After the mentioned actions, the waterproofing layer should be laid. As such, any suitable material can be used, for example, a simple roofing felt.
Laying down

The next stage of work is the laying of the so-called bedding. Supporting elements made of edged boards of the same width as the foundation and not less than 5 cm thick. The elements are laid along the entire perimeter of the foundation and fastened with the help of previously installed anchor bolts.
In order to mark the plank for drilling holes, simply lay the board on top of the anchor, align, and then hit the top with a hammer. The dents left after the procedure will be the places for drilling holes. The drilling is done by an electric drill. After laying the boards they are attracted by nuts, while controlling the horizontal level. In case of distortions, the boards can be lined with small bars, and the gaps filled with cement mortar.
Beam installation
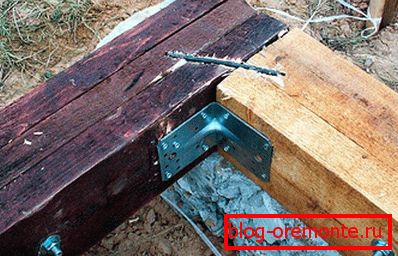
The next stage of work is the laying of the main bearing beams. For their manufacture, a wooden bar with a section of not less than 10 × 10 cm is used. Beams with their edges are laid on the rails and are attracted to them by bolts.
For additional reinforcement of beams in length, special supports are installed under them. They are made from the same timber, but before you put them, you need to make special concrete bases for them. They must be located at a distance of no more than 2 m from each other. Before installing the support, the base is covered with a layer of waterproofing. Beams are fastened to sunbeds and supports with the help of nails, and you need to drive at least two in each attachment point.
Mounting strapping

The next stage of work will be mounting the strapping. It is mounted around the basement perimeter. For the manufacture of this element can be used edged board with a thickness of 5 cm and a width of about 25 cm. The board is installed on the butt and nailed to the ends of the beams and the floor.
To the same stage, you can add and install the lag. They can be made from the same board as the strapping. Elements are laid across the beams and are attached to them with nails. The result is a rigid and durable construction that will be a good basis for further work.
Floor insulation

The next stage of work is floor insulation. For these purposes, suitable and mineral wool and foam plates. For laying material will need to mount the rough flooring. You can make it by hemming the logs from below with a cut board. Insulation tightly fit into the space between the lags. A waterproofing film is laid on top of the insulation and fixed.
Dressing skirt

The final stage of the work is the device flooring. For these purposes, various materials can be used, but, as practice and the tips of craftsmen show, the use of a grooved board will be the most successful option. It is worth mentioning that the thickness of the boards should be chosen depending on the distance between each other lags. For example, if the logs are at a distance of 1 meter, then the thickness of the boards should be 5 cm. The boards are laid across the lag and nailed. It is necessary to start laying from the walls, at the same time the first board should be located with a spike towards the wall, at a distance of 1–2 cm from it.
As a material suitable for the device flooring can be called and plywood. It is necessary to make a reservation that the plywood should be rather thick - about 25 cm. Sheets of material are laid over the lag and fixed with nails or screws.
In conclusion, you can add that the floor of a frame house with your own hands can be made only with special skills and extensive experience in this type of work. If this is not the case, in order for this crucial stage of construction to be carried out with the best result, it is advisable to trust the experts.
Video
This video about the device of floors of the frame house: