Pebble floor by yourself
The beneficial influence of nature has long been known to man: everyone likes to admire its open spaces and touch its gifts. Intricate piece of wood, shell, polished river pebble - everyone in the house has a similar "jewel". In addition, natural fragments can be used as a finishing material - they fit perfectly into the interior. For example, a made floor of pebbles in the bathroom with their own hands, is an excellent solution in both aesthetic and functional terms.

Pebble – это камень, которому воздействие воды придало обтекаемую форму. Укладка данного материала на полу в помещении и на улице давно пользуется популярностью, а современные дизайнеры включают его в свои проекты для декорирования, ведь любой натуральный материал всегда ценился намного больше, чем суррогат из пластика.
In addition, it has a massage effect, and complete comfort can be achieved through a heated floor.
Styling options
There are several ways to turn pebbles into a decorative coating.

Purchase of finished pebble mosaic. This option looks like a grid plastered with pebbles. All that is required is to stick it and wipe it like an ordinary mosaic. The cost of such a finishing material is quite high, about 3,000 rubles per square meter - not everyone can afford.

Using pebbles under glass. This method creates all the conditions for adding a spectacular LED backlight.

Design of any part of the bathroom with the help of individual stones. So, an open niche near the wall, decorated with pebbles, will bring a zest to any design project, however, the use of this option is permissible only if there is a large bathroom.
Benefits of using pebbles

The coastal shag has a smooth surface and a streamlined shape. And the possibility of selecting different sizes and colors contributes to the manifestation of creative abilities.
Pebbled floor is an excellent basis for the interior in an ecological style. This design solution will please not only the attractiveness and originality of the pattern, but also a number of healing properties, because walking on such a surface has a positive effect on the work of the internal organs. Massage of the feet and vital points will be especially effective if the stones are arranged not flat, but with an edge. Of course, in this case much more material is required, but the positive effect will not be long in coming.

Analyzing the cost of such coverage, it is difficult to name specific numbers, since the residents of the coastal area will easily get the necessary number of nudes for free, and those less fortunate will be forced to go to specialized outlets and pay the necessary amount.
Independent display of an interesting pattern is a rather painstaking work, requiring at least a little construction experience and accuracy.
The procedure for making floor of pebbles

Creating a floor of pebbles involves the following simple steps:
- It is necessary to prepare a concrete base, namely, level and prime (the sequence is the same as for the laying of ceramic tiles). How to make a cement-sand screed has long been known, besides it is easy. The whole difficulty lies in the fact that construction regulations require pre-waterproofing work. Consequently, the screed has to be laid on top of the waterproofing layer, which is screwed on the walls, at least 10 cm from the final floor covering. Before starting the glue work, the base must be primed, otherwise the glue will dry before the necessary strength has been gained.
- Now it is necessary to sort and sort the stones in accordance with the size and coloring.
- The next stage is the layout of the pebbles in the selected space and the selection of a suitable ornament. To simplify the work, you can move the display to the side, and then gradually transfer it and stick it in place.
- Glue must be special - for natural stone. Also suitable is the one with which they glue porcelain stoneware and weakly absorbing ceramic tile.
- Begin work from the corner farthest from the entrance. To apply the adhesive, you will need a notched trowel with a tooth height of 10–12 mm. Putting stones in glue should be such that the level of their immersion is from 30 to 50% of their own thickness. Excess glue should be immediately cleaned with a wet sponge.
- After the glue has hardened, but not earlier than after 1 day, you can start applying the grout for the tile joints. Dark shades are preferred - they not only imitate the bottom, but are also not “afraid” of dirt. Grouting will require much more than when laying tile. The material must be purchased in high quality and from the same batch, otherwise the shades may not coincide. A small rubber trowel is needed to apply the grout, while the stone will be recessed a little more than half.
- In the end you need to wash the patches of grout from the pebbles after it is completely dry. Now you can proceed to applying a water-repellent composition, which is necessary so that the pebbles are not covered with salt after drying. In order to emphasize the naturalness of color, you can cover the surface with varnish or wax.
Laying pebble mosaic tiles

The easiest way to create a pebble floor is to install a special tile. Externally, it looks like a square grid (approximately 30? 30 cm), over which the pebbles are pasted. Each such tile can hold about 60 pebbles. A significant advantage of this finishing material is the invisibility of the joints, because the base is a transparent mesh, and the stones are arranged in a wave. Thanks to this, the work of the self-taught master is made much easier.
Before starting work, you need to make sure that you have all the necessary materials, namely:
- pebble tiles;
- tile adhesive;
- grouting;
- primers;
- water repellent;
- varnish;
- impregnation to create a "wet" effect (depending on the design decision);
- wide brush or roller;
- notched trowel;
- rubber spatula;
- sponges;
- knife needed for cutting the tile grid.

So let's get started:
- First you need to prepare the surface. With the help of the level you need to assess the horizontal floor. The removal of small irregularities is not required, since they are then leveled by a layer of tile adhesive. But from large potholes, cracks and irregularities will have to get rid of with a cement screed or self-leveling mortar. Next, level the surface should be covered with a primer (for this you need a roller with a short nap or brush). This is necessary in order to enhance the adhesion of the tile layer and the surface. In this case, the primer should be deep-penetrating, solvent-free and moisture-proof. If you plan to lining the floor of the shower, you will need waterproofing. To do this, you can use waterproofing mastic or roll waterproofing.
- Then you should lay the tile "dry". This avoids possible errors.
- Now you can proceed to the installation. Special glue (for porcelain stoneware or natural stone) should be diluted with water and carefully moved until a thick, creamy mass is obtained. The layer of glue must be more than 1.5 cm, otherwise the excess will protrude beyond the pebbles. The grid with pebbles should be laid on the glue, and then leveled and pressed with the help of palms or plywood.
- The final stage is the grouting and application of impregnation. After the glue is completely dry, you need to wipe the seams with a regular joint for the tile.
Pebble mat
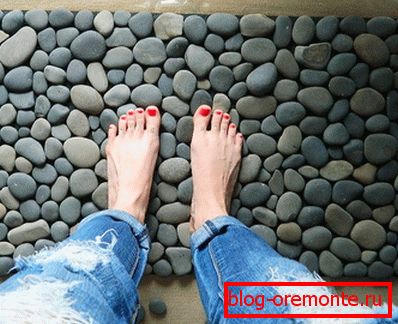
If you have a suitable moisture resistant base on hand, then you can get a great portable rug - a piece of pebble beach at home.
You only need to pre-stock up with thin flat pebbles, rubber mat and transparent waterproof glue.
The manufacturing process is extremely simple:
- You need to prepare and sort out the pebbles. For the basics, you can take a mat of any desired shape.
- Washed and dry stones should be stuck on the rubber base. The created surface can be either monochromatic or decorated with an inscription, ornament or pattern (for this you need colored pebbles).
- In the end you need to apply several layers of varnish.
Below you can see photo instructions for making a pebbled rug:


Pebble flooring does not require any special care products. All that is required is warm water and a mild detergent.
Video
This is how the pebble floor fits: