Moist floor screed
One of the options for easy and quick repair of the floor in an apartment or private house is a semi-dry floor screed device. How is it made, what does it consist of, how much time is spent on it? Answers to these and other questions can be found below.
What is the essence of the semi-dry screed device? The whole process consists of several stages:
- preparatory work (including the purchase of materials required for the installation of screed);
- preparation of the mixture itself;
- selection and laying of hydro- and vapor barrier;
- fixing beacons for filling the screed;
- pouring the mixture and mashing seams.
Preparation for the device of a new floor

The first step is to clean the floor from debris that has accumulated over many years of operation. Then, using a spatula, it is necessary to repair all the cracks and holes. If in some place a part of the screed has departed and “breathes”, it must be dismantled to the place where the concrete is held firmly.
In the event that a semi-dry floor screed with your own hands on a wooden base is being done, it would not hurt to check whether the boards are creaking somewhere or not, if there are rotten elements in the floor and so on. If you hear a creak - you need to check the reliability of fastening the log or boards to them. If some boards are badly nailed, you can attach nails or screws with nails or screws. If this is not done, the floor can creak even under a new screed.
Also the old screed, if the floor is concrete, be sure to check the level. This is done for two purposes:
- To level the basis with a layer of filling with cement.
- Despite the drops, put the beacons on the same level.
With the help of the level, the highest point of the floor is determined, and they are already guided by it, how exactly to place the beacons for the screed device. With the help of a laser or a water level, you can set the corners at which the beacons will be installed. This can be done by tightening the screws or hammering nails into the base.
Note! To hammer a nail into concrete or twist it into a screw, you need to drill a hole in the floor, cut a wooden chop and hammer it there. It is better to use self-tapping screws to mark the level of the floor, as using a screwdriver it is easier for them to adjust the height by twisting or twisting them to the required length.
The cap of the nail (screw) will be a zero mark for the installation of beacons around the perimeter of the entire floor. Between screws it is necessary to stretch a dense fishing line or thread along the diagonal and along the perimeter. It is important that it does not sag. So throughout the room you can see a complete picture of exactly how the new level will be, according to which the lighthouses will be displayed.
As beacons, you can take square metal, flat boards of the same section or special slats, with the help of which a semi-dry floor screed in the house is poured. The latter are of several types. They may (depending on the species) remain inside the screed. Others after work will need to be pulled out.
Installation of beacons for semi-dry screed

Lighthouses are necessary so that the mixture can be leveled. The main thing is that their surface should be even, because then the rule will be easier to tighten the embedded screed. To prevent the lighthouses from moving during operation, they need to be securely fastened. You can mix a bit of the usual solution (sand and cement in the ratio 1: 3) and put a beacon on it.
The lighthouse pitch should be taken taking into account the length of the rule that the tie will be tightened. If the tool length is 2.5 m, then the width between the two beacons should be about 2 m. It is undesirable to do more, as it can jump off the edge of the rule.
Laying the insulation layer
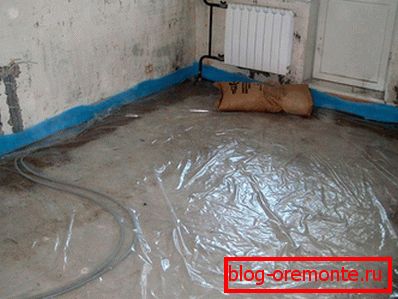
The walls and walls of the room before installing the screed should be covered with a layer of insulation, which is used as a tape made of polypropylene. Thanks to it, you can protect the coupler from the processes causing its expansion or contraction.
Note! The height of the tape should be 2–3 cm higher than the level of the filled in
How to make a mixture

Manufacturing technology semi-dry uncomplicated. Only a few components are required:
- cement of the brand M400;
- sand;
- water;
- polymeric materials.
As polymers, propylene fiber is usually used.
The mixture is prepared as follows. Cement and sand are mixed with water in any medium-sized tank. Water should be added little by little, so that the mixture turned out to be of good quality, but not too liquid. If you do not observe the proportions, the screed will spread, because of which its strength will be broken.
You can buy ready-made dry mix, which already has cement and sand in the right proportions. However, you need to beware of marriage, which is now so flooded with the market of building materials. Do not buy the cheapest packaging.
Note! The normal shade of the cement mixture to which no water has yet been added is gray, with no yellow or brown and red shades. If it is not, then there is poor-quality sand or there is an admixture of clay.
How to determine how much water should be in the finished solution? It is very simple - a slightly mixed solution is taken into the hand and squeezed. If a large amount of water flows out - the resulting mixture is too liquid, you need to add dry fractions. If some water flows out of the solution in the hand, then the optimum ratio of water, cement and sand is obtained.
Fill the mixture at the beacons

When the insulation layer is laid, you can knead the tie, as described above. It is better not to make the mixture in large quantities so that it does not quickly solidify in the container in which it is mixed.
Ready semi-dry mixture fall asleep between the lighthouses. Typically, the tie is made on one row between the beacons and begins with the far corner of the room. The mixture is poured in a layer that is just above the level of the lighthouses, so that it is easier to pull it, tightening the excess with the rule. This work has small flaws - it is more convenient for the couple to tighten the tie. And if the width of the filled layer exceeds 1.5 m, then, most likely, it is necessary to step on the edge of the screed with feet, so you need closed shoes.
When part of the filled mixture is aligned, the coupler is poured further. When the entire lane between the lighthouses is ready, the next row is filled in, and so on until the entire screed of the room is finished. The last section of the screed should be filled near the door to the room.
Note! Directly near the walls, you also need to put a lighthouse, otherwise the row will not be able to align. The lighthouse is not placed right next to the wall, since you need to have some space to work as a rule.
Pull out beacons need only after the screed hardens, it is best in two days. In order not to violate the integrity of the filled layer, the beacons must be tapped lightly with a hammer before being removed so that the solution lags behind. After that, the lighthouses are carefully removed, and the space between them is filled with a mixture identical to the ready-made coupler.
Grouting the joints

During the casting, seams from the lighthouses are inevitably formed. In order to wipe their surface, a special grinding machine is usually used. With its help, you can achieve two goals - first, level the finished floor until it is completely dry, and second, strengthen the upper part of the layer. Thanks to these actions, the floor will be safer and will last longer.
Note! Rubbing of seams is done almost immediately, because if it is done later than 15 minutes after pouring, the screed will dry and a perfectly smooth coating will not be possible.
Shrink Seam Device

To prevent cracks in the floor during operation, shrinkage (deformation) seams are cut in it. They will help to avoid the appearance of unpleasant huge cracks in the screed. The seam should not cut through the coupler through, only a third. That is, if the thickness of the semi-dry layer is 20 cm, then the depth of the seam will be 6–7 cm. To make such a seam, you can use the narrow edge of the rule, or cut them later with a grinder.
The semi-dry screed, gaining popularity recently, has some drawbacks, which include the need for special care. In particular, immediately after the installation, the layer of the screed must be covered with a polyethylene film so that the required microclimate is preserved and no cracks occur. In addition, after installation, the screed must be watered regularly for some time.
After what time can I walk on the floor? Only after 12 hours. And after 4 days, any floor covering can be laid on the finished base, whether it be laminate, linoleum or tile. Until the deadline for setting takes place, it is important to ensure that there are no cracks and chips on the floor surface, as the strength of the floor will deteriorate due to them.
In general, a semi-dry screed is an excellent option for creating a high-quality and reliable base suitable for laying any floor covering. Her device is simple, but requires careful adherence to the process. Such a floor, if properly executed, will last more than a dozen years.
Video
This video shows how a semi-dry tie is made on mobile beacons:
This video shows how to grind concrete floors: