Laying tile on the floor
During repairs, it is often necessary not only to make physical efforts, but also to make difficult decisions regarding the choice of materials. The difficulty of making such decisions lies in the fact that each material has individual characteristics, and they must be considered when choosing. In each case, a particular material is suitable in varying degrees. For example, for the kitchen, bathroom, corridor, the most appropriate option would be to lay tile on the floor.
What is a tile

In order to properly evaluate and select a tile for the floor, it will be quite useful to familiarize yourself with a certain amount of information regarding what tile is and how tiles are made.
For the manufacture of tile used clay, which has a fine-grained structure. It was noticed that the sodden clay becomes plastic, and when it dries, it hardens and keeps its shape. This idea was developed and clay began to be used for the manufacture of objects of dishes, and later tiles. To achieve the greatest strength, clay objects began to be baked in kilns.
Not an exception in this sense was the tile, manufactured in principle by the same technology. For the manufacture of tiles is taken a special clay, which is mixed with plasticizers. After that, the resulting mixture is filled with prepared forms, pressed and sent for firing. Incidentally, firing occurs in furnaces at a temperature of about 1000 ° C. After firing, the tile acquires the required qualities of strength and resistance to the effects of various media. It is also worth noting that before going on sale, the tiles are carefully sorted by size and color shade.
Selection rules

It is important to consider that in order to make a tiled floor in the bathroom or in the kitchen, it is not enough just to go and buy the tile you like. The selection process has a number of nuances that must be taken into account.
- First of all, I must say that the choice regarding colors is recommended in favor of natural shades. They never lose their relevance and are suitable for any interior.
- The next selection criterion is tile flatness. This refers not only to the perpendicularity of the faces, but also to the flatness of the tile along the plane. The fact is that during the production some mistakes may be made as a result of which the tiles are deformed. In order to verify this, simply attach the two tiles to the surfaces of each other. If curvatures are present, it will be immediately noticeable.
- A good tile should not have any cracks or chips, you should also pay attention to this.
- It should also be remembered that the tile should be evenly painted. Color should be uniform. If staining defects are observed, then this may indicate a violation of the production technology or the use of low-quality equipment. Both are unacceptable.
Preparation for laying

Like many other types of work, tile laying must begin with preparation. At this stage, you need not only to select and purchase the required amount of material, but also to prepare the surface for installation.
To find out how much tile is needed for a particular room, you need to carry out a series of simple calculations. To begin with, the area of the room in which the installation is intended is measured. The length of the room is multiplied by its width, the resulting value will be the area. To calculate the number of tiles, you need to divide the area indicator by the area of the tile, thus, a specific number of tiles is obtained. It is necessary to add about 10% to the obtained value with the expectation that extreme tiles usually rarely fit entirely, so they have to be cut.
Also at this stage you need to prepare the surface.
- If the tile is laid for the first time, the floor surface is cleaned of dirt and, if the height difference is acceptable, that is, it is no more than 5 mm per m2, it is covered with primer.
- If the old coating is repaired, the order of execution and the amount of work are somewhat different. To begin with, all furniture and other interior items are removed from the room. Ideally, the floor surface of the room should be empty. After that, you need to remove the old coating. If the tile was laid, then it is removed using a special spatula and a hammer. To speed up the process, it is permissible to use a perforator with a corresponding nozzle. It is necessary to remember about safety and use the protection of the respiratory system and hands. After cleaning the surface, you need to level the screed. This is done using special mixtures in accordance with the instructions, which are usually attached. After the screed is completed, the surface is coated with a primer.
Tile laying
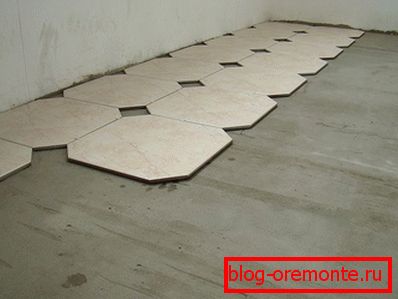
Once the surface is prepared, you can begin to work on laying tiles. It should be noted that laying tiles is recommended to start from the far corner of the room from the entrance.
- Laying tile is made using a special adhesive that must be prepared. To do this, in accordance with the instructions need to dilute the dry mixture with water and mix thoroughly. You can use an electric drill with a special nozzle-mixer. Do not prepare the glue immediately to the entire surface. The laying process requires a careful relationship, and the glue can lose its properties. It will be more expedient to prepare the glue in small portions as it is consumed.
- The finished glue is applied to the surface and smoothed with a special notched trowel. It is necessary to apply glue to the surface, which is slightly larger than the area of one tile.
- Further the first tile keeps within. In order to have good adhesion with glue, there are special grooves on the back side of the tile, so for their better filling with adhesive the tile must be pressed.
- Further, with the help of the construction level, the horizontal position of the tile is checked. If in this respect, everything is in order, then you can lay the next tile.
- It fits the same way. After laying it you need to check the level of horizontal position of these two tiles.
- Thus, the first row of tiles is laid, and you can proceed to laying the second and so on. It is necessary to pay particular attention to the fact that the distance between adjacent tiles should be equal, therefore, if necessary, and just for convenience, it is recommended to use special plastic crosses that are inserted between the tiles.
- It must be said that when laying the outermost from the walls of the tiles often have to cut them to the required size. This can be done with the help of specially designed tile cutter. These devices can be either manual or mechanical or electrical. You also need to remember that before cutting the tile, you need to put it in water for a while. A little soaked, the tile will not be so hard and easier to cut. During these works, it is necessary to remember the rules of safety and to be careful.
Note! Too thick tiles are cut only by a grinder with a diamond wheel or on a special tile cutter.
- After laying the tile is completed over the entire area of the room, it must be left alone until the glue dries. Usually this time is from a day to several, depending on temperature conditions and humidity.
- When the glue dries out and the flooring acquires its final properties, the seams left between the tiles need to be filled with a special water-repellent grout. This should be done with a rubber spatula. After the grout has dried, the surface must be cleaned of residual glue, and the tile laying work can be considered completed.
The nuances of laying tiles on wooden floor

The above process is appropriate when the tile is laid on top of a concrete base. When a tile is laid on a wooden floor, the technology will be slightly different. In particular, we are talking about the fact that the leveling screed should be carried out only after the waterproofing layer has been laid. For these purposes, suitable material on the basis of polyethylene. It is laid on the floor surface. Neighboring strips waterproofing materials must be laid with an overlap, which must be at least 10 cm. The joints must be additionally glued with tape.
A waterproofing layer of mesh should be placed on top of the waterproofing, while it should be at a slight elevation from the surface. And only then leveling is carried out. For better protection from moisture, floor boards should be treated with special water repellent solutions.
Note! A layer of waterproofing must be present when laying tiles in the bathroom.
In conclusion, a few words can be said about what are the ways of laying tile. Traditionally, there are three ways of laying, which differ in the position of tiles.
- Seam to seam. At the same time, as it is easy to guess, the seams of adjacent tiles are located opposite each other, forming a single seam.
- Scramble. This is the way in which the tiles are laid with some displacement relative to each other. For example, in chess order.
- Diagonal arrangement. At the same time tiles are stacked diagonally in the floor space. It should be borne in mind that with this arrangement there will be a lot of trimming. This is worth considering when calculating the amount of material.
Video
This video shows a simple tiling method: