Laying the electric floor heating itself
Electric underfloor heating can be used as a primary or additional heating. His installation is a responsible event, which must be approached seriously. In this article we will discuss the main tips and recommendations regarding its installation. You will be pleasantly surprised that the installation of an electric floor heating with your own hands can be done without much education and special knowledge. Also in the article we will consider the process of laying a warm floor under the tile, since in most cases it is this finishing floor material that is laid on top of the electric heating.
What is the best tile heating??

First of all, you should decide what type of electric floor will be used. Today there are several options. For example, you can buy ready-made kits that are sold in boxes. Buying them, you will not need to additionally collect items for a complete set.
Note! Infrared film heating is very popular. However, for combination with tiles, it is better to use special electric mats.
The ready set of such a mat includes the following elements:
- The heating cable, which is laid on a special film-grid. The width of one mat is 450 mm.
- Thermostat - this device will allow you to set the desired floor temperature, installed on the wall.
- Connecting wires
Depending on the manufacturer, the equipment may vary slightly. For example, in some sets you can find a corrugated pipe or double-sided tape. The choice of kit will depend on the area of the heated floor. In this case, the power of the product should be taken into account. You may need to purchase several sets.
Note! When buying an electric floor heating, it is recommended to immediately purchase a substrate / heater foil foil folle. This material will reduce the heat loss as much as possible, which will affect energy saving. It is necessary to lay a heater the folgirovanny party up.
Floor preparation

In order for all the work to be done well, it is important to thoroughly prepare the floor. All furniture and other items that will interfere with installation work should be removed from the premises. The floor must be cleaned of possible debris and various contaminants. Therefore, it would not be superfluous to sweep it up or vacuum it with a construction vacuum cleaner. If the floor has irregularities, then they should be eliminated. If it is impossible to level the irregularities mechanically, you will have to pour the screed on a cement-sand base. Before the next stage should take at least two weeks. During this time, the screed will acquire the necessary hardness.
Note! Do not neglect the alignment of the floor under the electric mats. If this is not done, the heating cable may bend over and penetrate. Ultimately, the repair work will draw for themselves additional funds and time.
Preparing the kit for installation

The cable used in electrical mats can be two-core and single-core. The first option is more expensive, however, it is safer. Which one is better is hard to say. In most cases, the quality of production plays a role. You can buy a two-core cable, but due to poor quality of production, it will quickly fail. As a rule, electric mats of German and Swedish production are appreciated.
Pre-determine the location for the installation of the thermostat.
Note! If the wiring in the house is weak, then you can spend a separate line to connect electric heating. For this wire is fed directly to the switchboard.
Insulation flooring
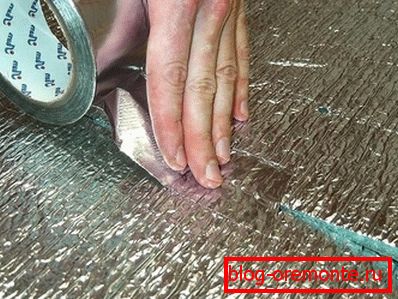
As mentioned above, penofol can serve as an excellent means for creating thermal insulation. The product is covered with foil, 14 microns thick. There is also a self-adhesive layer. There are a number of positive advantages of this material, including:
- Low weight.
- Small material thickness.
- Heat conductivity coefficient 0,049 W / mK.
His flooring will not cause you much difficulty. Penofol for sale in rolls. Therefore, it should be rolled over the entire area of the future electric floor. Each joint should be glued with a special tape.
Installation of heating elements

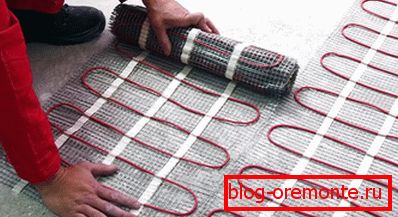
Electric mats are laid using special mounting tape, which is attached to the floor. On it the heating cable is evenly distributed. The convenience of its installation lies in the fact that you do not need to put every loop of the cable to the desired step. The cable is already attached to the mounting tape. You should simply roll out the roll on top of the insulation.
Note! If you purchased an electric cable floor not on mats, then you should additionally purchase a mounting strip. It is attached to the floor, and cable laying is performed at intervals of up to 250 mm.

In some places you will need to expand the heating mat. To do this, the grid can be cut in the direction you need. If you have bought a ready-made kit, then you will not have to take any additional steps to install the thermal sensor. If you have a combined heating system, it is important to consider its location so that in case of failure, it can be easily replaced without raising the screed.
So that the thermal sensor can be easily changed, it must be placed in a corrugated tube. Thanks to it, you can easily dismantle the failed thermal sensor and return the new work item to the corrugated pipe.
Installing the thermostat

The thermostat is mounted in a convenient location on the wall. For a more aesthetic appearance, the wire leading to it is best hidden in the wall. To do this, you will need to make a strobe. It is also preferable to install the thermostat, which is similarly hidden in the wall. The installation process is very simple. Connect the wires from the heating circuit to the thermostat on one side, and on the other side the wires from the thermostat to the electrical network.
Note! Although it is recommended to carry out a separate power line of electricity from the panel, in practice this is not always possible. Therefore, the most important is the correct calculation of cable power.
The cable is calculated according to the following principle:
- Copper cable section of 1.5 square has a maximum current of 19 A, and the power of 4 kW.
- Copper cable with a cross section of 2.5 square has a working current range of up to 27 A, and a power of 5.5 kW.
Note! If you take the floor space to 20 m2then a copper cable with a cross section of 1.5 square will suffice. This is because on average 1 m2 electric floor consumes 150 watts.
Inspection and Commissioning

Immediately before pouring the screed, test the assembled system. So, you can be convinced of its serviceability and reliability. In this paper, an error can have fatal consequences. Therefore, it is important to carry out accurate calculations and calculations, not to mention the installation work.
To check the operation of the heating system, it should be supplied with current. Further, with the help of a special tester, the resistance is checked, which is verified with the data in the passport from the manufacturer. If, after checking, it turns out that the system is working properly, you can pour the coupler, up to 50 mm thick. At the final stage tile is laid.
Installation of tiles

There are no special differences in the installation of tiles on the warm floor and its usual counterpart. The only thing is that you need to buy a special tile adhesive, which is adapted to high temperatures. There is a technology of laying tiles directly on electric mats. In this case, the work must be done carefully. Apply glue to the mats with a notched trowel. Glue must completely fill all voids. The thickness of the adhesive must be at least 5 mm from the heating elements.
When the tile is fully installed on the floor, the glue should dry completely. In the process of drying the heating mats can not be included. If you hurry, then made screed or tile glue will dry. As a result, cracks may form that will damage the heating cable.
Note! Consider that it is not recommended to lay an electric heat-insulated floor under furniture. Therefore, before laying the cable should draw a project of the future arrangement of furniture or sanitary objects, if it is a bathroom.
So, in this article we looked at how to carry out the installation of electric underfloor heating with your own hands. At observance of technology and recommendations of experts, even a beginner can cope with this task. If you are unsure of your abilities, then you can additionally get advice or even entrust the work to specialists. Have you already installed the electrical floor under the tile? Then write your observations. What difficulties have you encountered in the process of work, and what solutions have you found.
Video
You can find out how to make an electric floor heating system in the video:
A photo
In the following photos you can see some of the features of laying an electric floor heating: