Laying mosaic floors
It is known that work on the installation of mosaic floors is associated with high labor costs, and also require the presence of an aesthetic taste from their potential performer. That is why the order of formation of flooring, made on the basis of mosaic material, deserves special consideration. How mosaic floors are laid will be discussed in this article.
Types of self-leveling floors
In modern types of self-leveling floors, fragments of such common building materials as marble, glass or ceramic tile are most often used as mosaics. In addition, it can be natural stone or other natural minerals.

Our article is devoted to the consideration of the technique of arranging mosaic floors on the basis of marble chips, which is quite often used in modern construction. Depending on the binder used in these compositions, the following types of floor coverings are distinguished:
- massive or “thick” mosaic floors made from pure cement;
- medium thickness mosaic coatings, in the manufacture of which, in addition to cement, special polymer additives are used;
- floors with a relatively thin coating, which include only marble chips and the polymer component.
Advantages and disadvantages

The external attractiveness of the marble material makes it possible to use it when decorating various elements of the interior.
For the purpose of reasonable and economical consumption of this expensive mineral, a technique has been developed for using it in the form of small crumbs formed during the production of marble products. Currently on the market you can find many varieties of such crumbs, differing both in the size of the fractions, and in color.

The advantages of mosaic floors based on marble material include their properties such as:
- high mechanical strength;
- resistance to moisture and other corrosive environments;
- high wear resistance;
- ease of care for the surface;
- aesthetics

Note! The disadvantage of the floors of this class is the low level of comfort (due to the constantly cold surface), as well as the susceptibility of the chips to fading under the influence of ultraviolet radiation. In addition, marble crumb floors are difficult to dismantle, so that when replacing them you can face great difficulties.
Another significant disadvantage of such floors is their high cost.

The arrangement of mosaic floors on the basis of marble chips suggests the following sequence of operations:
- Preparation of the base leveled with a cement screed.
- Installation of special separators.
- Preparation of marble mixture.
- Filling the composition and grinding the surface.

Consider each of these stages of work in more detail.
Foundation preparation

High-quality laying of mosaic floors is possible only on condition of careful preparation of the base used for their arrangement. For this purpose, the old flooring is first removed, and then the so-called “rough” floor is prepared. The most suitable basis for such a floor is considered to be a monolithic reinforced concrete slab, closed on top by a cement screed.

The process of preparing a draft foundation includes the following mandatory operations:
- In the case when small dredging, cracks or voids are found in the floor - they must be carefully puttied and then filled with a self-leveling mixture (during this procedure, special attention should be paid to the places of passage through the floor of the riser pipes).
- Then you need to clean the surface of the base with a rigid metal brush, which helps to improve its adhesion to the liquid coating.
 After that, you should remove all microparticles formed during cleaning (as they say, dedust the surface prepared for pouring).
- Upon completion of the preparatory operations, you can proceed to the installation of special dividers distributed over the surface at a distance of about one and a half meters from one another (sometimes this operation is combined with the cement screed pouring). Note that as such separators, it is most convenient to use metal profiles with a side of 25 mm.
- To prepare a complex mosaic pattern, you will need a whole set of dividers, selected for each insert individually. For these purposes thin plates from brass or aluminum are used, and sometimes dividers in the form of glass partitions are used.
Making marble mix

Note! To fill the mosaic floor, marble chips of various sizes are used, which allows to more or less detail the prepared picture. To achieve the required level of detail, it is allowed to use a crumb with a fraction size of 5, 10 or 15 mm, selecting their ratio in the required proportion.
The order of preparation of the working mixture is as follows:
 First, small crumb of various sizes is mixed in equal proportions (before adding marble chips to the solution, it is recommended to wash all its fractions with running water, which allows to significantly improve their adhesion to the cement).
- Then it is added to the cement brand M400 in a 1: 2 ratio.
- When making a colored floor, special natural dyes are added to the mixture (ocher, marble flour, iron minium, or the like). Such additives in the finished mixture should be no more than 30%.
- Before diluting the dry composition with water, it is necessary to mix it thoroughly, after which it will be possible to gradually fill up the liquid (up to the mixture of the required consistency).
Floor fill

The marble floor is poured in two rounds, which allows to obtain an ultrastrong two-layer coating.
The procedure for filling the floor is as follows:
- At first, an ordinary cement-sand mortar type M150 is kneaded, which should not be too thick.
- Then the draft base is moistened with the same solution, which is previously diluted with water to a liquid state.
- Following this, the main solution is laid out on the cards and leveled with a wooden lath until a perfectly smooth coating of at least 2 cm in thickness is obtained.
- After the prepared layer has hardened to a state that allows you to calmly walk on it, you can proceed directly to pouring the marble mixture. To this end, the marble crumb solution is evenly decomposed on niches (cards), and then carefully leveled with a special trowel.
- After filling in all prepared for pouring cards, the surface of the future floor is left to dry, on which about 6–7 days should be allocated.

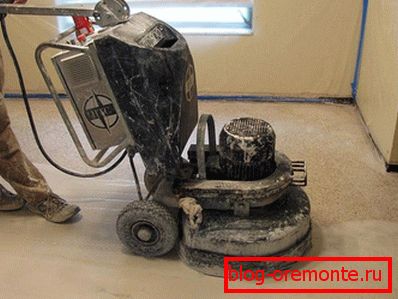
Surface grinding
In order to give the floor surface a more attractive and elegant look after drying, it must be ground. To carry out this procedure, you will need a special grinding machine equipped with a movable disc with abrasive attachments fixed on it.
Note! To facilitate and speed up the grinding process, it is recommended to wet the treated surface with water while applying fine quartz sand on it. If any defects are found on the surface, they must be filled with the previously prepared cement mortar, and after drying the latter, wipe thoroughly with a marble block.

When making a mosaic floor with a complex pattern, in addition to the grinding operation, you will need to polish its surface. To polish the surface, you can use the same grinding machine, equipped with a special felt nozzle. The final treatment of the floor is made using a special lapping paste, which significantly increases the efficiency of work.
