Infrared floor heating itself
Due to the uniform heating and the sparing effect on the laminated flooring, infrared floor heating can be laid under the laminate. This type of heating has recently become very common. At the same time film heating is one of the best products in combination with laminate. In this article we will consider the features of the installation of a warm floor under the laminate. You will be pleasantly surprised that everyone can do an infrared warm floor with their own hands.
Features of infrared heating
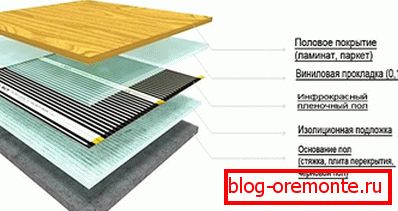
Laminate, laid on the infrared floor, evenly warms up if each component lies in its place. So, the whole heating cake system incorporates the following materials:
- IR film.
- Fastening clips and insulation for the film.
- Thermostat
- Temperature sensor.
- Wiring.
- Heat reflecting material.
Before you begin to build a heated floor, you should determine the thickness of the film and the area of heating.
We select power

The first thing you need to decide on what area you will lay the heating film. So, you can determine the required power of the heating element. If the area of the heated room will occupy about 20 m2, the film may have a power of 220 W / m2. Accordingly, if the area increases, the power of the heating film should also be greater.
Note! Laying the infrared floor under stationary pieces of furniture is not recommended.
As for the wiring for connecting film mats, their cross-section should be in the region of 1.5-2.5 mm. To connect better to purchase stranded copper wire.
Installation of the film under the laminate

The process of installing infrared floor heating do not have complicated instructions. Below are a few consecutive steps, following which you can do everything yourself.
- At the very beginning, you need to level and clean the surface of the subfloor. If there are strong irregularities, then you can pour a thin tie up to 3 mm.
- Further, the installation of the thermostat. To do this, in the selected place from the floor on the wall make shtrob. You can also make a gate to the wire for powering the floor to electricity. All these works are important to perform at the very beginning, so that the dusty work is completed.
- At this stage, the laying of the insulating layer. To do this, you can purchase a thermal insulation pad, up to 5 mm thick. The film must be connected with a special tape to reduce the likelihood of heat loss.
- Now it's time to install the infrared floor. Its installation is carried out to the wall where the thermostat is installed. From the wall, the film should lie at a distance of 10-20 cm. If there is a fireplace in the room, then the distance should be up to 1 m.
Note! If in the process of film laying a cut is required, then this can be done in a specially designated place, between the dark sections. The installation of the film itself is carried out end-to-end, which is fixed with adhesive tape.

Lay infrared film must be copper heaters down. When the film is laid, it is important to isolate the ends. This is necessary because cuts on copper can be damaged. We select insulation based on bitumen. Copper sections are glued over with bitumen insulation on both sides. Places with uninsulated pieces are equipped with special metal clips. When installing the clip, one side of it should stick between the copper strip and the film. Clamping the bottom and the top contact can not, because it can spoil the film. The clamp is fixed with pliers.
- Further, wires are connected to the terminals. In order not to confuse, purchase wires of two colors. So, on the right side and on the left side of the clamp there will be different ends. When the wire is fixed in the clamp, the connection should be insulated with bitumen insulation, and the tape should be pasted on top.
- To protect the wire - going from the film to the thermostat - from the pressure of the floor covering, it is placed directly in the insulation layer. To do this, cut the hole in the insulation and push the wire through it, which should also be fixed with tape in all places (between the film and the thermostat).
- Now it's time to install the sensor. It is placed under the film in the area of the second section. The sensor with the wire should be laid in a corrugated tube. Therefore, under it is cut a hole in the insulating layer.
- If the sensor wire has a bend, then the turn should be smooth. This will prevent its damage, as well as simplify the procedure for its replacement in the future.
- At the very end, it remains to check the system for operation. Make sure each section of the film is warm. Before switching on the heating, check the insulation of each joint.
- A layer of sound insulation is laid on top of the laid infrared film, which will play the role of a moisture insulation layer.

After that you can start laying laminate. This work is important to perform carefully so as not to harm the heating elements. The advantage of this technology is that you can organize a warm floor without pouring a screed. This is especially effective when the ceiling height is limited.
So, from the above it can be seen that the installation of infrared heating does not require special knowledge. It is important to follow all the tips and recommendations that are outlined in this article, as well as provided by the manufacturer of the film. Therefore, before you make the infrared warm floor under the laminate, study all relevant materials. We will be interested in your experience, especially if you have already organized such heating in your dwelling.
Video
From the provided video you can learn about the features of the installation of infrared heated floor under the laminate:
A photo
Below are a number of photos from which you will learn about the intricacies of working with IR film:


