How to raise the floor on the balcony itself
The problem in the difference in the level of sex between the apartment and the balcony is a common problem. Most people resort to the services of builders, but it attracts additional expenditure of funds. But few people think about how to raise the floor on the balcony with their own hands, but in vain. This work can be done by many people, and in this article we will talk about how to raise the floor on the balcony.
Floor raising options
The level of complexity of the work are divided into several options:
- using sand-cement mortar screed,
- on wooden logs,
- using an iron frame,
- dry screed.
Note! Each of the options for raising the floor is selected depending on the device of your balcony.
For example, if you decide to combine it with a kitchen or a room, then you need to precisely align it with the flooring. For a separate balcony, a slight height difference is allowed.
Cement strainer
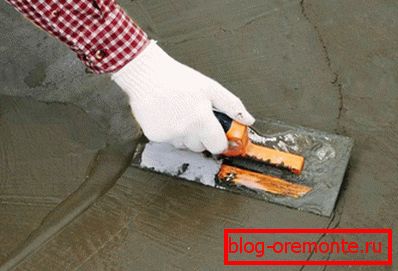
Both self-kneading material (cement, sand, water) as well as ready-mix, which is available at any hardware store, is used as a fill. Before pouring, you need to waterproof the floor, for this use the following materials:
- ruberoid
- glassine;
- thick plastic film.
Since the balconies in the apartments are not too wide, the insulation material can be laid in one piece, without joints. Along the edges of the floor and the wall need to make the bends of the material, like the sides.
Note! The gap between the slab and the wall need to cover up with bitumen mastic.
Laying waterproofing, pour on the floor a liquid mixture, diluted at the rate of: 3 parts of sand mixture to 1 part of cement. For greater strength and to achieve the most even surface, such work can be done in two stages.
- Conditionally divide the surface to be poured into two parts. The first is slightly larger and the second is smaller. When mixing the solution, add clay to it, this will save on cement and warm the floor.
- After drying, prepare a liquid solution and pour it over the first layer, leveling the surface.
In order to prevent the solution from leaking out, an improvised formwork around the perimeter can be made of stainless steel strips, equal to the required casting height.
We raise with the help of wooden lag

This option is allowed if you decide to make a wooden covering on the balcony or lay parquet.
Stages of work

- A framework of wooden bars is nailed around the perimeter. Thickness is selected depending on the required height of raising.
- The bars, which are additionally fastened with iron corners, are also nailed across the frame.
- Then waterproofing and heat insulation are put in the resulting construction.
- Planed boards are nailed to the finished frame.
Note! All bars and boards must be treated with protective compounds. It will be more convenient to do before they are installed.
Metal carcass

In some cases, in order to significantly raise the level of the floor on the balcony, or to strengthen its structure, you must first weld the iron structure, which will serve as the basis.
How to make a frame

- We measure the width and length of the balcony, making a small margin so that the design can be freely installed.
- The frame is welded from an iron corner (50? 50 mm) or a square pipe of a suitable size.
- For amplification, it is necessary, as in the version with wooden lags, to weld transverse corners.
The finished frame is installed on the balcony and, if necessary, leveled in height. Then it needs to be firmly fixed in place with construction anchors.
Note! Materials of waterproofing and insulation can be used the same as in the version with wooden lags.
Before laying the floor on the frame, paint it, and fill the voids with foam, cutting off the excess. After all the work can be laid edged board.
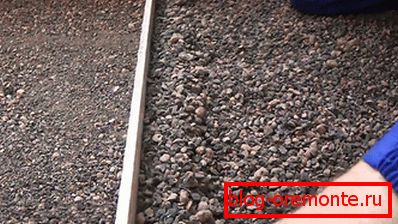
Dry screed
The process of raising the floor on the balcony in this way is more time consuming, but doable. Warming the floor in this way, you can not use insulation.
The screed is made of bulk materials. It is carefully compacted and subsequently the floorboards are laid on it. To preserve the shape, an improvised formwork is built around the perimeter of the balcony, and a heat insulator can be laid along the wall.
Note! Before preparing the formwork for backfilling, the entire surface of the balcony (namely, the flooring boards) is carefully cleaned, and all irregularities and cracks are smeared with mortar.
When the formwork for the backfill is ready, put waterproofing on the slab, make the formwork and fill the material, which is used as:
- fine slag;
- keramzit;
- sand of any fraction.
Note! It is necessary to take the tamping process very seriously - the better you do it, the stronger the foundation for the floor will be. Screed to fall asleep flush with the formwork and tamp to fit tightly to it. To do this, you can use any available tools, for example - solid brick.
Any option of raising the balcony floor is suitable for laying finishing materials. So your balcony will become more comfortable. And to better understand the process, watch the video, which shows how to raise the floor on the balcony.
Video
This video shows the installation of the floor on the loggia (balcony) on adjustable logs: