How to make a warm floor in the bathroom
If you had to stand in a bathroom on a cold tile, then you know that the sensations arising from this are not pleasant. Let's see how to make a warm floor in the bathroom.
We will choose later
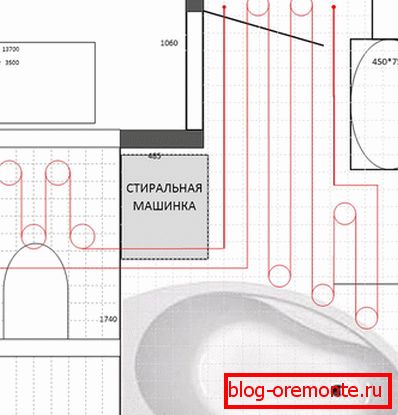
- Heated floor is laid before the bath itself, and it is better to do it under the tile. Therefore, it’s worth starting not with choosing a warm floor, but with drawing a rough plan on the paper and the floor surface.
- Sketch a rough drawing of your bathroom.
- Mark on it where there will be water pipes and sewage.
- Draw on it the location of the bathroom, bath and washbasin.
- Where will be the source of coolant.
- What is the maximum layer of screed can be filled.
- Will it be necessary to excavate the existing screed?
- Do you want to heat the whole territory or just a place near the mirror (bath, toilet).
- Will the warm floor main heating or additional.
You always have a choice.

A wise person always evaluates all possible solutions, weighing the positive and negative sides. Check out all the options:
- Floor fed from hot water. Usually this option is used in a private house, apartments, where there is autonomous heating or a separate riser pipe for these needs. If you have central heating, this option does not suit you. If a heated floor is already installed in some of the premises, then the choice will be obvious. There is no need to combine the system, making additional costs.
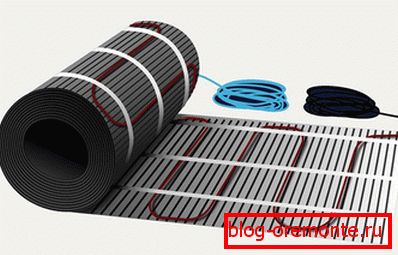
- It is powered by electricity, that is, by direct heating. It implies a system in which the cable itself performs the role of a heater. This view can go like coils, the loops of which are laid manually; or be represented by mats. In the latter version, the best option for the location of the snake conductor has already been chosen, so it is enough to simply deploy and lay it. Single-core system involves the return of the wire and the circuit in the feeder. The two-core system has a closed loop.
- Technology of wave heating or infrared radiation. In this case, each object serves as a heating element, because the rays first heat them, and then the temperature is transferred to the air. This is achieved at the expense of graphite rods, electricity to which is supplied using a copper conductor.
- Electric liquid warm floor is a novelty in its niche. The system consists of pipes that are filled with an antifreeze liquid (ethylene glycol). Throughout its length, there is a conductor that heats this fluid, and it already heats the floor. This option is suitable for any premises and does not depend on the central heating system.
What's better
The correct solution is the one in which the least number of minuses compared to other options. It is important to remember that for one situation one moment can be negative, and for another one the same moment can be positive. Therefore, it is important to carefully analyze the following nuances before the final choice:
| Electric floor heating | Water теплый пол |
| May require replacing old wiring with a more powerful one. | Heating does not depend on electricity (except liquid-electric). |
| Some types can be laid directly in the tile adhesive layer, and the infrared heater can be laid under laminate or linoleum. | Large lining layer and a lot of space for installation. |
| Enough energy consumption. | Cost effective compared to electrical solution. |
| Easy temperature adjustment. | The inability to fine-tune. |
| Protection at failure. | Leakage in case of failure. |
| The need to install an RCD or diphavtomat. | No contact with electricity. |
| Easy cable laying. | Some difficulties when performing rounding pipes and laying them a snake. |
| The increase in the electromagnetic field. | The absence of an electromagnetic field. |
| The service life of 40 years or more. | 50 years of continuous service. |
Materials for liquid floor

If circumstances favor the installation of a liquid floor, this is what needs to be prepared before starting the tasks:
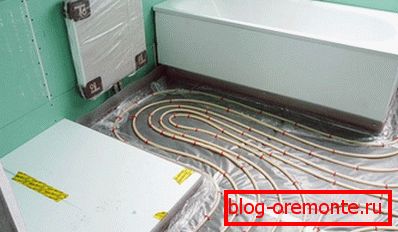
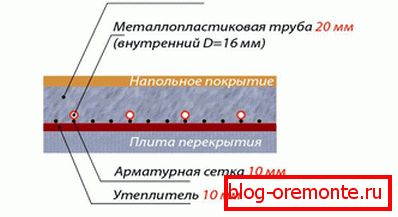
- Trumpet. It can be metal-plastic, made of cross-linked polyethylene or copper in additional braid (its service life can be 200 years!). Recently, more recommended to use the second, due to the fact that the first option over time begins to fall into disrepair due to delamination. In fact, the situation is such that if you acquire quality material, then they will serve in the same way. Indeed, among the metal-plastic pipes there are also seamless ones, the advantage of which is reinforcement with the help of a metal layer. The diameter can be 16–20 mm.
- Guides. In this role, both individual strips can be used (the fixation pitch is 50 cm, and their total length is 2 m), which are attached to the insulation layer, as well as whole insulation boards with “lugs”. Instead of guides, you can use a metal grid. For laying the best snake, take a step of 15 cm. If the pipe pitch is large, then take it with a 20 cm cell.
- Insulation with a reflector - foil. It is especially relevant if the bottom of the non-residential premises. Additionally, it is also better to use foamed polystyrene (withstands higher temperatures) or polypropylene.
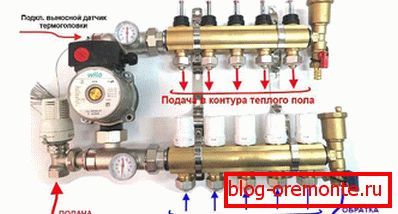 The collector is a multi-way connection that allows you to combine all circuits and adjust them. Take the one where there is the possibility of shutting down each circuit.
- Cabinet for the collector. Not needed if you plan to make a niche in the wall, in this case a revision door will be needed.
- Connectors and valves. For each object is selected individually.
- Mixture for pouring screed. If you want to achieve a perfectly flat surface, then do not take the money and take a self-leveling compound for the finish fill.
- Fastening material - screws, dowels, staples.
- Opressovyvatel. Someone says this is an optional thing. Indeed, in some cases you can do without it, but it is better to use it.
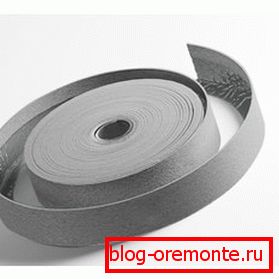 Damper tape. It is necessary in order to ensure the presence of thermal expansion joints.
- Metal or plastic sleeves. Their internal diameter must be such that they fit the pipe. They are necessary only in cases where the pipes will lie at the junction of the plates or at the junction of several screeds.
- Puncher, concrete drills, hammer, screwdriver, usually screed beacons, laser level or water level, marking tools, tape measure, crochet wire, adjustable wrench, set of wrenches, pipe scissors.
Note! If you are going to save, then do it within reasonable limits. Otherwise, you will have to pay the sad consequences.
Installation
To work and go without hesitation, you need to start correctly:
- Make it so that nothing hinders you. Free the room from everything. Tidy up If possible, go for a construction vacuum cleaner.
- If you are sure that your screed is flat and made by professionals, then you can move on. In the case of already laid tiles, it will need to knock. It will be necessary to remove the coating layer in order to be able to deepen the pipes (this will not be necessary if the screed is not yet complete or you plan to raise the floor).
- Determine how uneven your surface is. To do this, output the zero point in this room - it will be the highest place. It is usually located in a corner or near a wall. To determine it, you need to beat the horizontal around the perimeter. This can be done using a laser level or water level. Next tape measure need to measure the distance to the floor.
 The cement screed will normally hold if its thickness is 3 cm. If the difference is less, then a self-leveling mix self-leveling floor may be used.
- We lay insulation with a reflector, from above we cover it with foam plates (its thickness is 3 cm and more. A specific value is chosen for heat losses that may be in your case. Density should be from 35 kg per m3). In order to protect the insulation from water, we cover it with a film around the perimeter.
- We fix the insulation to the screed using dowels and screws. This is very important in order to prevent its displacement when laying pipes and pouring the upper screed.
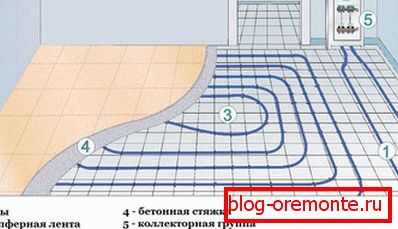
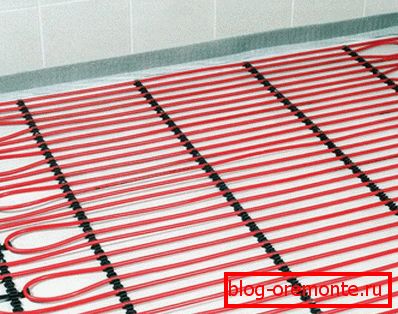
 Put the mesh or strips for fixing. The slats will be located depending on the pattern on which the pipe will be laid. If this is a “snail” - then it is necessary to lay them diagonally, and one line should be laid straight in the middle where the pipe turn will be performed. If you chose the "snake" method - then we lay the slats parallel to each other. The first method is more productive, in this case the floor will warm up as evenly as possible. For the bathroom the best step will be 150 mm. Remember that the initial circuit with hot water should pass along the outer wall and go down to the middle. It is important that those places where condensate can form are well warmed up. The maximum length of one circuit should not exceed 120 m if you use a pipe O20 mm, and 80 m, if it is a pipe O16 mm. If these conditions are not observed, there can be large heat losses, as well as hydraulic instability.
 We install the collector box and the collector where the circuit from the boiler will come.
- We fasten one end of the pipe to the collector and install it in accordance with the chosen scheme and pitch. In order to fix it to the grid, you can use knitting wire.
- After laying the second end is also connected to the collector. All pipes in the place of accumulation in front of the collector should be placed in additional insulation to avoid the formation of excessive temperature rise. It is important that the pipes do not intersect when connected to the collector, otherwise you will subsequently become entangled. Also, if suddenly there is a need to connect the pipe during installation (which is absolutely not recommended), then make it a non-separable connection. If this is not possible, then provide a small hatch for servicing the plug connection.
- We start water under pressure in the pipe (at the same time, using Mayevsky's tap, it is necessary to bleed all the air). Using an opressovyvatel, we increase the pressure in the system to 6–8 atmospheres and leave for a day. If after a day the pressure has not changed, then everything is ready. If the pressure has dropped, it is necessary to check all the joints, whether there are any leaks. If everything is in order, we catch up pressure again and leave for another day. If the connection is not made before the winter, then it is better to pressurize using air to prevent the system from thawing. When performing operations, be sure to turn off the tap that goes to the boiler in order not to damage this heater.
- After the pressure test, we don’t relieve the pressure, it should remain until the end of all work. This is important, because in the process somewhere you can damage the pipe. It is easier to notice if it is under pressure.
- We put the damper tape around the perimeter. Fasten it in the corners or on a double-sided tape along the length.
- Fill the upper screed. Its maximum thickness should not exceed 70 mm. Then you can lay the tile.
- Running hot water carried out after a few weeks, after complete drying (usually need about 30 days).
Materials for electric floor heating

Much of what we know from the previous version is useful here too:
- insulating materials, as in the previous instructions;
- Mixture for casting screed, if necessary;
- cable or mats system;
- thermostat and sensor;
- cold cable;
- mounting box for thermostat;
- insulating tape;
- side cutters, pliers, scissors, multimeter, hammer drill or drill, borax and crowns.
Electric floor heating
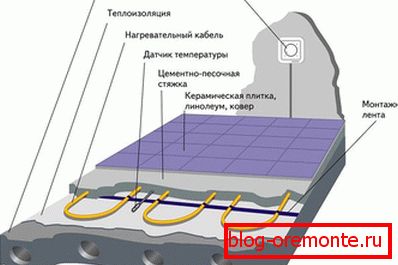
- We do general cleaning.
- We measure the surface level and align it, if necessary, as described in the previous instructions. In the case when the drop is small, there is no need to level the floor immediately. You can do this on top, after you lay the whole system.
- We put insulating materials (following the example from the previous manual).
- We make a groove in which we place the sensor. It should be 2? 2 cm, height on the wall - from 30 cm. The sensor itself is placed in a sealed tube. We wire to the location of the thermostat.
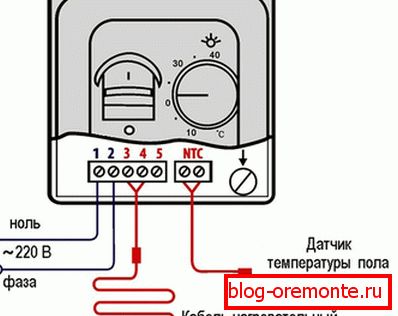
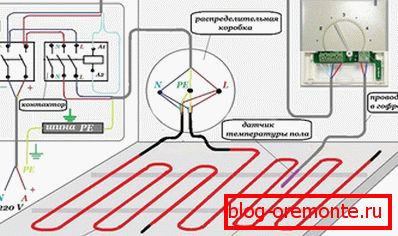 Install the thermostat.
- We put the type of warm floor, which we chose in accordance with the drawn scheme. It is important to remember that for a bathroom the value should reach 150 W per 1 m.2. If you are laying a single cable, the guide system will help. To calculate the pitch, you need to multiply the total heating area by 1000 and divide by the cable length. If you use a mat, then all these calculations, as well as the support bars are not needed.
- After installation we connect it to the sensor and thermostat.
- We check the performance. Some manufacturers allow short-term inclusion. Others recommend measuring resistance. The optimal values are indicated on the packaging. This should be done with a multimeter.
- Now you can pour the upper screed according to the instructions above. Some types of heating cable can be laid directly on the tile adhesive layer. If you plan to do this, then at the preparation stage, be sure to level the surface.
- Turn on at full strength after drying the screed.
Note! The thermostat can not be installed in the bathroom, do it near the door or in another room.
After all the work done, you will proudly enter the bathroom, and your wife will be able to comfortably clean up.
See also:
How warm water floors work
Which floor is better - water or electric
Video
See how to install a warm cable floor:
This installation of water floor: