How to make a self-leveling floor
Repair in an apartment or cottage allows you to finally upgrade the design of rooms, as well as apply new technologies. Along with this there are many questions - how to make a ceiling, choose the color of the walls, how to repair the floor. The last moment in recent times is particularly relevant, because the floor must be particularly durable and durable, and the usual screed, unfortunately, does not always meet these requirements.
The best is a technology known as a self-leveling floor. To be honest, this work is rather difficult to do, and without experience in this area you can spoil building materials. But not everything is so hopeless - this work can be done without the help of experts.
To understand how to make a self-leveling floor with your own hands, you need to understand what it is. This is a special coating that does not have seams and does not require any additional finishing. This floor is also known as liquid linoleum. Seeing this product from your friends or in the photo on the Internet, you unwittingly have a desire to do something similar in your home. This is natural, given the appearance of the floor, like a beautiful shiny carpet that is quite durable, resistant to wear and incredibly even. It is also durable and can last half a century.
The advantages of this design include such characteristics as warmth, lightness and elegance. In addition, self-leveling floors do not pose a health hazard, as they consist of environmentally friendly material. A truly excellent technology that can be easily applied in residential premises!
About self-leveling floors it is known that they were engaged in their development in order to reduce resource costs and to save energy, as well as to provide the ability to align curved surfaces (in the Khrushchev, new build or just after a failed repair) easily and quickly.
Due to the presence of special compositions, the number of which in self-leveling floors is considerable, it is possible very quickly, without delaying the work, to work on arranging an excellent and durable surface, which is monolithic, even and, as mentioned above, the complete absence of any seams. Thanks to a simple technological process, such work can be performed on its own, even if a person does not have a building education and experience in arranging floors.
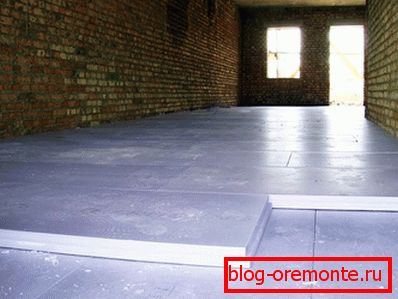
Properly preparing the base

Where can I apply the coating of self-leveling floors? Almost all are suitable surfaces, that is, cement screed, tiles that can not be broken, and even old wooden floors covered with lags and boards or plywood. At the same time, it is not allowed to use a filling layer for an extremely curved floor. Self-leveling floor can not be poured on a bumpy or very uneven surface.
Note! How to check if the floor is even? It is enough to take the level and attach it to the floor. If in some place the distance from it to the floor surface is 4 cm or more, then it is necessary to make a screed from cement or on the basis of adhesives, and only then to make a self-leveling floor. A floor height deviation of no more than 5 mm by 2 m is allowed.
What other work needs to be done before starting work on the self-leveling floor? Be sure to remove the old plinth. They will strongly interfere, as they will not allow the filler screed to spill to the walls. From the floor, it is imperative to remove traces of painting, to clean varnished areas or those on which glue remains.
Of the tools for cleaning, you must have a narrow spatula, a brush for metal or something else that can be used to scrape paint and varnish, and you also need a grinder in order to process the surface properly before pouring it.
Note! If the floor on which the screed will be made was made of wood, then in this case we check it for moisture. Humidity will be at least 10%.
Any cracks that are in the floor, be sure to repair and high quality polished using sandpaper. After that, the adhesion of the filling layer and the old surface will be much better. The resulting debris and old dust is cleaned with an industrial vacuum cleaner or in the old way (broom and dustpan), after which the surface is finally cleaned and at the same time degreased using a cleaning powder. In order to prevent the self-leveling floor from leaking into the cracks, these voids need to be sealed (glue-cement or any other mortar).
Preparing a concrete base, you need to do something. These steps include the following steps, such as checking the moisture content, which should be less than 4%. It is imperative to determine how high the strength of the floor in compression and separation.
Note! In the event that a concrete screed has been previously made, you should wait 28 days before pouring the self-leveling floor.

You also need to perform the following measures:
- remove from the old base the coating remaining on it;
- remove mastic residues, clean the surface from glue, oil stains, remove paint and other contaminants;
- ensure the purity of the coating;
- check whether the surface is flat.
Ground the surface

The primer is necessary so that after using it, the self-leveling floor better adheres to the old surface and can spread well on this surface, as well as to prevent the appearance of air bubbles. Places with a large number of pores are primed in several stages, using a primer having a high viscosity. When working with concrete, a two-component epoxy primer is used.
The base is soaked in rooms that are provided with excellent ventilation, provided that the temperature in them is constant. Otherwise, bubbles inevitably appear. The primer is applied using a medium-width brush or a regular roller. The next layer is applied only if the previous one has completely dried. After a day has elapsed, a mixture is poured onto a substrate that has already been primed. It is important to do this process immediately, otherwise dust may settle with time and all the work will have to be done first.
Preparation of the solution
Everyone who is going to do the bulk floor, wants the mixture to spread on the floor beautifully, filling everything around the perimeter. To do this, you must follow the instructions for the preparation of the mixture, in particular, to comply with all the proportions that are indicated as optimal. If you do everything as it is written - the mixture will spread normally.
Take a clean container - a bucket, a small basin or something like them. There is poured water, after which the dry mixture is poured. It is best to mix the composition with a drill with a nozzle - then there will be no lumps or bubbles.
Note! Mix the mixture should be intermittently, which should be 1-2 minutes.

How can I check how the composition turned out? You will need to look for a small plastic ring that is about 5–6 cm in diameter (a lid from a used deodorant or other cosmetic container will do). Found the bottom of the cover is cut, so it turns out the ring. It is placed on something flat and smooth, best on glass. The finished solution is poured into the cover, after which it rises and the mixture begins to spread on the glass. If the radius of the stain formed on the glass turned out to be about 8–9 cm, then the resulting consistency can be considered normal for pouring. If the diameter is more than 18 cm, then pour a little dry mix; if less - you need to pour water. Otherwise, too liquid mixture will lead to the appearance of cracks in the floor, which, moreover, will dry for a long time, which is why it will not be so strong.
Note! The temperature of the floor in the room where they will work should not be less than 15 ° heat and more than 25 °! You can view the required temperature readings in order to successfully carry out floor filling work on the label of the dry mix or the instructions attached to it.
The room should not be wet (the threshold is not more than 80%). Otherwise, you can face the appearance of condensation on the walls and ceiling, which will fall on the solidifying surface, leaving holes and hollows from water droplets there. To lower the humidity, it is necessary to provide the room with heating or to ventilate it, again, without forgetting about the required temperature.
Filling the floor - how to do it right

Work on pouring always starts from the wall. If you pour the mixture in the middle of a room or near a wall close to the door, you can block access to the room. Yes, by the way - if floors are being poured in several rooms at once, then the self-leveling floor continues to be made non-stop, so that there is no difference in height.
The finished mixture should be poured onto the old base in strips parallel to the wall. To keep the layer thick (best if it is 3-5 cm) and evenly distribute it, you can use a wide spatula. A needle roller is used to remove bubbles and better stretch, and a squeegee can be used to determine the thickness.
Note! Mixed composition must be used within an hour, and the interval between each next batch, placed on the base, should not exceed 10 minutes.
At the end of the pouring on the ready floor (not yet frozen), you need to lay a film or a thin layer of foil - so the sand will not get onto the floor of the flood, and it will freeze everywhere the same way.
When the screed is dry, it should be treated with polyurethane varnish, after which the floors will become glossy and shiny, and the quality of the coating will also improve. It is possible to walk on a new leveling floor 11–12 hours after completion of work, and it can be considered completely ready for operation after 5 days. And only after 7 days will it be possible to turn on the floor heating system, if, of course, it was provided there.
Production of a decorative bulk floor

An excellent option in this case is a three-dimensional volumetric field created using a special image. After the base is impregnated, the base color is applied to it, and then a picture that is created using a special program and superimposed on the surface. This process requires an airbrush; unique paints or films will also be required. Manufactured drawing is transferred to this film, mounted on the floor surface. Then the drawing is coated with epoxy, colorless, of course, and then with varnish.
A photo


Video
We bring to your attention a video that shows how to make the self-leveling floors: