How to make a kitchen floor
One of the rooms in the house or apartment - the kitchen - is used much more often than others. Because of this, the flooring is subject to intense wear. Sooner or later it is necessary to decide how to make the floor in the kitchen. Due to the abundance of options, you can choose exactly what will be to the taste of all family members.
Coverage Requirements

In addition to physical damage, the floor is exposed to other destructive factors that shorten its service life. That is why it should correspond to such indicators as:
- resistance to temperature effects. This is one of the basic requirements, as it often happens that a heated pan or frying pan, having broken off, leaves damage that cannot be repaired with anything;
- ease of care. Flooring must be such that it is easy to wash. Well, when the surface is such that there are no stains;
- strength. It is important that after the fall of a heavy kitchen utensil, the question of replacing part of the cover does not arise due to the fact that it has cracked or a dent has appeared;
- An integral element of cooking is water. It spreads everywhere. Flooring should be well tolerate moisture and evaporation.
Not all building materials are equally well suited for all items, but this can be achieved using combined solutions. So what to choose from?
Choose a cover
Many craftsmen do not recommend using laminate in the kitchen. It is argued that it is unstable to moisture, temperature, and quite fragile. To some extent, we can agree. But there are types of laminate, the base of which is made not of wood fibers, but of PVC substrate. Plastic can be in the water for as long as you want and nothing will happen to it. The surface in such solutions is covered with a special heat-resistant layer, which, even with a brief exposure to the burner, does not change its properties.
Note! Not necessarily the entire area should consist of laminate, the area near the sink and the cooking surface can be laid out of the tile. Such combinations look very impressive.

The main positive points of this material are:
- ease of installation;
- wide range of colors;
- imitation of various wood species;
- ease of cleaning;
- presentable and expensive look.
The disadvantages include:
- relatively short service life;
- high surface level compliance requirements;
- Some types cannot be dismantled and installed.
Next on the list is linoleum. Most of its species can not be called highly environmentally friendly material, but still it is very popular. This is explained by the following factors:
- Relatively low cost.
- Does not cause special difficulties in styling.
- A variety of patterns and colors.
- Ability to partially warm the cold floor.
- Resistance to falling objects.
- Ease of care.
- Long service life.
- High moisture and steam resistance.
- Additional sound insulation.
- Chemical inertness - tolerates the application of various cleaning agents.
What the buyer might not like:
- Dents from the furniture, which is on the floor for a long time.
- High requirements for subfloor.
- The use of synthetic materials in the manufacture.

Cork является относительно новым решением на наших рынках, но оно уже успело завоевать своих поклонников. Изготавливается оно из определенного вида дуба. Кору с него срезают каждые два года, после чего ее обрабатывают и получается конечный результат. Те, кто остановились на этом варианте, отмечают:
- high environmental friendliness;
- heat and noise insulation;
- pleasant tactile sensations;
- possessing antiseptic properties, therefore fungus and mold do not reproduce on the cork coating;
- reducing the load on the musculoskeletal system of a person due to the structure;
- large selection of interesting patterns;
- that the cork, if it is planted on glue, easily tolerates small floods;
- that antistatic properties prevent dust from settling;
- ease of cleaning and cleaning;
- safety for those who have allergies or asthma.
To take a balanced approach to the choice, you need to know about some of the disadvantages:
- floating version with MDF base easily deformed from moisture;
- there is a need for additional coating for protection;
- instability to action on a gap.

For many in the matter of covering for the kitchen is the ideal solution is ceramic or porcelain tiles. And indeed, she wins in many ways:
- resistance to high temperatures;
- lack of interaction with chemicals;
- ease of cleaning;
- abundance of shapes, colors and textures;
- wide price range;
- impact resistance;
- "Indifference" to moisture and fat.
Disadvantages do not stop consumers, but they are:
- Some species are quite slippery.
- You will need to take care of floor heating.
- Some complexity of styling.
- Bad soundproofing.

If there is a desire to realize something special and unusual, then perhaps the solution will be a self-leveling floor. It can be based on various materials, but the point is that you can put in the bottom layer what you personally like. It can be a beautiful picture of nature or of the sea floor, sand, etc. A transparent layer is applied on top, which gives volume. This option also has practical benefits:
- solidity, pouring is made without seams;
- choice of any pattern and pattern;
- high resistance to moisture;
- resistance to chemical detergents and other liquids;
- sufficient strength to withstand the fall of heavy objects.
The downside is:
- certain difficulty in applying;
- high substrate requirements;
- high price;
- preferably no direct sunlight;
- for self-production will require skills.
Note! In addition to all the above options, you can also consider the possibility of laying artificial or natural stone. In this case, you will need to take care of the presence of a warm floor. Some types of natural material have a large porosity, which leads to rapid absorption and the inability to remove certain types of spots.
Coverage is selected for a long service life, but over time, you may want to change something, and for this there will be all the possibilities. This probability should be foreseen. If a stone is laid, you will have to carry out serious dismantling work.
Independently - perhaps
With the right approach and knowledge of the business, everything can be done by hand. The first thing you need, after the choice has already been made - find out what are the nuances when buying a particular coating. It is necessary to assess the condition of the draft floor and what needs to be done in order to fix the case. Correct calculations imply that there will not be too many scraps when laying the material.
Foundation preparation

In order for everything to be done qualitatively, it is worth starting from the very bottom. First of all, the kitchen is exempt from all furniture. Dismantled old coating. If it is linoleum or laminate, then it will be quite simple. With a tile it is necessary to sweat a little. In some cases, it is planted so well that even the punch can not cope. To solve this situation, you can use the grinder and a special grinding wheel with a diamond-coated (cup). You need to remove the entire upper glaze so that it does not cause detachment of the screed.
- It is important to accurately determine whether there are drops in the subfloor and what their meaning is. This can be done with a laser level or water level. One wall is selected for this and an arbitrary mark is applied to it. It is transferred to the remaining walls and is measured from these markers to the surface using a tape measure. In the case of the plane builder, a line is simply projected, and measurements are taken from it.
- If the difference is less than 10 mm, then it can be neglected, as insignificant.
- When the values have a large amplitude, then it is necessary to make an alignment.
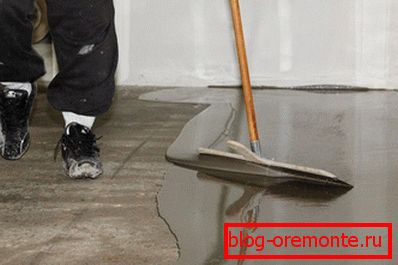
 The easiest way to do this is with self-leveling compounds. This is especially true in cases where the layer will be less than three centimeters. When using such materials it is important to remember the correct sequence of actions. The surface is carefully cleaned. All large gaps are covered with glue for tile, putty or other adhesives. This is necessary so that the solution does not flow into the holes. Primer is applied. If you see that the first layer is absorbed quickly enough, then perhaps it is better to repeat this operation. Strictly observe the proportions that are indicated on the package. If this is not done, the necessary adhesion will not occur and the coating will not acquire sufficient rigidity. After pouring it is necessary to walk with a needle roller or a spatula with teeth. This should be done before the air bubbles disappear completely. So that the liquid does not flow into other rooms, the outlets can be closed with partitions.
- In a case when laying of a heat-insulated floor is planned, it will be necessary to completely remove the old screed to the base. The hydrobarrier keeps within, a heater on it. At the top is a pipe or electrical heating elements and a finish line is poured. It must stand for 28 days, after which further work can be continued.

For some types of flooring, an alternative approach to the preparation of a site for laying is possible; this will be discussed for a specific material separately.
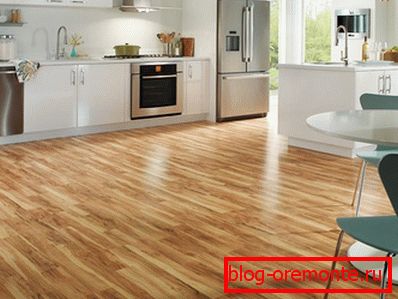
Laminate

I would like to immediately note that for the kitchen it will not be a low-budget option. It costs 32 class. This waterproof laminate is represented by many companies, against which the Belgian Aqua-Step and the French Dumafloor stand out. At the heart of the material is a plastic panel. To increase sound insulation, special air chambers are made in it, which quench the sound of footsteps or falling objects. The plates are interconnected by means of a click lock, which prevents liquid from entering the middle. Color and texture component - the choice of the buyer. To cope with the installation of this material, you will need the following tools:
- square;
- level;
- manual circular or end saw, jigsaw can be used;
- roulette;
- rubber mallet or ordinary hammer and wooden lining;
- wedges;
- marker or pencil.
There are several ways of drawing. But it is necessary to cover the whole territory with maximum quality and at the same time, so that a small amount of trimming remains, it is better not to use the diagonal arrangement. Firstly, it will be difficult to combine the lines with the arranged furniture, and secondly, the places where they adjoin the thresholds and walls will need to be cut strongly so that everything fits nicely.

- Laying is better to start from the wall with windows. Although there are no special rules and everyone is free to choose himself.
- Positioning the lines in the direction of light or perpendicular to it - it all depends on the shape of the room. If it is narrow and the windows are on a wall that has a larger size, then it is better to lay in the direction of the rays falling, in the opposite situation - perpendicularly.
- A primer is applied to the prepared surface to remove unnecessary dust and additionally strengthen the screed.
- The whole room is covered with a substrate. There is no need to overlap between the sheets, because of this, unnecessary projections can form that will interfere with the laying of the laminate. The joints are taped with reinforced tape.
- It is necessary to ensure a gap of 10 mm between the bar and the wall. This is a thermowell, which is necessary to compensate for expansion with temperature. This will help spacers wedges.
- Fit the first row. Measure everything well, if at the end there is a piece that is less than half, then it is better to cut the first and the last elements to the same value so as not to leave small details.
- The second one is laid out so as to ensure the displacement from the seam between the boards of the first row into 3 parts of the width of the plank. This way the cover will be secured and the entire structure will be stiff.
- In order to properly lock the Click lock, the bar must be brought at an angle of 45 °, inserted into the groove and then carefully but surely lowered to the characteristic click. This should be given special attention, because improper installation will lead to the fact that the liquid will flow under the coating.
- Well, when all pipes are recessed into the wall. But if this is not the case, then it will be necessary to make neat cuts with a jigsaw to get around them beautifully. The remaining gap can be sealed with a sealant, which is chosen to match the coating.
- The final step will be the installation of baseboards, which will close the gap left to the wall.
Linoleum

If, after dismantling the old coating, it turned out that it is necessary to level the base, and there is no time and effort to fill the screed, then you can go the other way - to lay the flooring on plywood. To do this, you need to do the following:
- The entire surface is cleaned and primed. After complete drying, the area is covered with plastic film with a thickness of 200 microns. The overlap between the sheets is best done at 20? 50 cm. The seam is glued with scotch tape. On the walls it is necessary to make turns to the level of the future floor.
 From the edged board with dimensions of 50? 30 mm (you can use any suitable one, but take into account how ready you are to raise the floor) the batten is made. A line is drawn on one of the walls. Relying on it, the first timber is exposed. Then, in 50–60 cm increments, parallel stripes are mounted. They can be fixed to the floor using dowels and screws. It is necessary with the help of the float level to check that they are in the same plane. In order for the whole structure to have greater rigidity, cross-beams are mounted.
- The next step is laying plywood. For these purposes, it is better to take high-class waterproof. Before you cut large sheets into smaller ones, it is better to make several specimens from cardboard or fiberboard. They are laid out on the territory. If the size fits, then you can proceed to the dissolution of the main plates, if not, adjustments are made.
- Finished squares also should not be in a hurry to fasten. Spread them across the territory. See where and what needs to be adjusted. Number them. And only after that proceed to the installation.
- The caps of the self-tapping screws should be slightly recessed to prevent the linoleum from clinging to them.
- Up to the wall must be left a gap of 10 mm.
Note! Exactly the same base can be made under the laminate. It is not necessary to use plywood, suitable, for example, sheets of moisture-resistant OSB.

Linoleum оставляется в помещении на сутки, чтобы он приобрел температуру и влажность комнаты. Если его занесли с мороза, ему обязательно нужно прогреться, тогда он будет более эластичным при укладке. Основную подрезку лучше осуществлять еще тогда, когда он находится в рулоне. Настил может фиксироваться при помощи клея или частично закрепляться двухсторонним скотчем. Для кухни лучше применить первый вариант. В этом случае клеящая основа будет дополнительным защитным слоем для фанеры. Покупать материл лучше с запасом в 10%, это позволит сделать нахлест и качественную последующую подрезку.
- The place where the roll will start rolling out is disinfected with glue. The composition is applied using a special notched trowel.
- The roll is placed so that the wall overlap by 10 cm.
- The material is partially rolled out and pressed against the already missed area. It is better to do this with a heavy roller or plastic spatula. Movement should be from the middle to the edges.
- Then the glue is applied to the next section and the roll is gradually leveled.
- After complete installation, it is advisable to walk with a hand roller to remove air residue.
- With the help of a clerical or special knife for linoleum, the overlap on the walls is cut, and also cutouts for communications are made.
- If several rolls are laid, then the seams are machined with cold or hot welding.
Note! If necessary, a heater in the form of mineral wool or penoplex can be placed in the crate space. It will also give additional sound insulation.
Bung

This option is desirable to combine with tiles, which are best placed near the work surface and sink. It is also necessary to provide that the cork is covered with a special varnish, which will provide a water-repellent effect. There is a laminate with a cork coating, its laying is carried out as described above. For the adhesive method is better to use special substances. Do not use PVA, since it is water based, it can lead to swelling and deterioration of the coating. The base is prepared in one of the ways described above.

- Start from the middle and spiral in a convenient direction.
- Spread out several square meters without adhesive. See how everything will lie, and find out what trimming will need to be done near the walls.
- Using the laser level, project two perpendicular lines, each of which will be parallel to two walls.
- Focusing on their intersection, set the first tile.
- Glue is applied to the base of the flooring using a roller made of velor, and on the floor - using a special notched trowel (the same as for linoleum).
- In order to better join the individual elements with each other, a rubber mallet is used.
- Control the plane by building level.
- After laying a few square meters, you can walk with a dry roller on the surface. If glue has protruded somewhere, then it should be immediately removed with a cloth soaked in water.
- First fit all solid elements. Closer to the walls - trimming. You can trim with the help of a side saw or jigsaw. If they are not, then a manual hacksaw with a small tooth.
- A 10 mm gap is left up to the wall, which is then closed with a plinth. To make it easier to follow, use wedges.

Note! In some cases, it will be necessary to apply an additional layer of protective varnish so that the coating lasts as long as possible.
Tile

It is a pleasure to stack it on an even basis. Flooded screed is cleaned and treated with a primer for better adhesion with tile adhesive. In order to make it easier to observe the correctness of the lines, it makes sense to design the level beams, as in the previous version. Landmarks can also be applied using chokline (dye cord). Laying need to start from places that are visible, and move to the walls where there will be a kitchenette and other furniture.
- The amount of water is added to the solution to make it look like thick cream. Strongly liquid will spread, and very thick will quickly set, which will complicate the alignment of the tile.
- The composition is evenly applied to the floor using a toothed metal spatula, then the first tile is carefully laid. The thickness of the adhesive should not exceed the thickness of the tile itself. It is better to apply so that the lines remain parallel. Then, as each element shrinks, a monolithic layer is formed under it without air pockets. If this is not observed, then when a heavy object falls, this place will surely break through.
- The reciprocating movement is the shrinkage of the element into place. You can help yourself with a rubber mallet or by tapping with your palm. Additionally, the plane is checked by the building level.
- The next tile is laid in the same way. Then between them crosses are inserted on the width of the planned seam.
- To make it easier to check the accuracy of the horizontal plane, it is possible to project a line from the level at a distance of 15? 20 cm from the floor and with the help of a square to control the distance from it to the tile.
- Trimming will be easier to do with a tile cutter. It will provide an opportunity to withstand the required angle of the line. In order for the tile to clearly correspond in shape to the place of installation, it is necessary to attach it to the planned place and mark it up, making measurements with a tape measure, the same result is much more difficult to achieve.

Note! The lines will be smooth, if you observe one trick. Usually on the back there are arrows or some text. It is necessary to lay two adjacent rows in such a way that the arrows or the text look at each other, then the same sides lie one against the other, and this results in a high-quality seam.
Bulk floor
This coating needs a special approach, but the result will be special. For the kitchen, polyurethane self-leveling floors will be the best solution. Before starting work, it is necessary to create a comfortable temperature above + 18 °. It should be like this for several days. It is important to avoid large and sudden drops. On the level of the future floor stuck on the wall stucco. Two marks are made: one will be for the first layer, the second will be a guide for the finish. Sifted river sand can be applied all over the area with a small even layer for better traction.
- The floor is primed in several layers. Further work can be started only after complete drying - after 12 hours.
- The base layer is prepared and applied (the instructions indicate clear correlations that are important to observe). Its thickness can vary from 2 to 5 mm. It is important to best distribute it throughout the area. This is done, as in the case of a self-leveling mixture, using a needle roller. It is necessary to achieve complete removal of air bubbles.
- Often it is impossible to immediately prepare the entire required volume. But it is important to do the batches with the least possible interval so that the previous fill does not have time to grab. Otherwise, uneven layers will be obtained, which will then be left behind.
- At this stage, you can apply any pattern, mixing different colors of paints.
- Now you need to take a break in two days. This time will be enough to grab the main layer.
- After 48 hours, you can begin to fill the finish layer. Also at this stage you can draw a picture. First, it is printed on the appropriate equipment. The first layer is primed. The primer can be mixed with a small part of the finishing layer. After the impregnation dries, the print is carefully laid.
- The final layer of polymer components. It dries very quickly, so the maximum time between batches should be no more than 10 minutes.
- During work, make sure that the room gets as much fresh air as possible. But do not overdo it so that there are no drafts. This can lead to the fact that the composition will begin to crack. Use rubber gloves as well as a respirator.
- After the top coat has dried, the surface can be coated with acrylic lacquer, which will serve as additional protection and also give the surface a gloss.
- All work usually takes about a week.

Note! To be able to move freely in the fresh solution, make yourself a special platform. They can be made simply by driving nails through a small plank and fixing another from above. Thanks to such a device, it will be possible to get to any part of the room without causing any damage to the surface.
As you can see, updating the kitchen floor can be turned into a creative process. We would like to know that from the listed options we managed to apply you personally. Share your experiences in the comments on the article.
Video
Tips for choosing coverage:
A photo


