How to make a concrete floor yourself
When building various objects, it is not always clear which material to choose for flooring. In most cases, the main criteria are strength, durability, ease of installation, undemanding to the conditions of operation and high energy efficiency. Concrete floors fully meet all these parameters. At first glance, this choice is not obvious, since the process of pouring concrete is rather complicated for people without relevant experience, and the energy saving leaves much to be desired.
Note! With the right approach and the observance of all construction technologies, it will not be difficult to carry out the entire list of works even for one person, and after acquiring a little experience, the process will seem simple at all.
In addition, concrete can be leveled to an accuracy of several millimeters per square meter and at the same time ensure high reliability even in the case of application of significant mechanical loads to it. This will allow to install on it not only any type of insulation layer, but also the whole heating system of underfloor heating, and then practically any floor covering.
Preparation of the basis under filling of floors
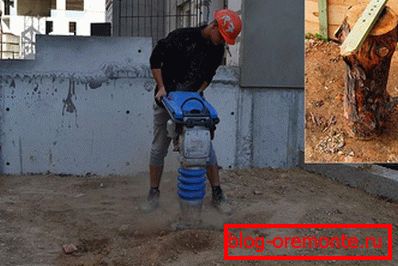
Before you make a concrete floor with your own hands, it is necessary to make preparatory work on the installation of a bulk cushion. For this, a thorough leveling of the soil is performed with the removal of the fertile layer to a depth of about 20 cm below the planned zero level of the floors, and also taking into account the thickness of the cushion from 30 to 40 cm. After that, all the excess is removed from the site and tamping is performed throughout the site. This procedure is convenient to carry out with the help of tamping technology, but it is also possible with the use of a heavy log, on which a handle should be nailed, which is a square or rectangular plank. After that, one of the walls should be chalked to control the thickness of the layers, so that when filling there is no error in the calculations. In total there will be three layers: sandy, gravel and rubble. The thickness of the first two is selected from 15 to 20 cm, depending on the density of the soil. The third one serves as leveling, and its thickness will directly depend on the size of the gravel.
Note! If the foundation of the floors is not subjected to tamping, then during the pouring of concrete or the period of its hardening, the soil may shrink, resulting in the formation of cracks.
Purified sand is poured on a flat, compacted surface in an even layer. On top of it, small crushed stone is poured with a fraction size of not more than 3 cm, and a second tamping is performed. Then the entire surface is abundantly wetted with water for better cushion subsidence, so that when pouring concrete, the moisture does not leave the solution. After that, pour a small layer of fine crushed stone with fractions up to 5 mm and produce a final leveling of the surface before pouring, re-ram and pour water.
At the next stage, install a waterproofing layer. For these purposes, various rolled materials are usually used, for example, roofing felt or thick polyethylene film. They are laid, starting from the corner, with a slight influx on the wall with a length equal to the thickness of the concrete layer, i.e. approximately 20 cm. The overlap between the waterproofing material should also be at least 20 cm to ensure good insulation. Roofing material is enough to lay out in one layer, while polyethylene can be easily damaged and therefore it should be installed in two layers: one is laid relative to the other in the perpendicular direction, and the edges are sealed with adhesive tape.
What needs to be done before pouring floors?
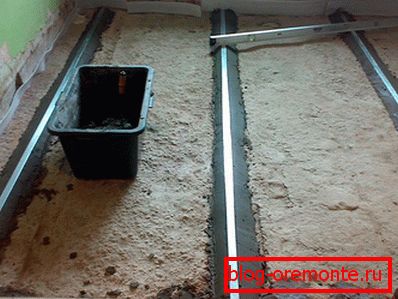
Before you start concreting, you need to properly search for a zero level of floors and install guides that will serve as a guide when working. To find the zero level is quite simple: on one of the walls two points are marked at the beginning and end of it at the height of new floors using a laser or bubble level. Then a similar two points on the opposite wall are selected. At these points, two metal guides are installed along the walls on a concrete solution with fixation every half meter to ensure the reliability of fastening and not knock them down during the work. The following guides are set at the level of the cord, stretched from one label to another on parallel walls. For convenience, it is best to stretch the threads along the walls, and attach a cross-thread to them, which would freely move along them. By moving it you can check the installation of the beacons on the entire floor area.
Note! In some cases, a special lubricant is applied to the guides, which, when the concrete hardens, does not allow them to firmly secure and destroy the surface of the floors when removed.
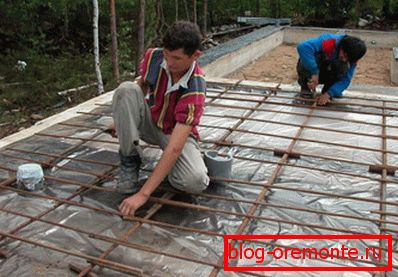
If it is necessary to reinforce the construction of floors, in the event of exposure to increased loads, at the preliminary stage it is necessary to prepare a suitable reinforcing mesh. You can buy ready-made rods with a size of 3 mm and a cell size of 10 × 10 cm, fixed with the help of welds, or you can make it yourself. To make such a grid you need to find a flat surface to create a pattern. To do this, fit a wooden table or workbench. A roulette is taken and marked on the surface of the point of formation of nodes for the grid, that is, the tops of the squares every 10 cm. Screws are screwed in several turns so that most of them stick out. After that, the longitudinal metal rods are laid, and then transverse, so that parallel laid ones are on one side of the screws. Then a thin wire is taken and strapping is made at each intersection of the reinforcement. The number of such grids should correspond to the whole area of the room, taking into account that they are 5–7 cm away from the walls. In addition, the reinforcing layer should be immersed completely in concrete in order to achieve maximum strength. Therefore, special plastic stands are installed under the net, raising them to a height of at least 5 cm.
Reinforcing mesh can be installed in order to save concrete solution and reduce the thickness of the floor by half. In this case, the height of the reinforcement should be 1/3 of the layer thickness.
Concreting floors
To perform the flooring it is necessary to know how to properly knead the solution in the right proportion and quantity sufficient to fill the entire area. This is a basic requirement, the failure of which will lead to deterioration of the properties of concrete and its rapid destruction. Therefore, when choosing components for mortar, you should select only high-quality cement of grade not lower than M300, clean sand without impurities and dirt, as well as small fractions of rubble with dimensions up to 5 mm. Since it is necessary to obtain a high homogeneity of the solution and a sufficiently large amount of it, you should use a concrete mixer for kneading. If it is not available, it can be rented from the relevant company providing these services. At the same time a lot of time will be saved and concrete of excellent quality is obtained.
Note! Concreting should be started only when the ambient temperature is at + 5 ° C. Such conditions are minimal for the concrete to harden. The ideal option would be a temperature of + 25 ° C and low humidity.
First, the components are mixed in a dry form. A piece of cement, 2 parts of sand and 4 parts of rubble are taken - everything is poured into a concrete mixer. When a high homogeneity of the dry solution is achieved, water is slowly poured in there. This should make a viscous mixture that is easily molded, does not crack and is not too liquid. The kneading is performed for about 10 minutes, and then poured between two guides in a small amount, in order to fill no more than 1 m, starting from the corner of the wall opposite to the exit. With the help of a shovel, it is initially leveled and then aligned with a rule in a more thorough manner. So that inside the solution there are no air bubbles throughout the thickness, vibrators are used. The final alignment is carried out with a trowel. If surface cracking occurs or the mortar adheres to the instrument, the concrete is slightly moistened with water. Thus, one run and then the rest is poured.
Note! The use of unrefined sand will not allow to obtain a layer of concrete with high uniformity and the required strength properties.
Concrete floor maintenance after casting
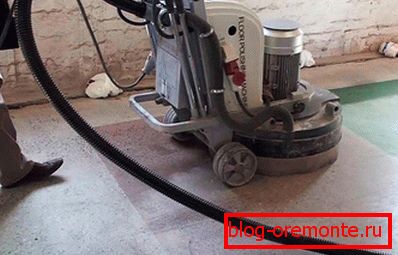
2 - every 10 m, it is necessary to make cuts with a grinder with a thickness of up to 2 mm, so that the floor will not crack when temperature expands. The grooves are sealed with a special hermetic putty. The same should be done in the joints of the floor with the walls, regardless of the area of the room.
Until the floors are frozen, after a few hours it is necessary to make a concrete floor screed. To do this, the ideal option is to use grinders. They are able to level the floors to the level of irregularities less than 1 mm / m2. If the flooring special requirements are not presented, then you can grind them manually. However, in the absence of experience in such work, you can only exacerbate the situation, therefore, you need to involve specialists or use self-leveling mixtures.
Before it takes three days, it is necessary to maintain a constant temperature in the room without forced heating with heaters. Also need to avoid drafts. If these conditions are not fulfilled, the concrete will set unevenly and mechanical stresses will arise inside it, which will subsequently affect its quality. Direct sunlight is also undesirable.
After 28 days, the concrete floor will be ready for further work.
How to increase the energy efficiency of the concrete floor
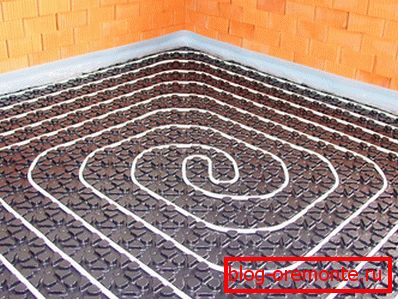
For many people, concrete floors are associated with cold surfaces that absorb a lot of heat, and barefoot walking on them alone is detrimental. Therefore, they opt for wood. However, in fact, their opinion is partly wrong, since an additional layer of waterproofing and heat insulation, as well as a system of underfloor heating, can be installed on the concrete, which will create warmth and comfort in the room. In addition, almost any floor covering can later be installed on flat concrete.
Warm concrete floor can be created by installing electric or water heating. Underfloor heating systems are so effective that you can refuse the usual battery and convector heating. Electric can be installed in any room without any restrictions, while water only in low-rise buildings. This is connected not only with the possibility of flooding of the inhabitants of the lower floors, but also with the fact that the water floor can only be connected to the autonomous heating system.

Self-pouring concrete floors includes a large range of work that requires a responsible and serious attitude. Each stage is important and will not be rushed. Compliance with all technical and construction standards and requirements for creating a foundation for concrete, mortar, conditions for its hardening, leveling and finishing with a decorative coating will be required. As a result, floors with high surface quality and long service life will be obtained.
Video
This video shows how to manually knead the concrete with a minimum of effort:
This video shows the installation of standard beacons using a laser level: