Floor in the steam room itself
One of the most important stages in the construction of the bath is the steam room floor. The main types of floor Russian bath - concrete or wood. A well-made floor is a comfortable stay in the bath for a long time. In this article we will look at how to make the floor in the steam room with your own hands from wood. For example, take the floor construction size of 2.5? 3 meters.
Main types of floors

Wooden floors can be of two types:
- Leaking
- Unprotected.

The design of the flowing floor provides clearances for quick elimination of water. Then the water goes out. This type of floor has a fairly simple design. Make it easiest. However, if you live in a region with severe frosts, this floor will not work, as it is not equipped with insulation. As for the impermeable floor, in this case, the boards are stacked close to each other. Unlike the washing room, in the steam room the floor is made with a double-sided slant.
Note! If the steam room performs the function of the washing compartment, then it makes sense to install a drain.

For a leaky floor should be made vapor barrier, waterproofing and make insulation.
Unlike a wooden floor, concrete has several advantages. Duration of operation is up to fifty years. Wooden floors, in turn, will last about ten years. Of course, for the manufacture of concrete floor will need to make more labor, however, it is fully justified. Such a floor can be insulated, finished with ceramic tiles and organize a good drain. Ideally, you can arrange a warm floor in the steam room and washing room.
Here's how to make a bath drain:
Features of the construction of a wooden floor
Regarding the fair floor, it should be said that it should be constructed with an elevation of up to 100 mm. This distance from the zero mark will contribute to the preservation of heat in the steam room. In the washroom, the opposite is done: below zero. This rule is important to observe so that water does not flow into the next rooms.

For a clean floor in the steam room is best to use larch. The wear resistance and hardness of such wood species is comparable to oak, but due to the high price, not everyone will be able to purchase larch. Alternatively, grooved fir, birch, pine, and alder boards can be used.
Note! The elements that will be below the level of the finished floor are recommended to be made of pine.
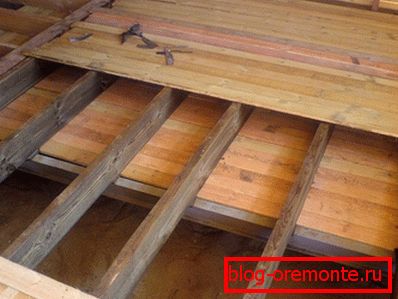
Before laying the boards should be well dried. Otherwise, the raw material may be deformed. Moreover, it can provoke the appearance of gaps between the boards, as well as the tearing of screws. If the board thickness is up to 25 mm, then there is less risk of deformation. In order to prevent even the slightest probability of deformation of the floor, several lags are additionally established. Ideally, use a board with a thickness of 36 mm and a width of 120 mm.
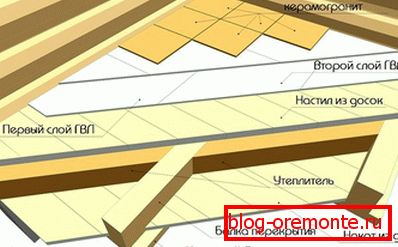
Before laying the boards, it is necessary to carry out work on insulation and waterproofing. You can buy basalt wool for floor insulation, and for waterproofing you can use a special windproof waterproofing membrane, for example, Tyvek Housewrap. This film is characterized by one-way bandwidth. Due to this, from the inside, the accumulated moisture will freely go out from under the insulation. Outside the film and will not pass moisture at all.
All additional wooden structures have the following dimensions.
- Lining bars - 70? 100? 2960 mm.
- Cranial bars 40? 40 mm.
- Lags 50? 180? 2460 mm.
- Unedged board for subfloor 25 × 150 mm.
Composition and design features of the floor
Lining bars will be necessary for the construction of sufficient elevation. They will simplify the process of installing the lag and leveling them horizontally. Moreover, their use will make the structure stronger, and they will take on part of the load.

The procedure for laying the floor is as follows:
- On the strip foundation fit the extreme slip bars. In this case, the foundation should be covered with roofing material in two layers. The central part of the timber rests on two support posts, and the two extreme ends on the opposite walls of the foundation.
- On top of these bars will be lags. They must be cut along the entire length with a slope of 20 mm to the center. For the installation of a subfloor, skull bars are nailed from below.
- After the subfloor, a waterproofing layer is laid with the issue on walls up to 25 cm.
- Next, the floor is insulated with basalt wool, and on top of it is a vapor barrier and a moisture barrier.
- At the very end it remains to establish a finishing floor.
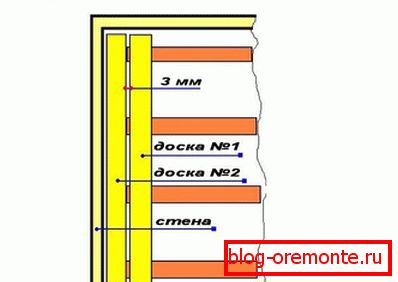
There should be a gap of up to 30 mm between the inner bottom of the vapor barrier and the finished floor. This is necessary to create ventilation. The presence of ventilation will completely eliminate rotting and corrosion, and the floor itself will be dry.
Note! When laying the racks and the log there should be a gap of up to 1 cm between the wall of the steam room. After a while, the log house will settle, and this distance will eliminate the negative impact on the floor structure.
Fastening methods of structural elements

The quality of the work done directly will depend on the correctness of the attachment of each element. Therefore, it is important to know which fasteners are used for installing the floor in the steam room and how to use them correctly. We discuss possible attachment methods:
- To fasten the backboard to the foundation, an anchor of O12 mm and a length of 140 mm is used. When drilling an anchor hole, it is important to prevent cracking of the foundation. There are two methods of fastening. In the first case, the anchor bolt support washer is sunk in the timber. In the other, the anchor will have a length reduced exactly to the height of the milled hole. On one timber will need four anchor bolts.
- Using a galvanized area of 60? 60 mm, the support beam is connected to the support column. This requires screws 5? 50 mm. On each side there is one corner.
- To fix the logs with support bars, corners and screws are also used. Available jumpers between the lags are attached with metal lag-holders.
- The cranial bar can be fixed with self-tapping screws or galvanized nails. Filigree precision is not necessary here, since the cranial bars only serve as a holder of the subfloor.
- As for laying the finished floor (tongue-and-groove board), the fastening is carried out in two ways: into a spike or into a groove at an angle of 45 °. Each screw head must be flush flush with the board. So, they will not interfere with the further installation of boards. If you decide to mount in the spike, then the first board rotates to the wall with a groove, and if into the groove, then, on the contrary, with a spike to the wall. The screw should be twisted carefully so that the board does not crack. To prevent this, you can drill a hole in the board before twisting. If the diameter of the screw is 4 mm, then the hole should be 4.5 mm.
- For mounting vapor barrier and waterproofing used construction stapler and staples. The fastening step is 15 cm. The film is docked overlapped to 30 cm.
Manufacturing of pillars

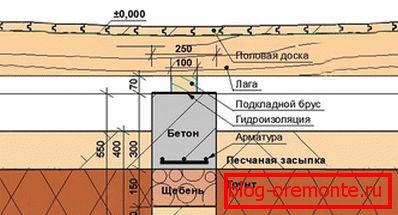
Under the weight of people visiting the steam room lags can sag, especially the center lag. To prevent this, it is enough to make a pair of supports measuring 25 × 25 cm. These pillars can be made of brick, wood or concrete. We consider the most reliable option of concrete:
- To begin with, the marking is carried out, where the supporting pillars will be located.
- Then the hole is pulled out up to 40 cm deep. Formwork can be made of edged boards.
- The bottom of the pit is covered with sand and poured over with water, and then rammed. A layer of compacted sand can be 10 cm.
- Next will be a layer of rubble at 15 cm, which is also compacted. The result is a 25 cm thick pillow.
- The inner part of the formwork is recommended to overlay with roofing felt. Also fit fitting with a cross section of 10 mm. The bars can be tied with wire. The distance between the formwork and the reinforcement should be 50 mm. The same should be the distance to the base.
- Next is the concreting.
- Each poured concrete layer of 50 mm must be tamped.
- It is recommended to level the surface on the formwork with an even bar.
- When the concrete is dry, you can begin to install the floor.
This work is preparatory.
The process of arranging the floor in the steam room
Each wooden element before installation should be treated several times with an antiseptic. The upper part of the strip foundation and the surface of the supporting pillars are treated with liquid tar and covered with roofing material in two layers. The process of assembling the floors in the steam room consists of several stages:
- Installation of bed racks.
- Mounting lag.
- Laying subfloor.
- Thermal insulation.
- Laying the finished floor.
Consider each of these stages separately.

Installation of underlay boards
- Each timber is marked and holes for anchors are drilled. The fastener will be on top of the bars. A timber located along the walls will be secured with four anchors. The central bar fastens corners on each side. Do not forget to leave a small gap near the wall to 1 cm.
- To achieve a good horizontal level. To bring the perfect horizon, in the right places enclose the bars or pieces of roofing material. In other places, you may need to trim a bar.
- Further, as a template, marks are made through the holes in the timber, where holes will be drilled in concrete under the anchor. This also applies to the central beam. The corners are attached and the drilling points are marked.
- Before inserting the anchor bolts, you need to center each hole. To do this, use a metal rod. Also check the horizontal bar.
- Now they can be fixed with anchors. Installation of underlay boards is completed.
Mounting lag
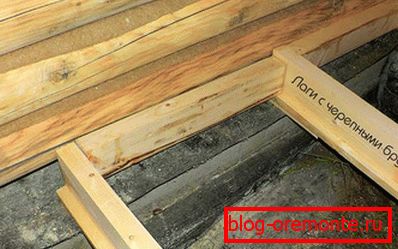
Given that the floor will have a slight bias in one direction, logs are cut from the two sides of the steam room along the central axis. Therefore, a vertical line is drawn from the middle of the lag and a length of 2 cm is measured. The resulting mark is connected in the upper corner of the lag. According to the received line, the lag must be cut off. For this process, you can use a circular saw, a plane or other appropriate tool.
Note! After making a cut on one lag, use it as a template for the rest. The bias on each lag will be the same.
- Next, you need to fasten the cranial bars with screws. This should be done so that in the end they do not interfere with the measurement of the horizontal level.
- On the slats, the markings are indented 5 cm from the walls. This size is maintained further from each element.
- Now extreme lags are laid on the slats. The level is checked.
- To the underlay of their bars must be securely fastened with corners.
- Internal lags are similarly set by level, fixed with angles and screws.
- Using lag segments, jumpers are made between the installed lags. Fastening is done by the Lagholder.
Laying the sub floor
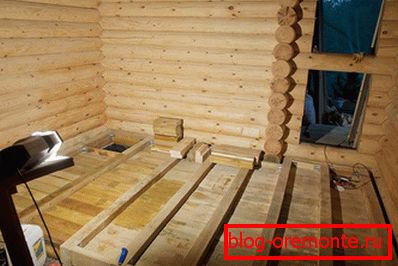
For the sub floor will suit any boards. Over them the heat-insulating layer will keep within.
Note! Used boards must be antiseptic and bark-free.
The thickness of the boards can be up to 2.5 cm. This will not complicate the laying of basalt mats. This work does not require special care and accuracy. The main thing is to ensure that there are no large gaps between the laid boards.
Thermal insulation
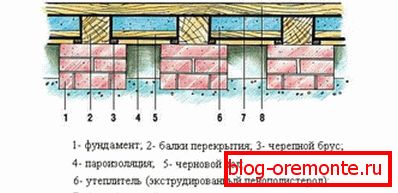
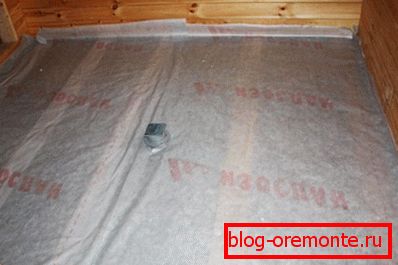
First of all, a waterproofing membrane is laid out with the release on the walls up to 3 cm. A film is attached to the side walls of the entire perimeter with a stapler. If the width of the film is not enough, then put the film with an overlap of 30 cm. The joint of the film is glued with tape.

The membrane should not have gaps. The next layer will be laying of basalt mats or mineral wool. She should lay all the gaps so that there are no gaps between the lags and the mats themselves. Any irregularities on the mat reduce the effectiveness of insulation, so the work should be done carefully.
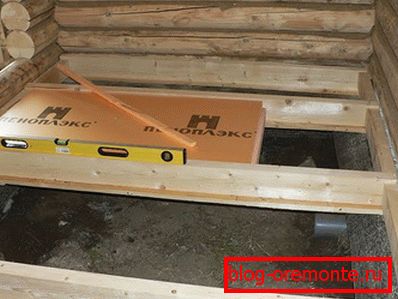
At the very end, the last layer of the film spreads, which will serve as vapor barrier and waterproofing.
Finishing floor
- To begin with, the rake is mounted 2 cm along the short wall. This bar will be the supporting base for the end of the floorboard.
- When laying the first board, make sure that a distance of 2 cm from the wall is preserved.
- Twist the screws into the board so that the caps are recessed.
- When the first board is laid, continue the installation of the subsequent ones.
- To each board well sat in its place, with the end can be tapped with a hammer. To do this, you need to use a stand block to avoid damaging the tongue / groove.
- The best option is to tighten the screw at an angle of 45 °. This will help prevent the board from cracking.
- When the turn of the last board came, you may need to cut it along. At the same time, do not forget to keep a gap of 2 cm. In order to fit the last board well into the spike / groove, you can use wedges, driving them between the wall and the board.
- This is the technology used for flooring. Upon completion of the work, the floor must be processed to put it into operation.
The right tool
To perform all the above work, you will need to assemble and prepare such a construction tool:
- Electric drill.
- Screwdriver.
- Plane.
- Circular manual.
- Hacksaw for wood.
- Hammer.
- Mallet.
- Rasp.
- Stameska.
- Stapler and staples.
- Square.
- Ruler.
- Roulette.
- Level.
- Drills for wood and concrete.
- Fasteners.
Useful tips and tricks
In the process of making the floor in the steam room, consider the fact that water can accumulate in this room. Therefore, the entire floor plane should have a certain inclination in one direction. As a result, there must be a distance of up to 15 cm between the sub floor and the bedding. This will create underfloor ventilation, as a result, dampness and mold will not form here. And the most important requirement is that all wooden elements are well dried.

So, we reviewed the detailed instructions on how to make a wooden floor in the steam room from scratch. If there are any ambiguities, then you can ask questions to experts who will provide enough detailed information.