Cracked screed what to do
The screed is considered the best, and in some cases - the only option for leveling the floor before finishing. But very often, with the wrong approach, the floor screed can crack and cause expensive laminate or other coating to become unusable.
How to repair the screed, why the screed cracked, what to do to prevent it? All these questions will be answered in the article.
Causes of deformation of the screed
 Failure to observe the proportions when mixing the mixture is the most commonplace cause, and it usually concerns the finished dry mixture. First of all, it is acquired by those who for the first time decided to engage in such work. The manufacturer in the manufacture of the mixture lays a certain number of additives that, when dissolved in water, should be evenly distributed in the solution (see packaging).
Extra liquid in the mixture should not be, since its excess affects the final strength of the material. But the liquid solution is easier to apply to the surface, and here it is tempting to slightly increase the amount of water.
Note! A person who first encounters work with specialized material must strictly observe the proportions declared by the manufacturer. Manual mixing of mixes is also not recommended, for this purpose construction mixers or drills with nozzles are mandatory.
Lack of expansion joint

Any building element undergoes mechanical stress from adjacent structures. Strains in the screed can occur due to the shrinkage process, unevenly passing due to the difference in thickness of the filled layer.
A vivid example is the interroom connections (doorways). If you carry out the filling of the screed with one layer in all the rooms, then due to the smallest linear size, this area will dry faster and may crack.
It is better to pour the mixture separately in each room, and in the doorways to separate the joints with seams. Also before pouring, a cutting tape is laid along the perimeter of the entire premises. It will create a compensation gap between the screed and the wall, which will not allow it to crack when it dries.
Note! It is necessary to comply with the layer thickness parameters declared by the manufacturer. As a rule, when pouring a smaller layer than stated on the package, it will eventually crack under load. And if you exceed the permissible parameters, the screed cracks during drying due to the release of excess moisture from the solution.
Non-adherence to drying recommendations

All specialized materials gain final strength when creating certain conditions, and maintaining the necessary time. In some cases, the cause of cracking is the desire of the owner to quickly commission the room. Some install heat guns or open windows, thinking that the draft will harden faster in the draft.
Note! If you summarize all possible problems, you can single out one way out of the situation - you must carefully read the manufacturer's recommendations before working with specialized mixtures.
Having considered the problems that lead to the deformation of the coating, you, of course, will not allow misses in the work, which can lead to such problems. But, for example, you settled in a secondary housing and, of course, decided to make repairs in their own way. The first thing you remove the old coating, and notice that cracked screed. There are two ways out.
- Completely dismantle the old coating and pour the self-leveling floor again.
- Try to eliminate the defects without resorting to drastic measures.
Recommendations before repairing cracks

If the screed has cracked, then before starting resuscitation work, it is necessary to carry out some procedures to simplify your task.
- First, determine the cause of their appearance, the structure of the base, the presence or absence of expansion joints, and, if possible, determine how the floor was filled.
- If the cracks on the surface were formed in the form of individual segments, the repair is carried out with two-component resins, using the "force circuit" technology.
- When cracking due to the lack of an expansion joint, do not rush to seal it. Initially, it is necessary to make this seam, and only after that to carry out work to seal the crack.
- If the formation of cracks is caused by the absence of a compensation seam near the columns in the room or along the walls, then first such joints should also be made, and only after repairing the cracks.
Note! Causes of cracks in the screed must be identified and eliminated before the start of repair work. If this is not done, then after a while they will reappear not only at the repair location, but also in other places.
Before starting repair work, it is necessary to determine the degree of damage and mark the areas that need to be repaired.
If it is easy to find the visible cracks, then you will have to inspect the entire surface to identify hidden voids. To determine the internal damage, you need to tap the entire floor surface with a wooden mallet.
If the sound when tapping is ringing, it will indicate the presence of internal voids. Problem areas are encircled with chalk, and after the work is completed, the total area requiring repair is calculated.
Note! If the damaged area is more than 30% of the total coverage, then it is better to dismantle the old tie and fill the new coating.
Repair small cracks

- Small cracks sawn grinder to a depth of 20 mm.
- Be sure to remove all trash using a household vacuum cleaner.
- After the cracks are sealed repair mixture.
Note! Before repairing small cracks, it is better to check them for the possibility of deformation. Stick on a strip of crack paper, and leave for about a month. If during this time it does not break, then the crack does not widen, and the repair will be local in nature. Otherwise, a more thorough approach to the problem will be required.
Repair large cracks in the screed
Cracks - the most severe case of damage to the screed, because its repair "is" an emergency character. If run, it will increase, and subsequently its repair will be impossible.
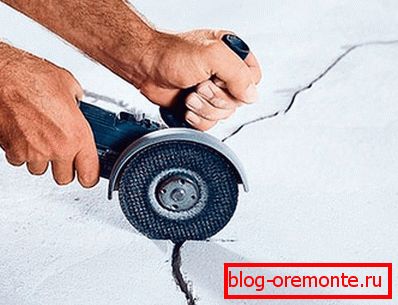
- First you need a grinder with a diamond disc to widen the crack. The edges should be smooth and strong, so you need to remove all falling off pieces and completely remove dust from the crack.
- Across the length of the crack, several perpendicular grooves are cut through, 15–20 mm in depth, and up to 200 mm wide.
- Then the repair site is carefully primed, preferably a composition with a quartz sand filler.
- Then the crack is filled to half with a solution and iron brackets are inserted into the sawn grooves. After setting the mixture, the crack is filled to the brim. The surface is leveled and polished after complete solidification.
Removing the causes of cracks and directly repairing them is a laborious and costly business. Therefore, when working strictly follow all the technology works, only a strict adherence to the rules will give a positive result, and you later do not have to repair the coating again.
Video
This video shows how to repair a cracked screed: