Concrete floor on the ground itself
In residential one-story houses, concrete floors are often made on the ground with their own hands, which saves money and makes the construction as simple as possible. Such floors are also made on the first floors of houses with several floors. To create a concrete floor on the ground is usually used substances such as clay - as a pillow, and cement with concrete and sand - to create a concrete mix.
Flooded on the ground, the most popular. This is due to the fact that it is quite simple and inexpensive to buy concrete or mix it up, and besides, the filled floor - if you adhere to the correct ratio of concrete components during casting - will be fairly durable and last for a dozen years. To create a floor you don’t need to be a specialist - it’s enough to get some basic but important skills that will help you to do everything correctly.
Conditions for flooring

Some requirements are made to the ground itself, by examining which one can understand whether the foundation is suitable for pouring a concrete floor or not. So, it is necessary that the ground was absolutely dry, and the level of groundwater lying under the future floor was at a depth of not less than 4 m. In addition, the ground should not “float” - that is, it will be foolish to pour concrete on a large layer of sand. .
It is most advisable to pour concrete over the ground in the basement or on the floor, located at the level of the basement (the so-called basement room). It makes no sense to make such a floor in a house that will not be inhabited, and therefore will not be heated in winter - in the winter months the ground will surely freeze, the load on the foundation will increase, which can lead to deformation of the flooded structure.
The whole front of the floor filling work should begin after the walls and roof have been erected. Thanks to this, it will be possible to do all the work as best as possible. The whole fill can be divided into several stages:
- Mark the level of the future sex.
- Soil tamping with its pre-clearance.
- The device pillows made of gravel, sand or rubble.
- Laying of the heat-insulating and waterproofing layers.
- Reinforcement (if necessary, if a large load is applied to the floor).
- Installation of beacons для заливки.
- Pouring concrete mix and its alignment of the beacons.
Consider all the stages in order and in more detail.
Floor marking
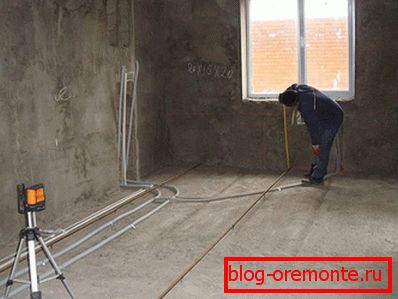
First you need to map the floor level, the so-called 0.000 mark (this is how this level is marked on the building design plans). As a rule, the bottom of the doorway should be flush with the zero mark. After that, the resulting label is affixed around the perimeter of the room using a laser or water level. This is the line that turns out, and it will be "zero."
A little more about markup. The construction level should not be used to apply the line of the floor, as this tool may have a downed water level, as a result the line will not close at the end. Even if the tool is working and accurate, it alone will not give the opportunity to create a perfectly accurate floor level. But the water level, or what is better - the laser - can perfectly cope with its task. To do this, on each wall it is necessary to mark 2 points near the corner at the level of zero. The resulting marks are connected with a paint cord, the ends of which need to be stretched along the marks with effort, and the middle to stretch. The remaining strip of lime on the wall and show the required level.
Note! To work with the hose water level and the paint cord, popularly known as "beating" or "chopping thread", you need 2 people, because there alone can not cope.
Ground leveling
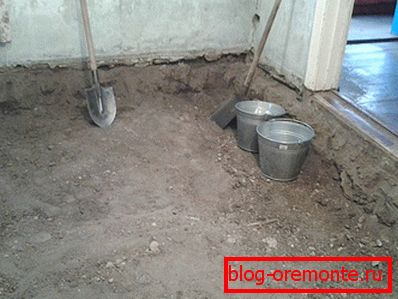
When the floor level is indicated, it is possible to level the soil on it, cutting off the excess. At the very beginning, you need to remove all construction debris - trimming boards, nails, stones, and so on. Then you can begin to cut the soil layer. The total thickness of the floor together with the bedding can reach 35 cm, therefore, at this distance the ground should be removed completely. The resulting space of the base must be compacted using a construction vibrator or a manual tamper made of a heavy piece of timber with a height of one meter with a strong board nailed down below, which will serve as an analogue of the “paw” of an industrial tool for vibrating the ground.
Note! When tamping soil density will increase, so the floor, subsequently, will not crack due to subsidence of the soil. It is necessary to tamp down until the foot marks on the soil cease to remain in it.
Sometimes it may happen that the level of dense soil will be located below 35 cm, and on weak soil, for example, black soil, you cannot fill in concrete. Then you need to remove a little more layer until the desired soil, for example, clay. After that, sand is poured to a mark of 35 cm below the zero level and compacted by tamping.
To increase the waterproofing of the concrete floor over the ground, you need to create a layer of clay, and on top - a pillow of sand. Before sand is laid, the clay needs to be wetted, so it can be more resistant to groundwater.
Note! Before choosing the thickness of the future “cake”, it is necessary to take into account how many layers there will be and what thickness, and then summarize the data obtained.
Gravel, rubble and sand
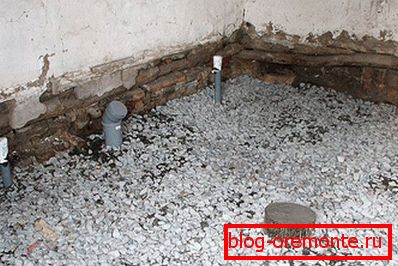
When the clay and sand are laid and tamped in layers, you can cover the gravel with a layer thickness of about 5 cm, it should also be poured with water and rammed. To make it easier to determine the thickness of the layer, over the entire area of the backfill, you can drive a few pegs at the same level, the top of which will help you navigate with how much more gravel to fill. After the fraction is laid, the pegs should be pulled out.
A layer of sand pours on the gravel again, about 10 cm. It is also rammed and poured with water. Sand with impurities will be suitable for this purpose. On top is laid crushed stone of an average size of the fraction (about 40 mm). It is very important in this case that the base on which the various layers will be laid is strictly level tested. Laying one or another layer, it also needs to be checked so that its thickness is the same everywhere.
Floor waterproofing and thermal insulation
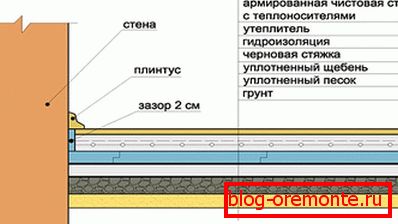
The waterproofing layer is made of polyethylene. A film having a thickness of 200 Mkn and a special waterproofing membrane will do. Such coverage should be over the entire area of the future floor, and the edges of the film or membrane should slightly go to the walls at least 3 cm above the level of the filled floor. To prevent the edges of the film from falling into the concrete, they can be glued to the wall with adhesive tape. Several rolls of film need to be laid overlapped with a seam of 15 cm and also glued together with tape.
In the role of thermal insulation, building materials such as expanded clay, polystyrene foam, stone slabs of basalt, mineral wool, polystyrene foam plates, in particular, extruded, are suitable. To this list, you can add perlite, special moisture-proof plywood of great thickness, materials from balsa wood and isolon in rolls. They are stacked on top of the waterproofing layer.
Reinforcing mesh to the floor
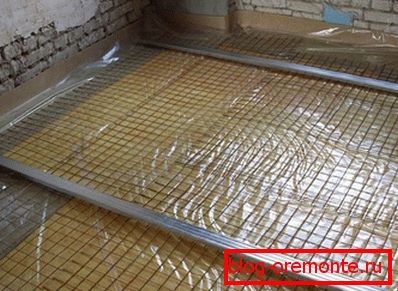
Reinforcement of the floor is performed using the frame, which is created from reinforcement, interconnected by a binding wire. You can also use a finished mesh with rods of sufficient thickness - at least 6 mm in diameter. It is necessary to enclose stones with a thickness of about 3 cm under the grid so that it does not lie on the ground - then the concrete will be not only above the reinforcement, but also under it, which will make the whole structure more durable.
Installation of beacons
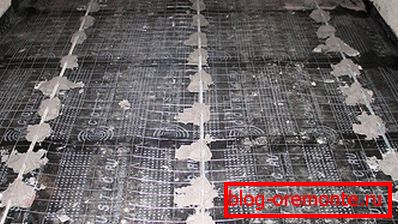
In order to make it easier to pour concrete, and the finished floor turned out to be even, use lighthouses. For this purpose, lighthouses are installed along the room every 2 m. Square metal-roll, flat bars, corner, laid up edge, forming a triangle, or special lighthouses for concrete, will be suitable as guides. Installed on the level of the lighthouses must be fixed with cement mortar or concrete.
In some cases it may be necessary to install the formwork. So, it may be necessary when there is a depression in the room that does not need to be poured (for example, a basement, a niche for a heating boiler, or something else). The formwork is also mounted if, for certain reasons, the floor is concreted before the walls are built. Formwork and lighthouses, which serve as guides, must be treated with an oily substance, so that later you can remove them without damaging the concrete. The depth of the lighthouses must be such that the concrete thickness for the floor is at least 7 cm.
Concreting the floor and leveling concrete
It is necessary to fill the floor with concrete at one time, with a large floor area - for 2 times. If you make the number of visits large, you will not get a solid and strong floor - later in the joints it may begin to crack. You can mix the concrete yourself, or you can order it at one of the factories in your area. If you order ready-made concrete, there is a risk that it will not have the necessary proportions, and therefore - strength. In addition, not everyone has the opportunity to conveniently approach the mixer to the house. It is better to knead the concrete yourself, there is nothing complicated about it.
For the floor will need a concrete composition in the ratio of cement / sand / gravel as 1: 2: 4 or 1: 3: 5. The proportion depends on what kind of load will be applied to the floor afterwards and whether it will be permanent or temporary. A ratio of 1: 2: 4 will give the floor greater strength, since less sand and rubble is spent on the same amount of cement.

For the kneading, you will need a concrete mixer, several metal buckets and a barrel with water, from which it is convenient to draw water, or a nearby water supply system with a hose and tap. First of all, you need to pour water, then part of the rubble of the middle fraction. The next cement is filled up, then you need to wait until it is stirred. Then you can fill the sand and the remaining rubble. If you follow this sequence, you do not have to unstick cement from the walls of the concrete mixer, and the whole mass will be perfectly mixed.
Note! If there is no concrete mixer, you can rent it in specialized stores or rent it from neighbors or friends. If there is no such possibility, you can use any convenient container for kneading - a metal trough, an old bath, you can knead the concrete even on concrete or earth, lay out polyethylene there so that the concrete components do not mix with the soil.
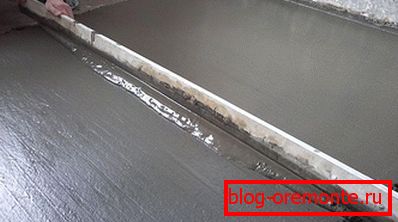
The finished concrete is poured into the formwork or between the lighthouses, while leaving a small hill over the entire area of the pouring. Poured concrete must be thoroughly vibrated with a construction vibrator, or at least rammed with a shovel. After that, using the 2.5 m rule or another flat batten, the concrete is stretched, moving the tool to the right and left, gradually moving it towards itself. Behind the rule there should be an even layer of concrete, from which no crushed stone sticks, and on top of the screed there should be a so-called "concrete milk" - water released during the work with the rule.
The finished floor should be smooth, without cracks, grooves. After two days, you can pull out the beacons and remove the formwork. In the case of lighthouses, you will need a mallet - a hammer with a wooden handle and a rubber head. With its help, guides are extracted, on which it is necessary to knock gently with a hammer, so that adhering concrete is separated from the beacons. The voids left by the lighthouses are filled with concrete and leveled.
Within a week or two, the concrete is poured over with water (of course, when it hardens, so as not to damage its upper layer). If necessary, in the summer, so as not to overheat, and in the winter, so as not to peremerz, the floor is covered with plastic wrap. For complete hardening of concrete, you must wait a period of about a month, but you can walk on it in a couple of days. The finished floor can be brought to a state of perfect evenness, the bay self-leveling mixture, which takes 3 days to set. Then you can lay the flooring - ceramic tile, linoleum, laminate or something else.
The finished design will not only have high strength, but also allow you to keep warm (if warmed) and protect the house from moisture. In order to fill the floor, you will not have to spend a lot of money - you can do all the work yourself, most importantly, buy the necessary building materials and follow the above tips.
Note! Concrete floor can be painted. The modern market offers a large selection of paints.
Video
In this video you can see how you can make a concrete floor on the ground: