Adjustable flooring on the logs
Developers do not always do their job with high quality, and sometimes after entering a new apartment, many have to level the floors in order to properly cover the floor. Banal filling the floor with a liquid solution, of course, will solve your problem, but what if you need to build additional communications? The solution to this problem will be adjustable flooring on the logs. It’s easy to do it yourself, but after reading this article, you will know all the subtleties of the work.
What is good such floors

Recently, they are gaining increasing popularity, since they have many positive qualities:
- Low weight This allows their structures to be used in any premises with the lowest bearing capacity.
- Once you install the adjustable floor, you can lay any floor.
- Thanks to their device, it is possible to level any unevenness of the room, while all work is carried out quickly and without excess dirt.
- Given the design, when installing such floors, you can place additional communications under them.
A little about the device adjustable floor

In fact, the whole installation process is divided into two stages:
- Installation of adjustable lag. This includes area measurement, material selection and installation in accordance with the required standards.
- Foundation flooring. It is, however difficult to understand, the final stage where the surface is prepared for laying the floor covering.
Note! If we talk about the functionality of such floors, they work on the principle of regulating the lag, fixed to special mechanisms, which allows to achieve a high flatness of the floor.
Isn't it easier to buy a finished structure?
Of course, it is more expedient to purchase ready-made logs with already built-in mechanisms and install them. But in this case you will have to use the services of masters in measurement and installation, and once you decide to do everything yourself, then the option to purchase the finished structure is removed to the background.
Installation methods for adjustable floors

Specialists use two options for installing adjustable floors:
- heels,
- at the corners.
In fact, both options are not too different in the method of installation and have both positive and negative sides.
Before you make an adjustable floor in your apartment, carefully consider both options.
Stiletto floors

A little about the design features.
For the device of such a floor with their own hands use the bars (50? 50). Adjustment mechanism: M6 stud, anchor, two nuts and washers. A hole is drilled in the place of the intended fastening, a pin is fastened to it on the basis of the anchor and a nut is screwed on.
In the bar also drilled a hole equal to the diameter of the stud, and, accordingly, the bar is put on it.
Note! The nut with the washer should be at the bottom of the bar, this will be a kind of adjustment mechanism.
In theory, everything looks simple. Now let's take it all in order.
- First you need to completely empty the room and take out all the garbage. Lay the bars of the required length on the floor at a distance of 25-30 cm from each other and 5 cm from the walls. In principle, this arrangement will be enough for the final design to have the necessary rigidity.
- Then you need to drill holes in the bars. Attachment points should be approximately 50 cm apart. The diameter of the hole make a little larger than the mounting stud.
- Now you need to drill holes in the floor. For maximum accuracy, it is better to do it directly through the bar. Or do it another way, put a bar, draw it along the contour and, turning it carefully on its side, mark the drilling points so that they coincide as much as possible with the bar.
- After you have drilled all the holes, hammer in the anchor and insert the studs, tighten the nuts with approximately the same distance. We put the nuts on the washers, then insert the logs and tighten the control nuts by hand.
Note! So that the fastening nut, which is located on top of the bar, does not interfere with the laying of the floor covering, you need to make a counter set under it, drowning it in wood. To do this, you need a large drill bit.
Adjustable gender

For this, it is better to use a laser level, of course, the usual one is also suitable, but for greater accuracy the first option is more profitable. The main task is to maximize the top plane of all lag.
For accuracy, perform the following instructions correctly.
- Set the level and determine the height of the future floor.
- Loosen the lower nuts of the first timber from the wall to the set level, and fasten the upper ones as tightly as possible.
- Then do the same manipulations with all the bars until you get the correct position of the lag.
- Align the logs, trim the excess height of the studs grinder.
After assembling the frame, you can begin to install communications or laying insulation (if it is provided by the design).
Note! Крепление анкера является одним из наиболее важных моментов в работе. Это обусловлено тем, что при сверлении бетонных полов вы можете попасть в полую часть, и он попросту не будет держаться. В таком случае вам придётся по-новому разметить брус и основание для сверления новых отверстий.
Lag on the corners
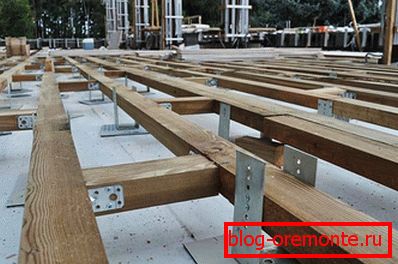
This option is not too different from the method of fastening studs. Only in this case the corner serves as a regulating element, and the logs are respectively attached to them. This method is acceptable for floors that do not have a rigid foundation, and there is simply no possibility to fix the anchor.
Algorithm of installation of an adjustable floor on the corners:
- Determine the level of the future sex.
- We spread the bars on the floor, but only with a distance of 30 cm from each other, and mark their location.
- In the line of laying the timber, metal corners are screwed with a fastening step of 50 cm, the size of the angle is selected depending on the height of the floor.
- To give the structure maximum rigidity on the reverse side of the lag along the entire length attach additional corners.
Note! It is better that the area was lower than the level of coverage. In this case, when installing the timber you will not have to saw off the excess part.
Here is the basic principle of assembling an adjustable floor, then, at your discretion, the base of the floor is laid, which can be bakelised plywood or chipboard.
Master note

In general, the whole process of assembling adjustable floors is quite simple, but experts advise you to adhere to the following rules so that later you will not have problems with operation.
Tip # 1
It is no secret to anyone that dampness is the enemy of any tree, and therefore, as you will mainly use wooden blocks, it is better to take care of ventilation so that the tree does not become damp. Leave one centimeter of clearance from the edge of the flooring, such natural ventilation will prevent the formation of dampness.
Council number 2
Do not save on the material, use only high-quality wood for the log.
Tip number 3
Approach the process of performing work as responsibly as possible, check the accuracy of the set level to get a flat surface.
There are cases when the adjustable floor can not be mounted indoors:
- In apartments with low ceilings.
- In rooms with high humidity levels.
- And also in those rooms where the level of the base of the floor is at a minimum height with doorways.
In other cases, such floors can be mounted and if you do everything correctly, the construction will serve you for a long time. In particular, manufacturers of such floors declare a 50-year term of their service.
Video
The video shows the lag adjustment with the help of improvised racks: