Slate fence - the most economical option
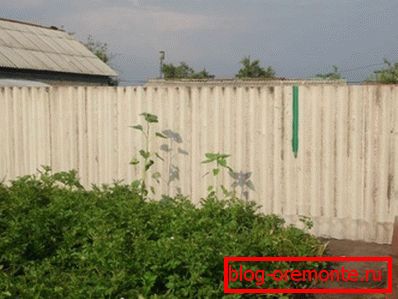
Photo of the wave slate fence at the dacha
Having a summer cottage, or a private house, you need to fence it somehow. The reasons, of course, may be different, but, nevertheless, a fence is needed. Today we want to offer you to build a slate fence with your own hands. Believe me, there is practically nothing complicated here, but there is a lot of benefit from such a fence.
The main advantage of such a fence is his low cost. The material that you need is in all hardware stores, and it is not so expensive. Buy everything we need under the power of any ordinary summer resident. Let's get down to installing such a fence.
Where it is advisable to install such a fence
Slate itself is not a very durable material, its direct purpose is the installation on the roof device. But its asbestos-cement composition, from which it is made, makes it practically durable.
Taking into account these characteristics, it can be concluded that it is advisable to install slate fences:
- In places that do not require protection from unauthorized entry.
- Temporary fencing of something - the site, the site.
- Use for fencing pet enclosures.
- Secure land between neighbors.
As you can see, due to the fact that this material is not very durable, capital fencing of slate should not be done.
Preparations for the installation of fencing
Starting any important matter, in our case it is the installation of the cheapest fence, we always need clear instructions for action. It is what determines where to start and in what sequence.

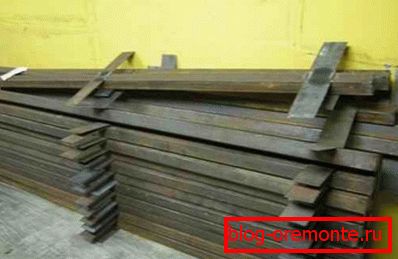
Photo fencing from flat slate sheets
We begin, of course, with the preparation of materials for our temporary, and maybe permanent collection. Here is the necessary material that we need to build a fence:
- Directly slate itself, you can use the wave, and you can use flat. There is no particular difference, the strength of these two types is almost the same. Only flat is a little easier to attach to the frame, unlike slate with waves.
- Steel pipe with a diameter of up to one hundred millimeters. The larger diameter should not be used, the smaller one is possible. Racks will be made of the pipe, so consider the fact that the smaller the stand will be, the less durable the construction itself can be. Accordingly, the price of a larger diameter pipe will be higher.
- Wooden beam, the size of one hundred to fifty millimeters. Slate sheets will be attached to this bar.
- Corner metal, size 85? 50 millimeters, will serve as a frame for fastening a wooden beam.
- Fasteners - here are studs with a diameter of 10-12 m, it is better to use screws for metal tiles, they have a wide cap with a hex head over a wrench.
- Cement, sand, crushed stone - for the preparation of concrete solution and installation of columns.
Theoretically, this is all the necessary material, in the presence of which you can safely begin to install a flat slate fence with your own hands.
Install the columns
Well, let's start, build our fencing, we hope that you already know exactly the dimensions of your design and first of all you need to install corner posts. Thus, determine the perimeter and then install all the other elements from them.

Installation options fence racks
- For a start, of course, we dig holes for the posts. The depth of the pit must be at least two spade bayonets. After you can immediately prepare the concrete, to fill the first columns.
- Next, you need a pipe that will act as columns, cut into identical pieces. The length of such pieces depends on the height that you have planned, plus the size that will fall into the pit.
- When at the summer cottage everything is ready for the installation of the fence, we proceed to the installation of the columns: we lower them into the hole and burst with the buta. Immediately try to align it vertically with a building level. After the column has taken the desired position, you can fill the hole with concrete.
- Do this procedure with all four corner support structures. When you finish this process, you need to stretch the thread between the corner posts and prepare holes for the following supports along it.
- According to the same scheme, without removing the thread, install supports between the corners, during the installation process, check the building level of each column, they should all be exactly vertical.
Information! Installing supports, perhaps the most laborious moment in the construction of such a fence. From how exactly the pillars will stand, will hang how the fence from the slate will turn out in the end. After installing all the supports around the perimeter, be sure to check, and may repeatedly, as the supports stand. This is necessary so that the fence does not fall in or out.
I sharpen the corner and the grind
Before you start attaching a metal corner and timber to the supports, the concrete you poured has to be well grasped, usually enough for a week to make the concrete strong. But if you do not have time to wait, then it is advisable to continue working no earlier than in two days.
Ready poles with mounts for wooden beams
Now you need to cut our corner into equal parts. The size of such pieces should be equal to the diameter of the pipe used, or slightly larger. After we drill holes in the pipe for the diameter of your studs. Holes are drilled at the top and bottom of the pipe. Accordingly, in the center of the segment of the corner you also drill such holes.
After the hairpin, you attach a corner to the support, so that you get a shelf in which the beam will fall after. This method of attachment makes slate fences durable and rigid.
Regarding the mounting beam there are two options for installing it:
- When you fix the corner to the support with the pin, the timber is also drilled to the diameter of the pin and immediately the design is pinned. It turns out, the timber will be held directly on the support, the pillar.
- Another option is fixing timber. Fasten the corner with studs and tighten well. After in the shelf corner, which is adjacent to the pole, drill holes. And through these holes attract the timber to the corner.
Both of these methods have the right to life, which of them to use, decide for yourself.
Tip! The method of construction of such a fence is intended for the construction of a fence for long-term use. But if you plan to install a fence made of flat slate with your own hands for a short period of time, and then demolish it, then the design can be simplified. In particular, the supports can not be concreted, and the timber to the posts can be fixed with ordinary knitting wire.
Fasten the sheets and ennoble the design
Well, when the frame is ready, you can start installing sheets of slate to its rightful place. As you remember, we have prepared self-tapping screws for sheeting for fixing sheets.
Using the nozzle under the screw head, a drill or a screwdriver, fasten the sheets to the timber. If you have a flat sheet, then dock the ends, and drill through the sheet through the timber.
If the slate is wave, then we do one or two waves on the lash. If you want to cut the sheet, cut it using a grinder and a disc for concrete. For accuracy of sheet fastening, it is recommended to pull a thread from the first sheet installed to the corner post. This will allow you to control the fence assembly and fasten the sheets smoothly.

Living plantings are a wonderful element of decor.
Now that the entire assembly remains a bit, we need to decide how to decorate the slate fence we built. First of all, our building should be painted, it will protect the sheets from moisture penetration and the occurrence of, above all, fungus on it.
You can also draw beautiful pictures on the surface. This is the case if you have an artistic streak.
Even as an element of decor, you can use ornamental plantings, small Christmas trees, trees. In the warm season, it will be a living decor of your fence. It is possible that your imagination can offer something extraordinary.
In conclusion of this article, we recommend that you watch the video that tells how to process the slate sheet before installing it on the fence. Thereby saving it from damage and prolonging its service life (read also the article “Distance from the fence to the structure: SNiP, standards and practical implementation”).