Slab fence with his own hands
The fence of the slab.
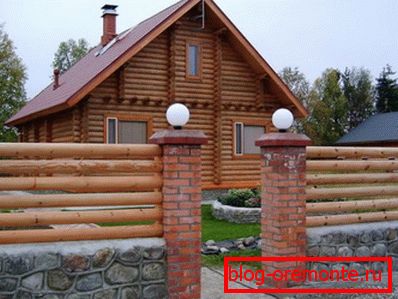
Nowadays, it is still fashionable to have a country house, where you can find solitude in the hot summer months, where you can escape from the noise and polluted air of big cities. And one of the main requirements for a country site is the presence of a reliable fence. If you want to get a green, attractive and strong fence, then you should consider such an option as a slab fence.
To some, such a proposal may seem absurd, because current trends dictate fashion for beautiful and majestic hedges, which are able to emphasize the unique style of a country estate. But despite the fact that the slab is, in fact, waste production, this material has the attractiveness of the tree and from it you can create a very original, and most importantly, reliable fence.
We use the slab for the production of the fence
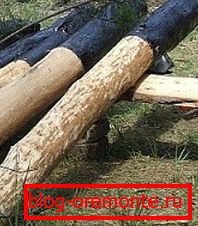
A croaker, like chips and chips, is a waste on any sawmill. Therefore, its main advantage is the price. And in this case, the concept is no longer applicable "cheap", but "for nothing." And if the sawmill does not use this material, it does not mean that it is hopeless.

Slab in bundles.
Perhaps the only drawback of such structures is the need to process every detail of the fence. And then, the flaw is immaterial.
Mounting the fence
The installation manual provides for such work:
- Preparatory stage.
- Slab. At this stage, you need to first prepare the material, so the work should begin with the debarking slab.
Tip! If you want the fence construction from unedged board to be durable, be sure to remove the bark. Otherwise, your hedge will be struck by the bark beetle, which will lead to its rapid destruction.
To remove the bark, use a carpenter's hatchet, a scrape and a flat, sharply sharpened shovel.

Carpentry Scraping - the main tool for removing the bark.
Tip! To facilitate the work, the horizontal handle should be nailed to the end of the spade handle about 150 mm in length.
Removing the bark can be a rather lengthy process, but here one should not hurry; take this stage very seriously.
- The pillars. For such a fence you can use both metal and wooden supports. For these purposes, even pine is suitable as a material.
- As a metal post, a pipe with a diameter of 76 mm and a wall thickness of 3.5 mm will be the best choice. In order to fix the horizontal girders, plates must be welded to such supports. As the runs, you can use the same croaker, which is cut along.
- The best material for wooden supports is larch or oak. The diameter of the barrel should be 200 mm with a support length of 2300 mm (500 mm buried in the ground).
That part of the wooden post, which will be placed in the ground, should be covered with Kuzbass-varnish or hot resin (as in the photo below). Pitch should be in several layers.
Pillars coated with resin.
- Marking territory. This stage is very important because it allows you to determine the amount of material and it is from it depends the strength of the future fence. The smaller the distance between the supports, the, accordingly, the stronger the structure will be.
The standard in this case is considered to be 2-2.5 meters. To save material, some home craftsmen increase the distance between the supports up to 3 meters, which is highly undesirable, since it will significantly affect the strength and durability of your fence.
In this case, one should proceed from the average length of the slats, so rarely is the step between the pillars of such fences more than 2 meters.
- Installing pillars. Such a fence from the boards does not require laying the strip footing, but it is necessary to concrete the poles, since the structure will be quite massive.
- So, by digging dig holes.
Tip! In order to quickly dig holes, use ice screws for the posts. He will do it much faster than the garden auger.
- Place a support in the pit and give it a strictly upright position. To do this, use a level.
- Secure the post securely with wooden struts.
- Fill the pit with concrete.

Concrete pole.
- Do the above steps with all the pillars.
- Fancy installation.
You can mount such a fence in two ways:
- Dies are mounted horizontally. In this case, we do without the use of runs, nailing dies directly to the posts. Naturally, it will be most convenient to mount such a fence on wooden supports.
- Dies are installed vertically. In this case, you can allow gaps or overlap. Buttting is undesirable, since this option does not look very much due to unevenness of the material.
For such a fence is necessary to install the runs, which are stuffed dies.
With the vertical installation of dies, you can make the upper edge of the ends even or figured. For a smooth edge, you should beat a straight line with a cord.

Figured fences from the slab have an excellent appearance.
- Painting the fence of wood. This stage is very important, because if the tree is not processed, then your fence will not be able to boast of particular durability. If you want to preserve the natural color of wood - the material can be treated with special protective compounds that will significantly increase the service life of such a fence.
Paint for fencing can be made by your own hands, which will allow you to save a lot.
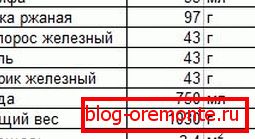
Ingredients "Swedish" paint.
Everything you need can be purchased at any building hypermarket. The exceptions are red iron oxide and vitriol, which are sold on the construction market.
The recipe is extremely simple:
- Dissolve flour in a liter of water and prepare the paste on low heat.
- Without removing the paste from the heat, add salt and iron sulfate. Mix thoroughly until the crystals dissolve.
- Pour the red pepper and mix.
- Add the drying oil and stir until you get a completely homogeneous mass.
- Finished paint should be diluted with 0.5 liters of water in order to achieve a paint thickness.
- Paint is ready. Now you can paint our fence.
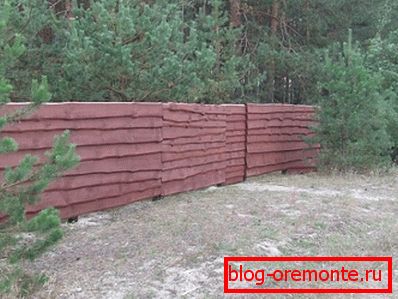
After painting the fence of slabs is as follows.
Some useful tips
- When laying the boards with the Christmas tree, allow an overlap of at least 1.5 - 2 cm. If the boards are well dried, then you can reduce the overlap, but still it is better to be safe. For example, boards with a width of 18–20 cm may shrink by 1.5 cm, so this measure is very justified.
- The optimal width of the boards for such a fence - 20-25 cm. Smaller ones will look too thick, besides, it will be uneconomical. If you take large - 30-50 cm, then such a fence will not look very attractive. Such boards can also crack in the middle.
- Making paint, you can replace drying oil with sunflower oil.
- A great way to transform such a fence is to install a small decorative gable roof above it.
- Despite the fact that this fencing looks very massive, the depth of the pits under the columns of 50 cm is enough to ensure the reliability and stability of the structure. However, if you wish, you can play it safe and dig in 70 cm supports. In this case, no hurricanes will be terrible for your fence.
Conclusion
As you can see, despite the fact that many belong to the croaker are skeptical and do not consider it as a valuable material for fencing, however, it is possible to create a durable, beautiful and inexpensive fence from it. Such a fence is a great option for a wooden country house.
Despite its simplicity and a certain “nationality”, such fences sometimes protect elite cottages, so if you know how to hold simple tools in your hands, then feel free to get to work. Watch the video in this article to get more information about the construction of such fences.