Metal wickets: elegance in simplicity
Beauty for many years
Metal gate, as well as the gate, are a necessary part of any fence. Moreover, to build the rest of the fence can be from another material. And the addition of forging elements will make the gate more attractive, while not violating the external aesthetic appearance.
They are intended for passage or passage beyond the perimeter of the enclosed area. In this article we will describe how they are built.
Preparation for work
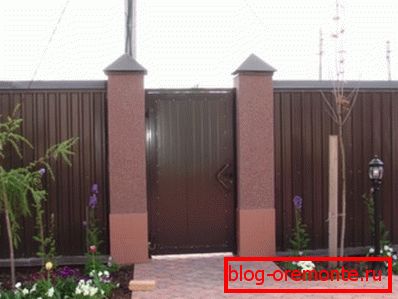
Before you start making, you need to decide which gate you want to put on your site. Beautiful metal gates are obtained with forging elements. It is better to order them in the company that is engaged in such works, giving the dimensions of the future design and determining the choice of the proposed sketches - make an order. Samples of metal gates and gates with forging elements can be viewed on the photo:
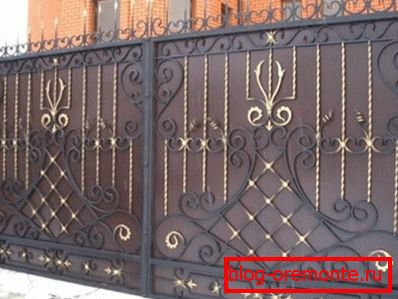
Majestic and rugged construction
If you want a gate from a metal profile or a profile pipe, you can do it yourself. Instructions or step-by-step actions of the whole process are given below.
In order to make a gate, you need the ability to use a welding machine. If there is no such skill, then invite a knowledgeable person to help.
So, for work we need:
- welding machine or converter;
- welder mask and canvas suit (it will protect from sparks during welding);
- Bulgarian with discs for cutting and stripping metal;
- bench hammer;
- personal protective equipment (glasses, gloves, respirator).
Tip! Do not neglect the safety rules to apply protective equipment, it will save you from injuries, burns and preserve your health.
Build process
First, let's talk about how to install the pillars for the future gate. If they are brick-made, then metal mortgages are made in the masonry for welding loops to them, as shown in the photo:
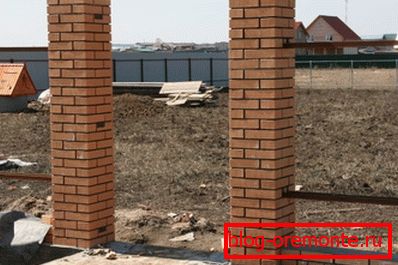
Clearly it looks like this
For metal pillars, use is made of a ribbon intake foundation or each pillar is poured with concrete separately. And under the metal gates and wickets installation is carried out with a more thorough tamping under the rack, so that later there was no roll pillars and your frustration from the work done.
Weld wicket
- The gate of metal, as a rule, the same height as the fence itself. In some cases, fifty centimeters recede from the top of the fence - this distance depends on the height of the fence. We choose the width taking into account that it was possible to pass with a wheelbarrow or to carry out a walk-behind tractor, we will take ninety-eight centimeters, as shown in the photo:

We measure the width of the opening
- Then we cut two pieces of the profile pipe of the necessary width with the grinder. They will go to the top and bottom of the future design. It will take another piece of pipe equal to ninety centimeters. We weld it in the middle.
- Next, we cut two more pipe segments equal to one meter forty two centimeters by the grinder. They will go to the side of the structure.
- Getting to the welding process. We place the profile pipe on a flat surface and weld it together by electric welding (photo below).

The frame, which should be in the end
After we welded all the parts, we got a rectangle with a cross bar in the middle of ninety eight by one and a half meters.
The next step is to weld the hinges to the resulting frame. Loops easier to buy, the price is not great, and this will facilitate the work, which is important.
We will use garage hinges for the gate. Installation:
- divide them into two halves;
- the part with the pin will be welded to the metal wicket;
- second to the fence post;
Note! Do not confuse, hinges without a pin are welded to the gate.
- during welding, make sure that the hinges are flush with the profile pipe and strictly parallel to the gate;
- beat off the slag with a hammer from welding to a clean weld;
- we grind welded seams with a grinding disc;
- we paint a gate with soil against corrosion.
Now we begin to install our gate in the opening of the fence.
- First you need to weld the second part of the loop, to the post, making sure that they are located at the same distance as on the gate itself.
- We connect the loops together and align the gate in the opening.
So we set the gate. It remains now to attach a professional sheet or weld, profile pipe, depending on what your fence is made of.
Today in low-rise construction garage sectional doors with a wicket are gaining in popularity, they have an aesthetic appearance. And also do not affect the territory near the house when working, which gives you the opportunity to use it for a flower bed or lawn.
The figure clearly shows the principle of operation:
Pretty effective in terms of space saving
We led only one modification of sectional doors. There are also those that go up, but they are installed before entering the room. Such gates are now used at car washes, service stations, as well as in private cottages.
There is still one plus - you can install an electric motor and open the gate by pressing a button on the control panel. This will give you the opportunity to open and close the gate without leaving your home or car, for example, in rainy weather.

Electrical installation automation gate opening
Externally, these gates look very attractive, you can be sure by looking at the picture:
Does not violate the appearance
Instead of persistence
In conclusion of our story, I would like to wish you success in your work. We hope that you have learned something useful from our article, and now it will not be difficult for you to do what you have in mind and choose the gate and gate option you like. If someone has any questions, you can watch the video in this article.