Making gates and gates from the profiled sheet: useful tips
How does the manufacture and installation of fences, gates and gates from the profiled sheet? What are the advantages of this material and does it have any serious disadvantages? What tools do you need for work? We will try to answer all these questions within the article.

Most popular material
We consider the construction of a relatively simple structure on steel pillars and without a solid foundation.
Advantages and disadvantages
Let's start with the features of the material. Before us is a construction of a steel profiled pipe and a profiled sheet with a polymer coating that protects steel from corrosion and is intended to improve the appearance of the material. What is she good at?
Virtues
- Installation speed Fencing moderate length is mounted from the blanks during the day. Manufacturing gates and wickets can take from one person no more than a week.
However: after installation, the gate can be fully used not earlier than in a day. Concrete, fixing the pillars, must gain at least minimal strength.
- Price per meter fence is more than low and significantly inferior to brick or rubble fence.
- The continuous tape base is possible, but is optional. In general, excavation work will be reduced only to digging holes for poles.
- The material has a long service life. The professional sheet is not afraid of corrosion and in the absence of external damage to the anti-corrosion layer can serve at least 50 years. The steel frame, however, will have to periodically tint.
- The professional sheet is completely opaque and will provide you with complete isolation if you want privacy.
- One of the standard sheet sizes - 2 meters - corresponds to the height of the fence from the street recommended by the SNiP and is quite enough to hide your yard from the eyes of curious passersby.
- Thanks to the sharp upper edge, it will be very and very difficult for intruders to overcome the fence of the profiled sheet.

This fence is very hard to force without ladders on both sides
- The appearance of the structure will be quite presentable even if you do not pay special attention to its decoration.
disadvantages
Of course, they could not have done without them either.
- The profiled sheet has a thickness of not more than 0.8 millimeter. More often thinner steel is used - 0.55 or 0.7 mm. This means that with a great desire, the fence is quite cut through or cut through; therefore, for example, garage sectional doors with a wicket are made of profiled sheet quite rarely.
- The professional sheet does not provide sound insulation. All dialogues behind the fence will be heard to you; Moreover, thin steel often acts as a resonator. Any brick or concrete fence in this respect greatly benefits our hero.
- Deforming the surface of the fence is easy, even just touching it with any heavy object. Unsuccessful reversal of the car is guaranteed to leave a dent on it.
- Any scratch is a loophole for corrosion. For comparison, on a concrete or brick fence minor defects will not be noticeable at all.
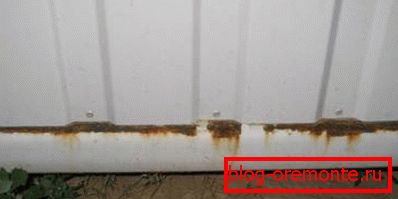
Steel exposed on the cut gave rusty stains
The conclusions of the above features each make their own. Those who once stopped on the fence from the professional sheet and do not regret their choice.
Getting Started
Materials and tools
What tools will require an independent production of fencing with a gate and a wicket?
What do we need, besides the professional sheet?
- Bulgarian with cutting circles for metal. To her, we will cut the profiled sheet and pipes (for poles, horizontal crossbars, gate frame and wicket).
- Welding machine. Ideally, the inverter is 160-200 amps.
Pay attention: it is quite achievable to assemble the whole structure on long bolts; However, the manufacture of wickets and gates on a welded frame can provide much greater rigidity of the structure. And the time spent will be noticeably less.
- The square allowing to mark corners in 90 and 45 degrees.
- Ruler. Without it, the 45-degree angle is extremely inconvenient to mark.
- Five-Tier Roulette.
- Any sharpened steel object for marking on the metal cutting lines. You can do with a pencil, but the lines left by him are easily overwritten.
- Screwdriver. Attach the sheet to the frame will be metal screws with press washers.
- Plummet and level. On the eye to evaluate the vertical and horizontal, really, not worth it.

Reiki length section will also help align the pillars
- Hinges for gates and wickets.
- The pillars. For them, a shaped square tube with a side of 60-100 millimeters is quite suitable. When calculating the length, please note that about a meter of each pillar will be in the ground.
- The lags of the fence sections and the frame for the gate and wicket. They will serve as a rectangular pipework 20x40 mm.
- Bolts for the gate, gate and lock for the gate, if necessary - a variety of decorations (forged patterns and so on).
Dimensions
The reasonable minimum width for the gate is 1 meter. With a narrower opening, you will definitely have problems with large-sized furniture; it is not always convenient to open the gate for her.
Tip: It would be a good idea to provide a small shed above the gate, which extends in and out by about half a meter. It will protect the castle from rain and make a much more comfortable attempt to open it in heavy rain.
Gates do not already 2.8 meters; much more comfortable two two-meter leaf. When choosing a size, consider the width of the profiled sheet - 1200 millimeters. In this case, adjacent sheets must overlap at least partially, with one half-wave common to them.
The typical length of the fence section is 2.5 meters. The distance from the upper and lower lag to the edges of the sheet is 25-30 centimeters. For fences two meters high, two lags are enough; for higher ones, at least one more crossbar is needed.
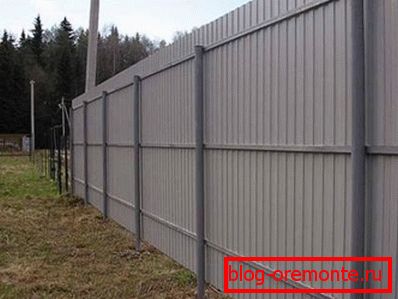
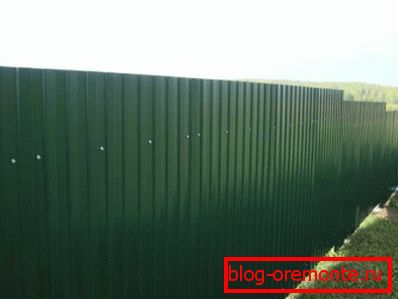
The fence in the photo has a height of 2.5 meters and, accordingly, three lags
Poles and logs
The distance between the pillars of the fence may have a small variation. The main thing is that the fence visually looks even and with a constant section size. But the gate posts and gates will have to die out very accurately.
In order for the fence to stand in one line, the cord is necessarily stretched. You are guided by it when marking pits and subsequent installation of pillars.
Typical pit sizes are:
- Depth - 70-100 centimeters. The weaker the ground beneath you, the deeper it is to bury the pole.
- Width - from 30 centimeters. The ideal option is to use a garden drill; if you dig a hole with a shovel, then you will surely get at least 50x50 cm in size. The intermediate option is to use ice pick to loosen the soil, and steel scoop with a sharp edge to dig it out.
The pillars are installed strictly according to the plumb line and fixed in the pits by fragments of bricks, stones or any other material at hand.
Then the pillars are connected by lags - strictly on the level. First on the pot mitts; after repeated inspection of the horizon and the straight line of the fence, the connections are welded.
Lags overlap with the outside of the fence; if the length of the pipe sections does not correspond to the section length - do not worry, butt weld them. Waste will be noticeably less.

On a slope, it is better to maintain identical height differences at regular intervals. Just for aesthetic reasons.
Gate and wicket
Making the gate with your own hands, as in the case of the gate, begins in marking and cutting pipes for the frame. The parallel parts of the frame must be exactly the same.
Then, the ends of the pipes marked with a square at an angle of 45 degrees are cut off, and the frame is assembled on tacks. Then it is laid out on a horizontal surface, after which both diagonals of the future flap are measured: they must coincide. Tacks will allow, if necessary, align the frame.
After the diagonals are the same, the frame is finally boiled.
To increase the rigidity of the structure there are three ways:
- Triangular steel plates with a thickness of 3 mm or more are welded to the corners of each sash.
- A pipe section is welded diagonally.
- Finally, another pipe can be welded along the inner edge of the frame.
Stiffening design
In the latter case, you do not need to boil a solid seam: you will spend a bunch of electrodes and will only achieve what the frame will lead. It is quite enough centimeter tacks with an interval of 25-30 centimeters.
The next stage is the installation of canopies. They are welded to the frame; then it is set strictly parallel to the pole at the desired height and grabs. After the slightest distortions are eliminated, the canopies are welded permanently.
Warning: do not try to tack on the weight. In this case, distortions are inevitable; Meanwhile, as practice shows, a three-millimeter warp is guaranteed to break the canopy. Place the frame on a firm support of the desired height so that you can only adjust the slope; then grab it.
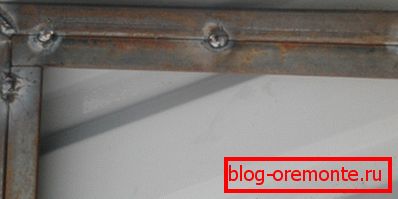
Lock and latches
A solid box is welded under it. The grinder and the cutter at the end of the future gate make a hole to install the lock body; Wrench holes are drilled from the side. Pads are put in the last turn, after the structure has been lined with a professional sheet.
Making wickets with your own hands allows you to focus primarily on your own convenience. No one rushes you to work; but to clear up all the flaws then you have to yourself.
What is this preface? A very common mistake is to install a lock for welding. Yes, it's faster; however, it is much more reasonable to foresee fastening on the bolts.
In this case, the jammed lock can be replaced with minimal effort in just five minutes.
How to put the gate on the gate? Two fix the sash in the ground. For them, you can simply drive a couple of half-meter tubes with a diameter slightly larger than the gate valve pin into tight ground; in weak soil it is better to dig a shallow hole and to concrete the tube.
The third flap ties together the top of the flaps. She will keep them still even in strong winds.
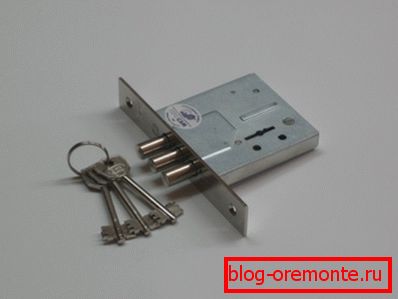
Double-lock lock is easy to install and failsafe. It is most often found in the gates
Concreting pillars
All struts - bricks, stones, rubble - remain in the pits. Concreting is reduced to pouring a liquid solution with a sand: cement ratio of 1: 3 or even 1: 2. In the latter case, in dry weather and at a high level of groundwater, it is possible to sheathe the framework in a day.
If you used a weaker solution, wet weather is worth it or the area is swamped around - let the concrete gain strength for at least 3-4 days.
How to knead the solution? Ideally - a concrete mixer. If it is not at hand, and buying for the sake of a one-off event is expensive, the output will be a whisk-mixer for installation in a drill chuck or a perforator.
A bucket of mortar is mixed in about 2-3 minutes. You not only save a lot of strength compared to manual mixing: you also make the solution much more uniform.
Painting
Slag after welding is cleaned all the same grinder. It is more convenient to use a special grinding wheel; The final gloss can be applied with a metal brush - hand-held or made in the form of a nozzle for a grinder or a drill.
Then the surface is carefully swept from dust and rust.
Further depends on what you are going to paint. For nitro or oil paints, an alkyd primer is applied with the first layer; However, the author of the article in such cases is well-suited for painting with PF-115 alkyd enamel in two layers with an interval of a day — two.

Alkyd enamel allows to paint pipes without primer
Sheathing with a profile sheet
The procedure is usually as follows:
- The first sheet from the outermost or corner post is held by the assistant and is fixed by one screw; at the same time it is not slightly screwed.
- Then the sheet is set to the horizon using a level and fixed with a screw from the other side in the cavity of the PRE-LAST wave. What is the reason for such a strange instruction? With the fact that the next sheet will be attached with an overlap.
- The sheet is attached by edges to the second (and, if they exist, to all the others) lag. Then the line is marked for the remaining screws. The easiest way to do this is to stretch the thread.
- Then the sheet is attracted to the lags along the entire length. Step - through the wave. With a rarer attachment to the wind, the professional sheet will rattle.
- The next sheet is attached, starting from the closest to the previous edge so that the edges of the sheets coincide. The combination of waves will provide the correct position relative to the horizon.
- Sheets on the gate and the gate are oriented along its edges.
- At last, fasteners of the wicket lock are fastened.
Useful: it is technically possible to sheathe the framework with a profiled sheet before concreting the pillars. However, in this case, a strong wind may well loosen the pillars in the pits until the solution hardened; but the windage of the bare frame is minimal.
Here the builders saved their time and twisted the screws through two waves. In the strong wind the fence will rattle.
Conclusion
We considered one of the easiest scenarios for building a fence. The video in this article will offer you some more interesting options. Successes in construction!