Iron fence for a country plot
If you have purchased a summer cottage, the first question that should concern you is how to build a fence. After all, there are several options, and each is good in its own way. But the most accessible and practical is considered to be an iron fence.
It is about him that we will talk: what are the advantages, how is it installed, what is worth paying attention to.

Iron perfectly transfers not only moisture, but also low temperatures, and the surface does not change.
Metal fence
In this article we will look at the fence on the example of the following materials: metal pillars and sheeting. This combination allows you to achieve the best result at an affordable cost.
Positive sides of fences from a professional flooring:
- Reliability and durability. The material is immune to any natural influences: precipitation in the form of rain and snow, temperature changes. It is worth noting immunity and ultraviolet rays.
- Installation is done by hand. You do not need any special tools, all work can be done by improvised means.
- PRofnastil wins from other materials and the fact that it simply does not require care. Pоверхность забора на долгие годы остается в первозданном виде.
Note! This is a huge savings on finishing materials, for example, wooden fences need to be painted every 2-3 years. And the price of paint does not decrease from year to year.
- Pривлекательный внешний вид. In the range there are several shapes and colors of corrugated.
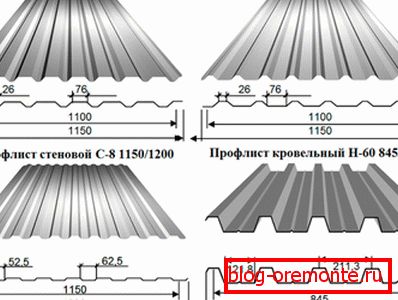
Varieties of corrugated and its size
- The possibility of dismantling and reuse of metal products.
Auxiliary materials
- Metal corner or channel, which is a horizontal jumper, securely fixing the vertical pillars.
- The fastening is galvanized metal screws with a drill at the end. They are easily screwed up and at the same time resistant to moisture.
- Also, do not forget to purchase metal reinforcement, which allows you to increase the strength of the foundation for the fence.
Phased installation of the fence
In this section, we will consider a detailed process of how to make a metal fence on our own, saving money on the call of expensive professionals. All stages are described sequentially.
Marking and site preparation
- Pервым делом необходимо замерить рабочую площадь. Это поможет более точно определиться с количеством материалов. Расчет осуществляется следующим образом: между столбами должно быть расстояние не более 3 метров, высота зависит от габаритов профнастила.
- After the preliminary calculations have been made, it is necessary to dig holes in the ground at least one meter deep. The diameter of the pit about 30-40 cm
- The next step is to fall asleep sand and rubble in the pit so that a pillow of about 20 cm in depth is obtained.

Auxiliary scheme for those who do not know how best to calculate materials for the fence
Note! To make the grooves in the ground more even, it is necessary to pull the string from one corner of the plot to another.
Preparation of the solution
- Take the bulk solution tank.
- Pour cement in the required amount.
- Now add water, which should be slightly less than the volume of cement.
- We mix sand with rubble in equal proportion in the same container.
- Stir until smooth.
Tip! If possible, use an electric concrete mixer, this will speed up and facilitate the process of preparation of cement-sand mixture.
Pillar installation
- To install iron pillars for the fence, it is necessary to drive the product into the sand pillow.
- Then pour the prepared solution pit, leaving 10-15 cm of free space.
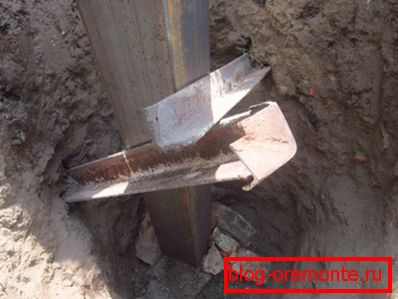
Instead of reinforcement, you can use different metal corners, which will be driven into the ground
- Wait until the solution dries and fill the pit with earth, having thoroughly tamped.
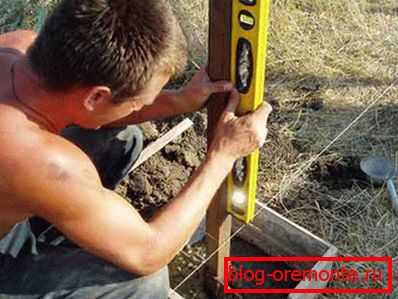
Do not forget that it is necessary to use not only the twine, but also the construction level
Fixing horizontal crossbars
To pull the vertical pillars in two ways:
- Use welding. To do this, it is necessary to weld metal plates to the posts. Wait for the metal to cool, then weld the channel to the plates.
Important! If you are unfamiliar with the welding instruction, it is better to turn to the services of professional workers.
- With screws and screwdriver. Для этого дрелью необходимо сделать отверстия небольшого диаметра на углах швеллера. Pриложить к столбу и вкрутить саморез по металлу.
Note! If the metal pole for the fence is round, the idea with hardware will not work, you have to either weld the plate and attach a horizontal jumper to it. Or immediately take care and purchase square pillars.
Installation of flooring
The most recent stage - the installation of corrugated horizontal lintels.
For this you need:
- Decide on the distance between the fence and the ground, and lay a support. It will be enough to 6-8 cm, that is, an ordinary brick is perfect.
- To press a professional flooring to a fence.
- Using a screwdriver to screw several screws in the corners of the sheet.
- Pроверить уровень забора и закрепить основательно лист профнастила.
This is the way you can build your own iron fences to give. Please note that no special tools, all the work can be done by every man.
Recommendations
- Do not use wooden horizontal lintels, as they are short-lived. Especially in areas where it often rains and low temperatures.
- Use fasteners with rubber washers to eliminate the possibility of metal touching metal. For example, such as in this photo.
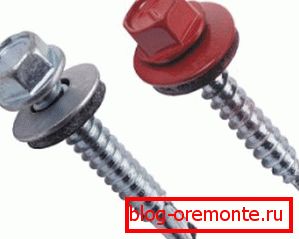
Two types of screws: one is used for metal, the other for wood
- The cement solution usually dries 5-7 days, in winter it is better to wait more than 12 days.
- To strengthen the foundation, use metal reinforcement; 3-4 bars are enough to significantly increase the density of concrete.
Conclusion
As you can see, the process of building a fence does not take much time and effort, the main thing is to follow the sequence. If, after reading the article, you have any questions, the answers to them can be found on the video attached after the text.