How to build a fence of corrugated do it yourself
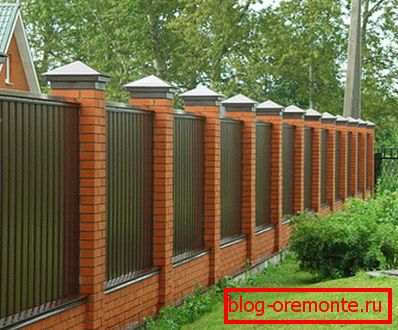
A fence from a professional flooring with brick columns.
Each owner of a country house wants his property to be surrounded by a reliable and beautiful hedge. And, despite the fact that some designers scold fences of corrugated board for an unattractive appearance, practice has shown that very effective and stylish fences can be created from this material. Therefore, in our days, home craftsmen are increasingly asking the question: how to build a fence from corrugated flooring with your own hands?
In addition, in recent times professional sheets have appeared, imitating wood, stone and other natural materials, which only increased interest in this type of hedge.
Fences from a professional flooring
First of all, these are high quality fences that perfectly fulfill the functions assigned to them. If you want to get not only functional, but also an attractive fence, then you should think about the design of the combined fence, using stone or brick foundations and pillars.
Consider several advantages of this material:
- Acceptable price.
- Durability - the average lifetime of a professional sheet is 50 years.
- Solid constructions of such fences perfectly protect your site from prying eyes and wind.
- Quick and easy installation. You can easily install such a fence with your own hands (see also the article Fence made of corrugated board - an economical installation option).
- A large variety of colors, including imitation of stone, brickwork and wood.

The fence of corrugated stone.
Installation Features
Consider how to properly build a fence of corrugated board to avoid the most common mistakes.
Preparatory stage
Before carrying out any installation work, you need to prepare (see also the article Calculation of a fence made of corrugated flooring: a calculator, a calculation diagram, and work planning). It is about marking the terrain.
It is best to use a building tape for this, which is able to stretch up to 50 meters. This will save you from errors in measurements.
Determine the places where the supports will be located. The average distance between the pillars is 2.5 meters and is considered optimal by most builders.
Tip! Do not increase the distance between the pillars. Since the profile sheet is characterized by the effect of sail, then at a step between supports of 3 meters or more, this material will quickly lose its shape under the influence of strong winds.
According to the distance between the fence posts, cut the logs of the desired length.
Assembly work
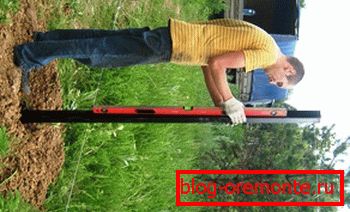
Posting a pillar by level.
Instructions on how to build a fence of corrugated flooring yourself include the following steps:
- This design of a fence provides filling of the base.
- Dig holes, about one meter deep, according to the pre-made marking. The depth of the holes should be calculated based on the length of the racks. So, professionals recommend that you put in supports into the ground by exactly one third. This approach will provide the design strength and reliability. The width of the pits should not be less than 20 by 20 cm.
- Install a support pole in the pit and set it vertically level.
Tip! As pillars, it is better to use not round, but square pipes, since it is easier to attach logs to them.
- Secure the pole with wooden struts.
- Further it is necessary to fill a hole with a pillar with a solution of cement. Some homeworkers, wanting to save money, do not concrete their supports, but simply hammer them into the ground. However, this is not a question of any reasonable economy.
If you do not concrete pillars, then moisture will act on them, which sooner or later will lead to corrosion. As a result, after 5, a maximum of 6 years, such a fence will simply fall apart, being absolutely unsuitable for repair.

Concrete pole.
- Concrete should "take" for 3-4 days. After this, you can safely proceed to the next phase of installation - the installation of transverse lags. They should be fixed with electric welding.
It is best to use steel pipes with a cross section of 60 to 40 mm as lags. In the event that the height of your fence will not exceed 2 meters, then 2 beams will be enough for a span.
- To fix the lag, you should retreat 20-30 cm from the ground and top of the pipes.
Tip! If you decide to build a fence more than two meters high, then you should install another beam in the middle, which will provide the structure with additional rigidity.
- Weld the logs to the posts.
- All welding places must be treated with a primer, and then with two layers of special enamel that will protect the attachment points.
- The basis for the fence is fully prepared. You should have the same frame as in the photo below. Now is the time to install professional sheets on it.
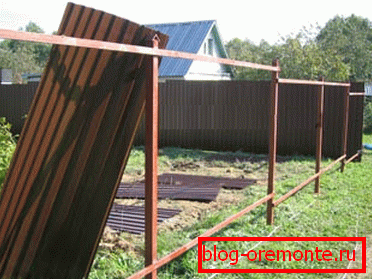
The framework prepared for fastening of professional sheets.
- You can fasten professional sheets on the frame in two ways: using rivets or metal screws. Mounting with screws is easier and cheaper. In addition, you can easily dismantle.
In most cases, the pitch between the screws is 25-35 cm. However, for greater reliability, we advise you to stick to the pitch of 20-25 cm. Sheets should be fixed with an overlap.
- The final stage of the installation is not just for aesthetic purposes. Upon completion of work, cover the scratches on the profile with a special paint. You can get it in the same place where professional flooring.
If you think that this measure is superfluous and you do not need paint for masking scratches, then you are greatly mistaken. Masking scratches is needed not only for aesthetic reasons, but also to protect the surface, because in these places rust forms with time.
A few tips when installing fences more than two meters high
- For such structures, pipes with a cross section of 80 by 60 or 80 by 80 should be used as racks. The wall thickness of such a pipe should be at least 2.5 mm.
- Professional sheet should be mounted on three or more logs, using only screws for this purpose.
- The pits for such pillars should be 1.25, or better, 1.5 meters deep.
- Never use used pipes. Due to the fact that they have already begun the process of corrosion, the installation of such supports can be difficult or even impossible.
- You should not save on the primer when machining welding sites. The fact is that the enamel itself has a very poor adhesion to the metal, and therefore this coating will peel off quickly.
- Rivets should only be used to secure additional items. Fastening profiles produce only through screws.

Screws for metal in various colors.
Conclusion
In this article, you learned how to properly build a fence of corrugated board (see also the article Building a fence from metal profile: how to make it yourself). If you choose the fences made of this material, you will be pleasantly surprised by their reliability, durability, and with a creative approach, and appearance. Be sure to watch the video at the bottom of the page to learn more about this topic.