How to build a fence from a professional sheet: fence step

The main elements of the fence
Despite its apparent simplicity, the construction of a fence from a profiled sheet has a number of nuances that an inexperienced master may have overlooked. Moreover, these nuances are associated both with the selection of the most suitable material, and with the technology for performing work on the construction of a fence. To some extent, numerous video tutorials posted on our website can help here, but the technology itself is still better explored separately.
Preparation for work
Professional flooring selection
Before building a fence from a professional sheet, it is necessary to determine the materials that will be used for this. And the main thing is, of course, the choice of the most profiled sheet.
What is a professional sheet?
The professional sheet (a professional flooring, a steel sheet profiled, etc.) is a plate from rather thin metal which surface by means of stamping is issued in the form of several waves.
The characteristics of this material depend on:
- thickness
- profile and dimensions of the waves,
- coating features, etc.
Depending on the intended scope of application, this material is divided into:
- Roofing (in the marking index "H") - designed for horizontal installation. Used for roofing roofs, as well as for creating technological structures, such as formwork or temporary overlaps.
- Wall (index "C") - it is applied in vertical position. Partitions, fences are erected from the wall profiling sheet, and it is also used for exterior cladding of frame buildings.
- Universal (marked with “NS” symbols) - can be used for both vertical and horizontal structures.
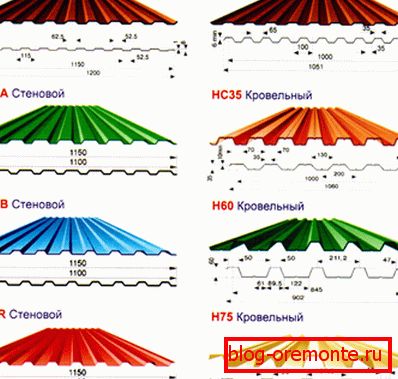
Types of sheeting
As follows from these definitions, wall and universal material is suitable for the construction of corrugated fences, for example, such brands as C-8, C-20, C-21, etc.
Note! Roofing professional sheet can also be used for fences, but only if they are planned as a temporary fence and have a small size.
What professional flooring is best suited for the fence? Choosing the material for the fence, you should pay attention to its coverage. Here are the following options:
- Galvanized sheet - the cheapest variety. This coating has the lowest durability, because the use of galvanized sheet cost only for temporary fences.
- Zinc coating somewhat more durable due to the inclusion in the composition of aluminum and silicon (up to 55% by weight). This coating has increased scratch resistance and darkens significantly more slowly over time. At the same time, its price is somewhat higher than that of a simple galvanized sheet.
- Polyester and matte polyester coatings quite reliably protect the steel base from corrosion, and also allow you to give the fence almost any color.
- Plastisol, Purale or Polyvinyl difluoride coatings cost much more expensive, but provide comprehensive and durable protection of the fence. For example, a professional sheet with a pural coating is able to stand for up to 50 years without losing an attractive appearance.
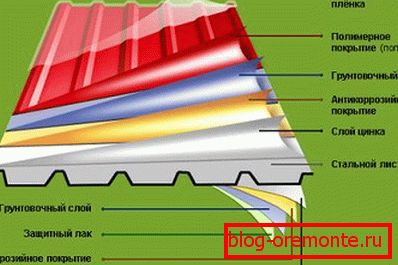
Profiled steel sheet coatings
The choice of material for the construction of the fence of corrugated board is determined, first of all, by your wishes and financial capabilities. And only after the professional flooring is selected, you can begin to purchase parts of the supporting structure.
Selection of materials for the supporting structure
One of the features of the profiled steel sheet is its high windage. This means that the fence, made of this material, under the influence of the wind will experience a rather high load. Therefore, she will need reliable support.

Round pipe posts for collection
As a support, most often used is a welded or assembled frame of vertical pillars and horizontal lags. For temporary fences and small fences the use of wooden bearing elements is allowed.
- Vertical support for the fence is best done from a metal pipe. The preferred option here is a square shaped tube (60x60 mm, with a wall thickness of up to 3 mm).
- At the corners of the site, as well as on the sides of the gate or wicket, more powerful posts are installed. As a rule, suitable pipework 80x80 or 100x100 mm.
Plastic caps for frame supports
Tip! To protect the internal surface of the supports from corrosion, we put on special plastic plugs on the upper and lower ends of the supports (an example is shown in the photo).
- Lags are made from a professional pipe 40x20 mm, with a wall thickness of at least 2 mm. A metal corner of comparable dimensions can be used as a replacement for the pipework.
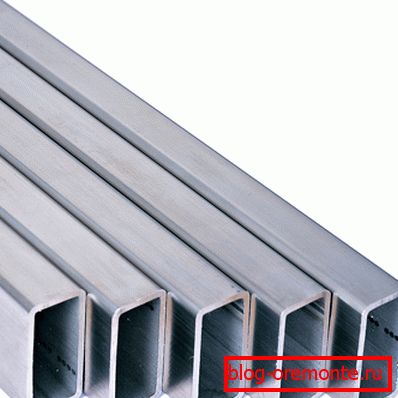
Rectangular pipe for log
As we noted above, it is best to use welding to join all parts into a single supporting structure. If the use of the welding machine is not possible, then we use a mechanical connection using special plate brackets and metal bolts.
We build a fence
Plot marking and drilling holes
If you have at least minimal skills, you can try to make a fence made of corrugated flooring with your own hands. However, if the perimeter of the fenced area is quite large, it is still worthwhile to bring a partner to work - otherwise the whole process will take a very long time.

Layout of straight lines
We start work with measurements of the site and marking on the terrain:
- Using a laser rangefinder, we outline straight lines between the corners of the site.
- Along the marked lines we stretch the marking cord, which will serve as a guideline for the construction of the fence.
- On the cord we make marks where we will install the supporting pillars. The optimal distance between the vertical supports should be 0 m 2.5 to 3 m.
Tip! When calculating the appropriate distance between the pillars, be guided by the length of the lag. Best of all, if the joint log will fall on the pole itself.

Drill for drilling nests under the pillars
- We use the special drill to make holes for the pillars. Each hole should be at least 100 mm wider than the diameter of the post, since we need a gap to fill the concrete.
- The depth of the holes depends on the degree of penetration of the support. As a rule, the nest is made 30 cm deeper than necessary - below we will tell you why.
Installation of supporting structures and installation of profiled sheet
After all the preliminary work is completed, you can begin to manufacture the fence itself. Below is a detailed instruction that should be carried out as accurately as possible.
- Pour about 30 cm of gravel on the bottom of each nest for support. To increase the reliability of the installation, we wet and tamp the gravel cushion.
- In the hole set the post, sprinkle it on the lower part with gravel and align it vertically.
- We prepare a mortar (1 part of cement, 3 parts of sand, 4 parts of gravel), after which we pour the solution into the gap between the column and the walls of the hole.
- Finally align the support and fix it with braces or boards laid on the ground. Leave the pillar alone until the solution hardens.

Post alignment
Tip! It is better to start the installation from the corner posts, after which it will be much easier to align the intermediate ones with them.
- When the solution is frozen, we attach horizontal lags to the vertical supports. At the fence standard height (1.5 - 2 m) requires at least two horizontal elements.
- After the logs are installed (welded or bolted), paint the entire structure with metal paint for exterior work. This will help to more effectively protect the frame from corrosion.
The finished frame can be sheathed profiled:
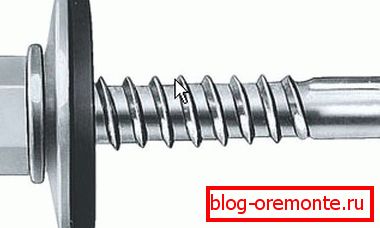
Fixture for the professional leaf
- For mounting use special screws with a drill. The polymer gasket with which this fastener is completed protects the coating of the profiled sheet from damage upon contact with the metal.
- Sheets of sheeting are applied to the frame at the required height, after which - we fasten with screws on the logs. To protect the material from corrosion, the optimal distance from the lower edge of the fence to the ground should be at least 100 mm.
- Each next sheet is overlapped, i.e. two adjacent waves must overlap each other. In order to prevent profiled trimming from blowing up, it is recommended to fasten in one or two waves.

Covering of the bearing design professional sheet
The installation is completed with the installation of the upper end-plate, as well as hanging on the hinges of the wicket or gate.
The construction of fences from the profiled sheet is a laborious task, but a task that can be fully realized by itself. And we hope that if you start this event, our article will be useful to you!